4 Methods to Access Settings in Windows 10

We somehow got access to Windows 10 Preview 9901 Build and explored newly introduced features. Settings in Windows 10 is changed completely, separated along with different options like System, Devices, Network & Internet, Personalization, Accounts, Time & Language etc. Moreover, way to access Settings option in Windows 10 has been also changed. For example, you may find it directly by pressing Windows + ‘I’ Key, on top of the menus at Windows explorer interface, at start screen.

Settings option are also nested and you’ll need to click on any specific category to find more setting options lying under each category. Please read the detailed steps to access settings using different methods:

                settings-Windows-10

Method #1
As explained earlier, press Window + I button and you’ll see all the settings categorize in list order such as Display, notifications, speech, storage sense etc.


Tap/click on any option to see inner settings option. For example, after clicking on Display under settings, you’ll see further settings options related to Devices i.e., Devices, Mouse and touchpad, typing, auto play etc. 


Method #2

Unlike start button in Windows 8/8.1, you’ll be able to see old styled start button interface. Settings option is also equipped with your start button menu options as described in the image below:


To access start menu, simply press on Window button on your keyboard.

Method #3
You can also access these settings from start screen in Windows 10. Small light blue setting button will be placed at your start screen. Simply click on tap on it to access settings windows on Windows 10. 


Method #4
On Windows explorer window, you’ll find the settings button entitled ‘Open Settings’ along with other header menus options i.e. Access media, Map network drive, Add a network location etc.


Mentioned 4 methods are completely new and was missing in previous version of Windows. This will lighten your burden and lets you directly access all the settings option, no matter on which screen you are active. You’ll be able to directly access settings option in not more than 2 clicks.

Mac keeps freezing !! What to do ??

Mac freezes, when the system halts to respond to inputs. Why does this occur??


Causes of the freezing


  • Too many programs open at the same time
  • Operating system issues
  • Heat related issue
  • 'Software Updates' not updated
  • Not have enough memory
  • Duplicate and hidden files 


Steps to Unfrozen the Mac

1) First step is to open the 'Activity monitor' to analyse that what is eating up the system resources. So just drive your cursor on Applications folder, then on Utilities and lastly click on Activity Monitor. You could be able to see the list of certain files.

2) Next step is to sort the list by CPU percentage. After the sorting procedure, the applications with the higher percentage of CPU value causes slow down of the system.

3) Now sort the Activity monitor by RSIZE i.e. according to the memory, each program is using. This list will makes us to look for the file that uses higher memory which indicate the reason to slow down the speed of the system.

4) After this procedure, you will surely find the files which need to be quit from the system. Before proceeding further, either you need to take the bcak of the system or you will loose any data in that program. Now select the program from the list above which slow down the speed or uses more memory and click the Quit button in the window above.

5) Sometimes we came across the programs that are failed to run correctly or not responding at all. This is the very critical situation which affect the freeze up of the system and locks it up. In this situation, we need to force quit the particular program.

6)  Last step is to boot the Mac. If you can't be able to access the mouse, you need to reboot your Mac. And since you can't access the shutdown option, just press and hold down the power button till the computer shut down.

Measures to prevent it from freezing

1) Clean the space on the hard drive

This is an important step because the less space on the primary drive will encounter the higher chances  to slow down the task.

2) Upgrade software updates

Timely updating the software and version of Mac OS X will enhance the system with greater security and certain other features, which reflect a greater impact on performance and other factors too.

3) Repair hard disk
Due to some errors on to the disk, the computer can become unresponsive and slow. Regularly verifying and repairing the disk with the help of Disk Utility will minimize the freezing upto larger extent.

4) Booting in safe mode
This feature helps to determine the number of programs that will affect the computer to freeze. After booting the computer in safe mode, don't forget to reboot your computer normally.

5) Reinstall programs which do not run properly
The programs which constantly gives you difficulties should be reinstalled again to avoid such problems.

6) Avoid opening corrupt files
Corrupt files will lead to encounter freezing problem in Mac. If the Mac freezes after opening some file, then that file has to be deleted to avoid any discrepancies.

7) Check SMART status of the hard drive
The special SMART(Self Monitoring Analysis and Reporting Technology) status of the hard drive will indicate the health of the hard drive which is very helpful to monitor the freezing or slow down issues.

These points will surely rescue you from the problem of freezing or system hang kind of problems.

How to Use Old Windows Boot Manager Screen in Windows 8 Dual Booting Environment

Windows 8 lead outstanding changes in their fastest ever OS, formally known as Windows 8. Changes including Start Screen, metro style interface, faster boot processing etc. are some of the major one that greatly modified the way we interact with the PC.

Boot manager in Windows 8 is a part of the booting process that lets you choose desired OS to start with if you’re running in Multiple OS platforms. You’ll see this screen just after starting your system. Once you select the operating system, you’ll need to press Enter to start with desired version of operating system.


Microsoft had decided to remove the old boot manager screen and replaced with modern boot loader screen in Windows 8 so you can reach to desktop within the shortest possible span of time. However, some user didn’t liked it at all as it’ll restrict capabilities like advanced startup options, capabilities to start system using various other method like Safe Mode, Clean Boot Mode, system recovery options (all these options was previously found at Advanced startup options in Windows 7/Vista/XP). 

Moreover, if you’ve installed multiple OS including Windows 8 on the same system, it’ll directly boot into Windows 8 OS without giving any options to choose other installed operating system.
This will seems annoying if you want to boot into different copy of OS, Windows 7 or Windows Vista.

Sometime, user may get distract with their modern boot manager screen of Windows 8 and desperately want to bring back the old interfaced boot manager screen like Windows XP or Windows 7. This article will guide you how to bring back old boot manager screen without digging much deeper and conflicting your customizations and settings. Once you’re done with following all the steps, you’ll probably see your old boot loader screen instead of metro boot loader screen, as seen in the image below:


Disable Metro Boot Loader Screen
Follow the steps mentioned below to get your old boot loader screen:
  1. Open elevated command prompt in your Windows 8 computer by pressing ‘Window’ + ‘Q’ button, type cmd and right click on it. You’ll see an option to start command prompt using administrative credentials on the right screen.

    P.S. Enter desired admin details if asked and hit enter.
  2. Once you are on the black screen window (MS-DOS screen), type the below mentioned command and hit enter:

    bcdedit /set {default} bootmenupolicy legacy
  3. After receiving the conformation message, you’ll need exit from the command prompt window and restart system to see the old boot loader screen.


How to restore or enable metro boot loader screen back again
If at some time, you want to restore modern boot loader screen in Windows 8, just follow the tutorial below:
  1. Start command prompt as described in the first step of disabling metro boot loader screen and type the command mentioned below:

    bcdedit /set {default} bootmenupolicy standard
  2. Again, you’ll get a confirmation message as received in the previous tutorial that confirms that metro boot loader screen has been restored successfully.
In case you aren’t able to perform steps described above or facing problem while enabling/disabling metro boot loader screen, post your questions using the comment section and we’ll look onto it.
Moreover, if you’re continue receiving boot manager popups even after removing other copies of Installed OS, you’ll need to follow the tutorial to remove boot manager popups error.

Issues that won't let Macbook pro start at all


Apple Macbook pro is one of the portable computers with high technology and powerful apps. These notebooks are thinner and lighter. The latest model of Macbook 17 inch pro is also experiencing start up problems which has become a major issue nowadays. These problems may arise due to:


Peripheral devices

Peripheral devices could be the problem. Just check its connectivity and then try starting Macbook pro. If not, then you need to disconnect the peripheral devices and then turn it on to check everything goes well or not. By doing so, you can address the issue.

RAM issues

If the computer beeps more than one time or the lights are blinking, then there must be some hardware failure. Bad RAM is very common issue on newer Mac's. So, to test this case, just remove one RAM at a time and reboot. Repeat this activity again till you find the problem. If any of the culprit arises, then have a look in Mac owner Manual and install RAM.

Bad battery

Just check the battery level of the Macbook. To perform this task, press the battery button or on the side of your computer. Single light blinking may lead you in the condition of dead Macbook. So, you need to charge accordingly whenever necessary.

Operating system

The operating system may stuck resulting in start up problems. All you need to do is to hold down the control key, command key and the power button together to restart the computer. In this scenario, try booting off an OS CD and run Disk Utility to repair the disk. If this also doesn't work, last option is to use the software like Stellar volume repair or Onyx software to repair.

Hard drive failure

A major issue is of the hard drive. If the hard drive has been corrupted or damaged or makes abnormal noises, first thing you need, is to back up your data safely and replace it immediately.

Mac's SMC

Resetting SMC is the important feature. The simple SMC reset can resolve number of failures such as battery not charging, USB ports and Bluetooth not working, fans running fast, erratic sleep mode performance, failure to response to power button, sluggish performance etc. So, to reset the SMC, first shut down the Mac, disconnect from MagSafe connecter, remove the battery and hold the power button for 10 seconds. After releasing the power button, reinstall the battery, reconnect the MagSafe connector and turn your Mac on.

Thermal sensors not working

This issue is noticed when the fans run at a higher speed but the computer does not boot. You have to ensure first, that the sensors are plugged in properly. If yes, then replace it. If this doen't fixes the problem, you need to change the logic board.

Faulty MagSafe adapter

To test that the adapter is faulty or not, one needs to check the electrical outlet and the plugs are inserted properly or not. If the outlets works smoothly, then unplug the power adapter for a while and then plug it again. By doing so, if the power adapter's LED does not light up, then definitely MagSafe is damaged.

Therefore, fixing these issue in the appropriate manner will resolve most of the start up problems of the Macbook pro.

Threats, weaknesses to an iPhone


The iPhone is the smartest technology these days among all. Everybody has the craze to tickle the extraordinary features of the smartphone. But due to some weaknesses and threats, iPhones are declining in the market. Some of the threatening points to an iPhone are:

iPhone competitors hitting the market
Apple launched its product every year but if we think about its competitors they are releasing their product probably every month. Smartphones and Android phones in the market with its incredible features are hitting the market. iPhone being expensive incorporates glossy features but Android on other hand provide lesser glossiness but offers great deals of app through ‘Play Store’, thus making easy to penetrate the smartphone market.

iPad sales are higher than iPhone
There are billions of users of iPad in the market as compared to the iPhone. Undoubtedly, iPad is a boom with the superior quality features and a large screen. The iPad doesn't have calling feature, still the users are interested in buy this product. In all, iPads are more busniess oriented.

AT & T and T-Mobile are Apples threats
These companies are hitting the US market to a greater extent. Apple's business is getting affected and its is very difficult for them to maintain the current position in the market. T-Mobiles are affecting the market of iPhones as they are successful in selling some of the iPhones as consumers can't bear the price of Apple iPhone's. They are increasing with the sales because of their exciting plan which provide reduction in cost with the greater quality.

Apple's own smartphone is an idea for other competitors
At first Apple launched its smartphone in the market. Its superiorty and quality features allows Apple to sell their product at higher prices. But on the other extent, competitors and the other brands come up with the same smartphones at lower prices which has again let the Apple product fall in the market. Asian markets are much inclined towards smartphones that look-alike iPhones and cost lesser.

Latest iPhone still lacking in some features
iPhone 5 has massive competitors in the market. Now this iPhone 5 has a nano-sim which is a curse as it cannot swap while upgrading contacts and all. Also it does not have headphone jack which is a great problem for those people who does not have Bluetooth capabilities. Then Apple's maps are not up to scratch. One needs to stuck with iTunes for loading content as microSD card slot, USB slots and NFC connectivity is not there.

Competition is tough in China for iPhone
China has unexpectedly hit the market with their smartphones at a cheaper price. These phones has Google Android operating system which has led the Apple sales down due to its superb features, apps and quality. China beat the biggest companies such as Apple, Samsung and many other companies.

Android apps are beating iPhones
There are certain android apps auch as Cover, Swype, profile scheduler etc. in the market which iPhone didn't support. They are doing the terrific business with its functionality and features in it.

Not have any recovery software for deleted content
One of the major issue these days that being very expensive in the market, it does not have any recovery software for the deleted content. Sometimes, if data got accidently deleted, then one has to buy some software to recover it.

History and working of an iPod


After 10 years of sustainance, iPod has gained cavernous number of users in the world of entertainment. iPod has become one of the most advanced technology and smarter choice. If we look back in history, the percentage of users are increased rapidly.

History of iPod

:Source:Msmillersartblog
iPod Classic 
 
The first model of iPod generation is iPod Classic. The first portable music player with the mechanical scroll wheel. Later on from 2001 to 2009, it came with features such as mechanical scroll wheel, dock connector, color screen plus picture viewing, 120 GB capacity etc. Last version of classic is seen with slimmer case and larger screen with video playback.

iPod Mini

Then comes the iPod Mini, a digital audio player which was launched in 2004 with the ultimate 5 colours. It introduced the click wheel with the brighter color variants and longer battery life. In that time, this is the most famous electronic product available in the mini.

iPod Nano

Release of ever thinnest iPod Nano by Apple announced the stylish portable media player with the flash memory as storage. This was the first iPod with the passionate features of including video camera, accelerometer for shake and horizontal view, 2.5 inch multi touch screen, Bluetooth etc.
This version with the enhanced model gained the enormous number of people towards it.

iPod Shuffle

iPod shuffle is the smallest member of the iPod family which uses flash memory. The first model of this category released on January 2005 with no screen. It is a slim and highly proficient music player which encases a 1Gb flash based media player. The iPod shuffle is a random player which pop up the music on its own with a loud rock tracks.

iPod Touch

One of the most widespread and thinnest model which weighs 88 g possessed brilliant design, 4-inch retina display, superb camera and many more advanced features marketed by Apple. It is a multitasking pocket size gadget which consist of outstanding user interface that is touchscreen based. The latest model was dispatch in 2012 which has new aluminium design with several colour case options featured with iOS (Apple operating system).

How iPod works?

iPod is the most popular gadget of the decade which is used for storing, transferring and playing multimedia files. Generally iPod stores all the multimedia files on an internal memory chip. From here we could able to retrieve the files accordingly. The working of the iPod is very simple. All the devices of the iPod are integrated with iTunes. So, first download your music files or Cds into the computer. Then that files are loaded into the iTunes software. After ensuring that the multimedia files have been transferred to the particular software, plug the iPod in the computer and tranfer them from the software to the iPod. Unplug and there are your favourite numbers on it. Let us see the different parts that how it works:

1) iTunes:

This is a software developed by Apple which is used to organize, add or delete the multimedia files from the computer to the iPod and vice versa. All the devices are generally integrated with this piece of amazing software which always sync it with a portable device. With this software we can easily pluck the music from Cds into MP3 or various other formats as well. When we connect the iPod to the PC it automatically updates the music files and all.

2) Touch-sensitive wheel:

Touch is the sensitive feature which makes the task of accessing the menus and features on the screen faster by dragging. iPod uses a technology called capacitive sensing. These capacitive sensors are hypersensitive to detect anything that is conductive and consist of an insulator different fron that of air. It uses electrical impulses and react accordingly.
So this is the overall history and working of tremondous digital portable media players i.e. one and only iPod.

Rescue Childhood: Learn how to block adult websites on Mac OS X

Kids, these days are smart, smarter than teachers, parents or any adult. Within minutes, they know how to operate a Mac, iPad, iPhone, iPod or any other fascinating devices. Talk of Internet, kids know how & where to download their favorite games from. Gadget manufacturer also produce devices keeping interest of kids in their mind. It’s the part of the worldwide business. With modern technology, laced with web, kids can surf along everything. They can watch cartoon, read books, play Temple-Run, watch PORN. Oops, did I say Porn? Yes a kid or pack of kids may somehow know how to watch porn videos, messages or photos through some websites. Or an innocent kid may accidentally reach a pornographic website which can immediately ruin the soft mind.

Talking of porn and adult content, website on web shows almost everything. Sex, violence, gory content is available like cookies. Forget kids, even adults are addicted to gory content over the web. These website producing such contents hardly bother about who or whom is accessing their websites. Adult sites can easily be penetrated by clicking their weak age proof feature which reads “I am over 18”.

As a matter of fact, there is no doubt parents are realizing this bitter truth and want to take actions. Actions, not necessarily means harsh one but they can be implemented using simple technical tricks that allow monitoring websites on a Mac computer.

Tricks to block Poisonous websites on OS X Mac

1.     Get to OS X Dock & launch System Preferences.
2.     Get to System<<Parental Control under System Preferences. Below Window greets you.


3.     To commence, Click on to the lock. Clicking unlocks it for modification. Enter the system password, if it asks for.

4.     Now you need to select the account to which you want to secure. In above, screenshot, I would select the only account which is ‘GUEST’. Below screen will appear.


5.     Several options to the account ‘GUEST’ are now visible to be operated upon. Switch to ‘WEB’ tab, since we are learning to block dirty sites. 

6.     If you have caught your child visiting an inappropriate website over again. Then simply, click the “Try to limit access to adult websites automatically”. A further window will open when ‘’’CUSTOMIZE’ option is clicked.


7.     Quickly click on “+” button to add that particular website to the section which reads “Never allow these websites:

8.     Next time, when your child will try to open that website below message will show up.


Apart from this method, you can select another option supplied by Apple Inc. in that window only. Get to the third option, which reads ‘’Allow access to only these websites’’. The set of websites which you view in the list is educational & healthy website enrolled by Apple to nurture a child’s mind.


So, it is not always good to blame the technology for children sudden change of behavior. Instead get to know your computer, phone and gadgets in order to safely block all inappropriate content on it.

9 Tips to improve Mavericks Performance on Mac


Millions of Mac users have already upgraded their existing Mac to OS X Mavericks, and why not OS X 10.9 is absolutely free to upgrade. It’s not only free but an outstanding OS that deserves praises by all of us. Apple have spent good amount of time to bring in some good features that were missing from the OS X. The integration of some iOS features such as iBooks, Maps helps sync the iOS devices for ease.

Minor Glitches that rocked 10.9 upgrade: Since, the Mavericks was rapidly being upgraded, reports of bugs like data deletion from WD HDD were reported. However, the issue was resolved sooner than later and now OS X10.9 is free from such bugs.

So, OS X 10.9 is smooth, fast and convenient to use, that is how it is built to perform.  But, being responsible Mac users, it is our duty too, to help 10.9 run smooth forever.

Evergreen tips that work on 10.9 to fasten its speed: Some tips & tricks work on every OS X, even on the latest releases such as Mavericks. Not only these, tips are simple, but when put to action they produce results.  Today, we shall discuss some of those free & fair tricks that can help both gain & maintain high performance for the new OS X baby, which is “Mavericks”.

1.     Use Command + R – Like in predecessor OS X, CMD + R works on OS X 10.9 too. This command is used while the OS X is loading on to the machine. Restart Mac and press CMD+R to bring in the ‘Recovery Mode’ menu from OS X. A Recovery Mode is a hidden partition of the OS X and helps restore the system in case of any logical causality. Now, when you are in the Recovery Mode, go to Disk Utility and run Verify & Repair Disk permissions on the boot disk. (Please Note: Only the boot partition has the ability to verify & repair disk permissions). Any fault in the permission will be resolved with the help of Disk Utility feature.


2.     Check Spotlight–One of the reason you experience slow performance just after the upgrade is may be because of the spotlight being indexed again. While indexing, the performance of the OS X suffers, until the entire process finishes.  Being a user, you don’t need to take any action against the indexing. Since it is a general process of the system, it is better to let it happen. You can check the indexing via a small dot (.) symbol appearing on the magnifying glass, which is situated top-right location. Once the indexing finishes, the OS X performance restores to normal.


3.     Activity Monitor – Activity monitor is the only place that lets you know the reason behind a slow application or Mac. One can easily monitor which application is consuming what amount of spaces & deteriorating the OS X performance.

4.     Console of Mac–Hidden under Application>>Utilities, console is a fine way to check out the system logs which might give user a clear picture of slow Mac performance.

5.     Dosage of additional RAM – Just like popular energy drink Red Bull gives you fly to wing, similarly additional RAM provides Vitamins & Minerals to a slow & crawling Mac. Upon adding RAM to an existing Mac OS, the system can experience a sudden power-boost up. The old Intel machine may not have those sufficient RAMs, unlike the new ones. So, go ahead, enjoy the 10.9 update with increased dosage of RAM. The best size for smooth Mavericks operations varies from 4GB-8GB and so on, depending on the type of work.

6.     SSD for Solid Performance – Again, a SSD can make the Mac OS X to reach to the peak of fast performance. Imagine, a SSD made, as a start-disk of Mac will boot into desktop in few seconds. It is that fast but a costly affair too. Again, adding a SSD is directly proportional to amount of task that is to be done on Mac.

7.     Duplicate files – Coming back to the free tips, finding and deleting duplicate data from OS X can help grab some quick spaces of the HDD. The most duplicated data is commonly found in iPhoto, iTunes library that eats up good amount of space. Eliminating such redundant files will help the OS X to get good amount of free spaces.

8.     Empty Trash & Download Folder – These 2 is the most neglected and underrated folder on OS X Mac. Everything that is sent to trash is made to live there to an indefinite time period. Trash folder is actually to hold the unwanted data for a short period of time. Once, filled, it must be emptied so that it consumes fewer spaces on Mac HDD. It goes for the download folder too. Everything that is downloaded from the web is made to stay in Download folder to an indefinite period of time. When neglected, both these folders consume Gbs of spaces, thus making the performance suffer.

9.     Back up data in clouds – Its not only the HDD, to which data could be saved. With plenty of clouds, user can now migrate their images, music & videos to online storage sites such as iCloud, Dropbox, AmazonCloud Drive and more.

There are plenty of others minor and major tricks that one might opt to boost up Mavericks performance, including running a Mac clean up App.

5 Things to Do When Windows 7 Won’t Loads Properly

Many times we run across problems when our Windows 7 computer fails to boot or load properly. As we can’t get through and resolve the error, immediate working solution is needed to access your computer and so as your data. Though, many problems can be easily addressed by reinstalling a fresh copy of Windows but you may lose crucial information stored on the computer hard drive. 


We've combined here a list of 5 working tricks that may eventually leads to your computer booting failure problem resolved and allows you to access it without facing any problems or continuous restart loop.  Carefully look for steps to troubleshoot the problem, depend on your system and type of error you’re facing. 

P.S. Some of the error requires to modify settings in your computer hardware, so please see if you’re comfortable with playing around the hardware equipment’s. Expert help is recommended if you’re novice computer user or won’t have enough knowledge about hardware parts.

The solution may applies to all the latest Windows OS editions, however we’ve written it exclusively by keeping Windows 7 users in mind. So you may find it little different while applying solutions on your computer. 

#1 Perform System Restore
Sometime, there are few minor problems behind your unbootable computer state and simply restoring the system could fix it. System restore is a powerful system utility comes pre-included with your Windows installation package and helps user in restoring everything back to any specific date. However, it won’t roll back any saved documents, media files, and stored backup copy on the hard drive etc. 


If choosing any specific date doesn’t address the issue, you could select any different date (restore point) and see if it might help you on this. However, if restoring system doesn’t seems the obvious solution for your computer you might need to get deeper and proceed to next solutions covered below.

#2. Fix hardware related problems


The internal hardware lying on your CPU could be the primary suspect in most of the booting failure cases. If running some basic troubleshooting steps didn’t address the problem, this is the second place where you need to look carefully and make sure that the problem is not related to hardware. Based on the facts, below are the common error you may have faced already. You’ll get the subsequent solution that you can apply to resolve mentioned errors. 

Computer starts but no light on the monitor (memory related errors)
If you press the power button on your computer and everything seems running quite well except there is no display at the monitor. Moreover, replacing the display device yields the same result. If that’s the case, your computer might be suffering from some serious memory errors caused by faulty or outdated RAM (Random-access-memory). 


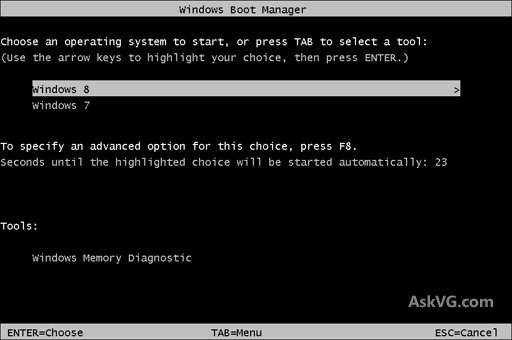
Latest Windows OS have capability to automatically detect problems related to computer memory and provides relevant solution to fix it immediately like Memory Diagnostic tool. You may choose to run this utility immediately by restarting your computer or choose to run it at any later date. Microsoft has a detailed tutorial page on to find and fix memory related problems on your computer. 

Windows Freezes, Hangs or Crashes During Boot (Hard Disk Error)
This error could happen because of installing faulty or suspicious software on your PC, but hard disks remains the primary suspect in most of the freezing or hangs cases. Failing or dying hard drive may give freezes or hangs at the startup and prevent you from accessing Windows normally.  There is a formal method to check your hard disk for errors and find ways relevant solutions to fix it.


In worst cases, you’ll need to replace the existing hard drive in order to get your system in working state. Though, complies to lose all your valuable data. You can try some professional Windows partition recovery program which offers very easy ways to recover data from inaccessible Windows. 

Blue Screen of Death or Continuous Startup Failure Loop (Device and Driver Errors)
Unsigned or outdated drivers for any newly installed hardware equipment’s may give BSOD errors which may occurs while logging in screen. It may also cause the system to fail while booting into Windows and follows the same in loop. 


You can either choose to uninstall such hardware or update all your system drivers to its latest. 

#3. Software Related problems
Avoid installing programs from unauthorized vendors or which has originated from any unknown sources. Such programs might provide heavy damages to your system and leaves it in inaccessible state. 
Moreover, try installing programs written exclusively for the OS edition you’re using. Old version may have compatibility issue with your current copy of Windows and is heavily responsible for damaging registries. 

#4. Windows Starts but Running too slow or starts abruptly
Sometime, due to corrupted or damaged file system and registries which prevents Windows from running smoothly. If you’re so lucky, you might able to logon to Windows but what if screen stays there for a very long time or restarts automatically. 


Windows provides powerful utility to solve such issues, even without reinstalling Windows or manually applying any registry tweaks. Startup repair provides powerful options to fix missing or damaged system files, solves memory errors or recover system from unbootable state. You can access it from the System recovery options by pressing F8 after starting the system. 

Startup repair will automatically find and fix problems on your Windows 7 computer without asking for any information. If it fails or won’t come up with any errors, you may need to run it again or run it twice as sometimes, it’s just miss errors which it won’t recognizes. 

If startup repair didn’t seems helpful, Try running your computer in Safe Mode by using Advanced Startup Options menu. It’ll start your system using minimum set of drivers and applications so you might have any idea about the conflicting programs or the devices drivers. 

Clean boot has been already available for selective startup by disabling certain programs so you can find the conflicting applications and uninstall it immediately to make your system working again. 

#5. Interrupted power supply or damaged cables
Sometime, performing basic tests could solve most of the issues at the very beginning. Just check and make sure that all the power cables were connected properly and performing their tasks. You’ll also need to check and make sure that PSU has been providing the needed power supply and in controlled manner. In case you’re using Laptop, removes the secondary power source which is the laptop battery and try connecting it directly to the power source. 


Windows 8 is Set to Overhaul - Windows 9 Codenamed ‘Threshold’ Releasing Next Year

After the successful release of Windows 8 and handful upgrades to Windows 8.1, this time Microsoft has reportedly planning something big to announce at Build 2014 Developer conference. As per the news report, it’ll be the release of Windows 9 codenamed “Threshold”, somewhere in April, 2015. The Microsoft very next OS after Windows 8.1 update 1 which will release this year in April.


With not so expected success of Windows 8, Microsoft still managed to sell over 90 Millions of license keys worldwide and raises their net profit for up to 13.5 % as compare to their previous quarter. This clearly indicates that users are interested in Microsoft upgrades and releases even if they weren't fully comfortable with it. 

What will be possibly included?

Microsoft vision is to release the advanced computer operating system with high end tiles and Metro 2.0 introduction which might lower the criticisms that Microsoft has faced after releasing the most recent operating system i.e. Windows 8. Rumors around the tech world were also loud about the addition of start button will be a big hit for company and might turns rumors into appraises.  

Besides this, there are number of changes that might rolled out before the final release of Window 9. These changes will completely overhaul Window 8 and leaves no traces of their previous pitfalls. The company is in no mood to sacrifices with anymore criticism whatsoever.

What we actually thinks about this release
According to a news report, Microsoft will release three pre-release versions of Windows 9 for users and developer to test. However, it’s still unclear that how many versions will be actually available for users to explore when Windows 9 is going under development. 
Build 2014 developer conference this year in April might bring some exciting changes and noticeable improvements on which, the company success lies. The company is not comfortable with announcing any updates till now but have high chances of revealing its vision in Build conference.