iCloud, Dropbox, Skydrive and Google Drive for Mac OS X. All Free

Computer operations started from floppy disk devices, moved on to optical media and further went to high capacity storage device in the form of HDD, SDD, USB and memory cards. All these devices helped a computer user (Mac) to store their surplus data through safe manners. But with the constant creation of new data every day, a need arrived to further store the data on different channels, without using any form of devices.

As World Wide Web expanded to new heights, many third party entities offered surplus amount of free spaces on their servers. These servers included huge machines dedicated to store & preserve data on them. Not only storage of data but ability to sync user’s data through Desktop computers, Laptop, Mobile Phones and tablets also gave Cloud an upper hand over any other medium of data storage. It also almost excluded the chance of loss of data stored upon physical hard drives.

Before iCloud came on Mac OS X, Apple made sure to offer data storing clouds though MobileMe and .Mac services. Though, these services hardly made any impact on the users, and further led the Apple to Research & Develop much more sophisticated cloud service.

iCloud – iCloud can be launched from System Preferences and an Apple ID which is used as login credentials. It offers superb 5GB of free space to store Mac OS X data from built-in Applications.


Once you create an account on iCloud, you see what applications you can choose to back up on cloud. For Example, click on Check box to select the Mail, Contacts, Notes, Calendar, Safari (bookmarks), Photo Streams and Document Data to sync alongside with the OS X Mac.

You can also open www.icloud.com and enter your account to manage the applications.


iCloud has functionality to sync data on an OS X and to be retrieved on iOS, vice-versa.

Dropbox – Talking off free cloud services and Dropbox rank above all in terms of usage and simplicity. The 30 MB set-up file can be quickly downloaded from the site https://www.dropbox.com/downloading.

To Set-up Dropbox on Mac OS X –
  • Install the file in Application folder & double click to launch. 
  • Insert essential credentials to set-up Dropbox account.

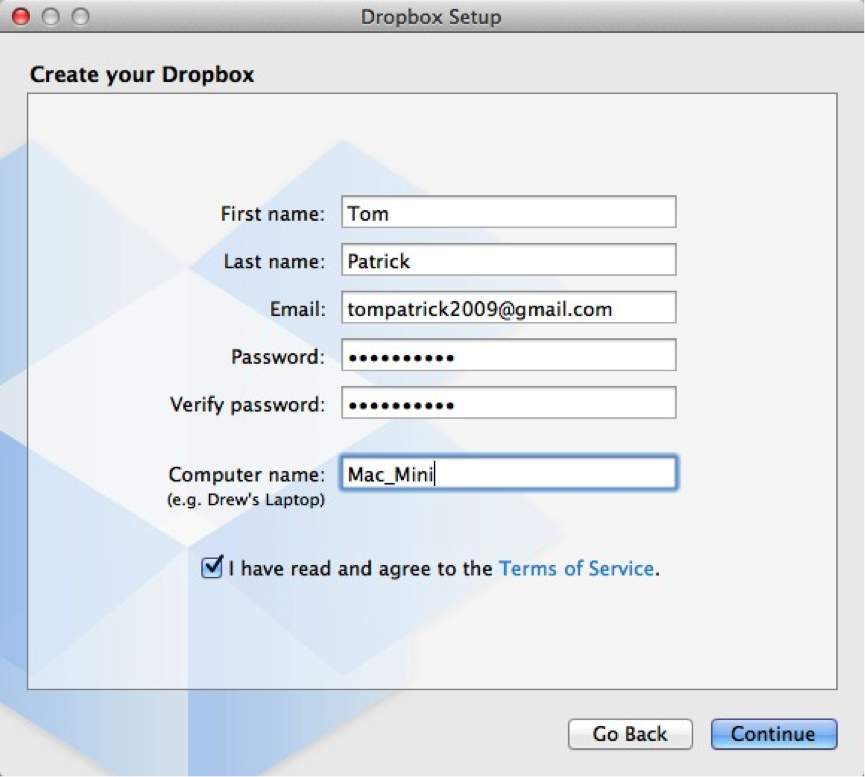
  • Agree to terms and click Continue. Select 2GB (Free) account to store your future files on    Dropbox. Now click series of Continues to finalize the process. 

  • It will now ask to set-up Dropbox folder on OS X, which would help sync, the files between the  Machine & Cloud itself.
  • Once installed, the Dropbox folder can be located in the Finder menu. Any files or folder pasted in this folder will sync to the cloud.
  • Though, its free and convenient to use, it only allows access to store 2GB of data online. 
Amazon Cloud Drive – Yes, its our very own favorite online store that delivers all shopping items safely to our homes. And now, it has taken a stand to store your precious data online. The Amazon Cloud can be accessed via link https://www.amazon.com/clouddrivs, and if you have an account on Amazon then use its credential to login. Similar to Dropbox, once you are login, you can upload documents, images & files to store. Unlike the Dropbox, it has 5GB of free spaces to offer.


Compared to Dropbox, Amazon Cloude Serivce pricing for storage is much cheaper. For 100 GB both Dropbox and Amazong offer $120 (9.99/Month) and $50 each.

Microsoft SkyDrive – Microsoft SkyDrive offers mammoth 7GB of storage spaces to save files for Mac OS X.  Like iCloud is to Apple, similarly SkyDrive is to Microsoft. SkyDrive management application for OS X, allows you to access and organize the files on the drive directly from the Finder.


Google Drive – Click Download Google Drive button to download 23.5 MB DMG file into your Mac download folder.
The set up is as similar as other cloud storage services. It integrates a folder on Mac OS X and starts syncing files to upload on the Google Drive. You can access the Google Drive by one of your GMAIL id. 15GB of storage cloud space is waiting for you to use it.


With Google Drive, one can easily create documents, spreadsheets and presentations.

Calculating the amount of GB you own for free – Dropbox (2) + iCloud (5) + Amazon Cloud Service (5) + Microsoft SKyDrive (7) + Google Skydrive (15) = 34 GB. Go grab it for your Mac OS X.

Illusion Cracking Differences Between Macs And PCs.

The Conflict between Mac and PC users has been going on for years. Some Mac users can’t understand PC users and vice-verse. Windows users allegation calls that Macs aren't suitable computers because they’re not practical and Mac users claim that PCs are insufficient and slow. So can we credit these myths?

Are Macs not worth their price?
OR
Are Windows PCs really that frightful?


Here, we will compare both companies in a very unbiased style!
Initially, We will discuss which company started early, then the reason of the more successful existence. We also discuss which company is more relevant today and who are the majority users of both PC and Mac. We will also discuss important features and technical specifications in both; Macs and PCs.

According to the sources Apple Macintosh introduced the prior computer system to feature a mouse and a graphical user interface (GUI) in January 1984. And Microsoft introduced Microsoft Windows in November 1985, in reply to the rapidly growing interest in the GUIs.
Mac Systems are widely known for their interactive graphical user interface from earlier times. The Apple Macintosh continued to sell successfully till the mid of 1980's, though its sales got reduced in 90's . In 2009, Microsoft quickly took over World's PC market by retiring the Mac OS.

Who Was More Successful & Why?


It’s not a myth, Microsoft dominates the world’s operating systems market. The reason for this domination is simple, Microsoft designed it’s operating systems to be compatible with various hardware created by a wide range of computer companies such as Dell, IBM, HP, and Sony, etc.
On the other hand, Apple designed its software for close integration of computer hardware and software, which means it’s not compatible with other computer hardware. An Apple OS will always run on the Apple hardware only.

Whereas, Microsoft sold it's operating system to various computer companies. Microsoft is more prominent than any other operating systems in the market. In the mean while, Apple's operating system rigorously fit perfectly in their own hardware only .
Many years ago most of the business computing applications were standardized on Windows PCs.

If we discuss about the compatibility
While the main operating system for Apple is OS X, and PCs is Microsoft Windows, only Macs have the proficiency to run both. Naturally, both systems continue to develop faster and more powerful versions of these operating systems that are increasingly user-friendly and more compatible with handheld devices.


And though the PC tends to rule the workplace, many software programs for professional use–including Microsoft Office and the Adobe Creative Suite–have versions for both operating systems. PC is very popular for its application when it comes to leisure time apps.

When it comes to reliability, most of the PC users know that their devices are vulnerable to malware and viruses. Although Mac users are much safer from these virus attacks, but still both PC and Mac users must install an up to date antivirus software to protect their devices from malicious attacks.


If we discuss about the cost of both PCs and Macs, then their it is very clear that PCs dominated the budget friendly market. As Macs are more expensive then PCs, for many user cost is an issue, as users wants to get most from their money. If we talk about budget, then PC wins over Mac.


Easy Availability - Mac or PC.
Macs are privileged to Apple, which means that its price, features are same for the most of the part, so it hardly matters from where you shop. This restraint Mac availability now, even its easier to buy Macs and its accessories from new Apple stores. Whereas any upgrades or reair can only be done by an authorized Apple support center.
On the other hand, PCs are available from a wide range of retailers and manufacturers. This means a wider price range for all budgets, repair, and upgrades, it makes upgrades easier for home users.


After discussing about so many features, facts about Macs and PC, In the end the choice is yours as per your personal preferences If we look upon the availability and price then PC tends to be the winner. While Mac is the exclusive choice for the noble anti-Microsoft computer user.

I have given you a little overview on Apple and Microsoft’s, and an impression of who was more successful and why, Now, it is up to you to decide which company serve you best with your specific needs.

Fix Startup Repair Loop and Solve Windows 7 Loading Problem without Reinstalling

Ever wondered why your Windows 7 PC not able to load properly and inbuilt utilities like Startup Repair won’t able to fix this issue? Moreover, startup repair keeps coming again and again but didn’t able to repair problems of your computer. If you’re unlucky, other troubleshooting options like ‘System Restore’, ‘safe mode’ and similar to fix unbootable Windows system will not work either.  

Previously, Startup repair is used to heal problems with your computer by repairing or replacing important system files, fixing registries and removing problems with third party installed software. However, in some cases startup repair seems useless as it might not able to detect the exact cause behind the problem or the startup repair itself facing difficulties with system registries or the conflicting windows system files.  

In such cases, you've got only one option to make your Windows system working again. That is, by reinstalling a fresh copy of Windows which involves risk of losing everything stored on your computer along with all the installed applications being removed completely. 

What causes ‘Startup Repair’ to Loop?
There might be bunch of reasons that causes startup repair to loop infinitely. However, we’ll group here only few popular reasons of why this is happening with your computer along with subsequent steps to fix it. The first and foremost popular reasons behinds this is due to bad registries which prevents startup repair to perform actions effectively and thus causes it to loop forever.  

Some other possible reasons could be malicious programs installed on your computer that you haven’t noticed yet. It may have high vulnerabilities of damaging system files and other registry settings which prevents Windows to load properly and prevents other system options to troubleshoot Windows. 

In both the cases, you can easily get rid of all the problems and roll back your old Windows in working state by performing clean installation of Windows. Again, doing this will compromise you to lose everything stored digitally with no traces of deleted files and folders, which makes data recovery impossible on your computer even by using most powerful data recovery applications

Little about ‘System Recover Options’ before getting in
It’s a Windows 7 inbuilt utility, mostly comes preinstalled with your copy of Windows 7 and if not, you might have Windows 7 installation disc provided from your manufacturer. As of now, we’re supposing that you try to access ‘System Recovery options’ using inbuilt recovery options provided from manufacturer. 

  1. Start or Restart your computer
  2. Start tapping F8 just after the beep sound or as soon as you get the motherboard screen.
  3. 'Advanced Boot Options’ screen will appear, choose ‘Repair your computer’ and hit enter.

  4. Choose your preferred language and click ‘Next’ to proceed.


  5. You’ll be asked to enter your username and password, after typing the same into text box click ‘Next’.  If you won’t set any password for current user previously, leave the password field blank.


If you’re trying to access this menu using Windows 7 Installation Disc, the steps will be little different. Insert installation disc on your CD DVD drive and press any button when asked to press any key to boot from CD or DVD…

Again choose language and click ‘Next’. On the ‘Install Windows’ screen, ‘Repair your computer’ option will be listed at the left bottom corner. Choose which copy of Windows you want to repair, applicable to multi boot environment. Click ‘Next’ to begin repairing your computer. 


System Recovery options’ windows mainly constitutes six options:


  • Startup Repair
  • System Restore
  • System Image Recovery
  • Windows Memory Diagnostic
  • Command Prompt


As of now, we restrict the information to ‘Startup Repair’ only. However, you can use further system recovery options as per your knowledge and capability to perform actions carefully.

How to fix bad registries and startup repair loop problem?
Before diving in, make sure that you’ve enough knowledge and capable to follow all the instructions carefully as any wrong attempt might leads to further damages of your computer. Those changes can’t be rollback and you might forcefully need to reinstall Windows and permanently lose all your important documents, pictures, videos etc. 

Once you’re at the ‘System Recovery Options’ window as described earlier, start following steps mentioned below:

1. Let’s give one more try to repair your computer to verify that the problem really exists. Click on ‘Startup Repair’ from the same window and it’ll start searching for problems. Wait for few minutes till action is being performed. 


2. As startup repair couldn’t able to fix startup problems, you should see the message ‘Windows cannot repair this computer automatically’.


3. Click on ‘View advanced options for system recovery and support’, which opens again the same ‘System recovery options’ window.
4. This time, instead of clicking on startup repair you’ll need to click on ‘Command Prompt’ as we’re trying to fix problems manually. Note: Basic command operating skills is required. So if you’re feeling uncomfortable, take help from your friends to do this for you. 
5. On the command prompt window, you’ll see the default drive of internal ram disk mainly used by system repair, perhaps labeled with X:\


6. Now you need to navigate to system drive, drive where your system is setup. Most probably, It’ll labeled with ‘C:\’. Don’t worry if you don’t know exactly the system drive as we’ll check and verify that we’re on the track. Just navigate to the C drive and type DIR and hit enter. You’ll see the common folders, only found in the system drive such as Program Files, Users and Windows. 


7. After confirming the system drive (which is C, we’re presuming), type CD \Windows\System32\Config and press enter. This will let us enter into the Config folder located in the system drive. 


8. Further, we need to explore its subfolder. Again, type DIR to check the subfolders containing into Config folder. It’ll contain folders like RegBack, DEFAULT, SAM, SECURITY, SYSTEM, SOFTWARE. 


9. Type MD newbackup and hit enter. It’ll create a new backup folder entitled newbackup in case, this whole process didn’t yield any positive result. 
10. Type Copy *.* newbackup and press enter to copy the created backup folder. In case, if you’re asked to overwrite existing file, type Ato allow all backup files to be overwritten. 
11. We’ll check and see if we can use windows automatic backup to fix/restore damaged registries. To do this, type CD RegBack from the config folder location to go to RegBack Folder.
12. Type DIR to further explore all the existing subfolder und RegBack folder. Please check and make sure that all the subfolders should be of defined size as mentioned below or at least very close to.  

* The DEFAULT, SAM and SECURITY file should be around 262,000 bytes in size
* SOFTWARE files should be around 26,000,000 bytes in size
* SYSTEM files should be around 9,900,000 bytes in size


Please note that all the file size mentioned here were in approximate figure only and may vary, depending on your system. If any of the file sizes were completely different or can say 0 bytes in size, you should stop following steps immediately and seek for an alternative method.
13. Once assured the files listed in RegBack folder is of defined sizes, then proceed to the next step.
14. Type Copy *.* and press enter to copy all the RegBack subfolders or files into config folder. Again, if prompted to overwrite existing files, press A and hit enter. 
15. Type Exit and hit enter to close the command prompt window. Restart your computer and most probably, you may able to access your Windows system as before. 

15 things you must do when you have a Mac OS X


So a day might arrive in your life when you switch from a PC to Mac OS X.  Even an avid PC user will stumble in every step while operating the OS X. Though you will love the way OS X is carved for the user but will sure fume when simplest of thing will tend to confuse you. 

I have been using Mac Mini from last many months and now think I have mastered few things. So, I am compiling the list of 15 essential things, which you can set up on your OS X. 

  • Install Office for Mac - PC gets an advantage of having Microsoft Office at time of installation, as it’s a basic need for the machine. Unfortunately, the same is not found on the OS X when you bring it home. Installing Office on Mac OS X may or may not be a choice for the user. But if it’s a definitive need for you then you must buy Office for Mac 2011 (latest) suite for the OS X. The Office powered for Mac is same as that of PC. Once you get Office on Mac and learn to operate in Mac environment, you will hardly remind of the Windows. Office for Mac constitutes Excel, Word, PowerPoint and Outlook.


  •  Set Time Machine – If you are installing the OS on your own then don’t forget to partition at least 50-60 GB of space for Time Machine backup. For those who are new to Mac, Time Machine is a built-in features for Intel Macs that takes incremental backups of your volumes. So, if in the starting you can create a distinct space for the time machine, then you can set the time machine to back up volumes of your computer. Or you can also allow a separate external hard drive to be as your time machine capsule. Do either ways to back up Mac machine. 


The time machine is a life-saving utility that offers edge to the Mac user to set prior backups and enjoy no loss at time of data disaster or system failure.
  • Using Disk Utility – Disk utility is the central function of the Mac OS X where you can perform series of activities to monitor the health of the hard drive. Disk Utility can be reached out by following path Finder<Application<Utilities<Disk utility. The icon of the disk utility is represented by a hard drive with stethoscope, clearly representing it’s functions.


What quickly can you check with Disk utility?
  • The hard drive information and its SMART status.
  • Individual volumes of the machines & their information
  • User can test hard drive & volumes for any malfunctions.
  • The application permissions on Mac can be verified and repaired by Disk utility alone.
  • Disk Utility can erase a partition and create a new one.
  • It can clone on of the partition or entire drive to another destination.
  • Burn a disc, create an image and unmounts a partition.

Apart from being very useful to the Mac, the Disk Utility doesn’t provide any support for hard drive defragmentation or data recovery. For these two operations, a user has to depend upon 3rd party software.
  • Customising the Dock – A dock is where ships are parked for loading & unloading of the cargo. Similarly in Macs, the dock is place where all your essential icons of applications are well parked so that you can make a single click to launch them. See Below:

With Mac you can play some fine game with the Dock’ settings:

  1. Firstly, to bring an app to the dock simply drag it’s icon and place in the dock to include that app. To remove an app from the dock, right-click and select Options<Remove from Dock
  2. GotoApple Logo < Dock and here you can play with the settings like magnifying the dock icons, hiding the dock and bringing it back when mouse floats towards the dock.


  • Force Quit – This feature is situated under Apple Logo < Force Quit and it ends up a stubborn application. Very handy.

  • Activity Monitor won’t let you miss Task Manager: -PC users are well aware of Task Manager. I remember, myself looking around for the same on Mac OS X. The equivalent application to the task manager in Mac is Activity Monitor, which is located in Finder<Application<Utilities folder.

What quickly can you check with Activity Monitor?

  • Quit bunch of processes that might be running at the background.
  • Quickly monitor the CPU, System Memory, Disk Activity & Usage and Network on your Mac OS X.
  • Check CPU load
  • Verify Process Identifier
  • Check Read-in and Write-Outs

  • Set-up Apple Mail – Apple Mail is build in client to send/receive mails from Mac OS X to anywhere in the world. All you have to do is configure Apple Mail by providing you account information. Once done it will sync all your mail, contacts from the account and you can start using Apple Mail without wasting a second.

  • Trash – Trash is what Recycle Bin is in Windows OS. So to delete a file in the Mac you can both drag and drop it into trash or right-click and select ‘Move to Trash’ option.OH Wait, if you seek to delete a file using keyboard then pressing only the Delete key won’t help you send the file to trash. In actual you have to select the file and press the combination CMD+Delete keys to trash a file. Tricky, it’s Mac after all. It is also simple to Empty Trash in OS X Mac. Either click ‘Empty Trash’ in the trash folder or right click the trash icon and select ‘Empty Trash’. 
  • App Store –It won’t be wrong to judge the App Store as one of USP of Apple Inc. It was Apple who brought the concept of digital store to the IT industry, followed by everyone else. The Apple App Store is full of opportunity, where you can check out for latest OS X developments. The App store continuously prompts you to download new updates for smooth up running of OS X Mac. 

  • Swap between applications– While you set hands on the Mac keyboard, you will come to know that CMD+ TAB shuffles user amongst open applications. While this is simple to understand, but one might become hot tempered in finding ways to swap between 2 similar open apps. E.g. I want to swap between two excel files but CMD+TAB doesn’t help me doing that. So, I must press CMD + ~ to shuffle between similar apps. 

  • Install Dual OS on Mac – Like Windows, you can have two copies of different OS X on Mac machine.A Mac hard drive is large enough to accumulate multiple OS on it. So go ahead and Install another OS X on Mac. On Intel Macs, one can have Lion, Mountain Lion or Mavericks in a pair of two.

  • Boot Camp – So, one cannot install OS X on a Window machine as it is a violation of Apple’s EULA. But the reverse of this is 100% possible with OS X built-in feature, which is Boot Camp. All you need is a 2GB of RAM and 20-30 GB of partition kept aside for the Windows OS. You could set a dream computer by having Mountain Lion and Windows 8 on the same Mac machine.

  • Screenshots – If your work includes taking lots of screenshots from systems then Mac is just the machine you badly need. A user can capture a screenshot in two ways. Firstly by pressing CMD+SHIFT+3, the entire screen is grabbed and saved on desktop by default. Also, by pressing CMD+SHIFT+4 altogether, a sign appears that allows you to crop the image as per need. 

  • Terminal – Terminal is all about finding deep routed features through several commands. It is as same as the Command Prompt from Windows OS. You can unhide system files, change a file format, change the destination of a file etc. and lot of other advance stuff that you can perform with Terminal application.

  • iCloud – Last but not the least, you have Apple’s own cloud support to hang your ultra important files in cloud backup. On cloud storage, they remain safe from worldly affairs. You must check iCloud now and grab your free support.

Keep searching new things on Mac and do let us know. See You Until Next Time.

HOW TO CREATE, MAINTAIN AND RECOVER BOOT CAMP IN MAC OS!!!

Apple.Inc is an american multinational corporation situated in California that develops, designs and sells many products . It’s popularly known hardware products are Macintosh line of computers, the iPad tablet computer, the iPhone smartphones, the iPod music player. The software of these products are OS X and iOS operating systems whereas iTunes for media browser, the Safari web browser and many more productivity suites respectively.

This corporation keeps on updating its technologies & its new buzz in the town is OS X Mavericks. It is a free upgrade which can be easily downloaded from the Apple's App Store. The OS X has many inbuilt utilities and here we will discuss about one of its most vital utility i.e. Boot Camp.

Boot Camp is a multi boot utility of Mac OS X, that enables a user in installing Microsoft 
Windows Operating system on Intel based Macintosh computers.
Basically this utility is known as Boot Camp Assistant, which assists user through safe and non-fatal disk partitioning of their hard drive and installation of Window Device Drivers.

Whereas, it also enables user to re-size the existing HFS+ partition of their hard disk as per their requirement. A Window Control Panel applet automatically gets installed with this utility for selecting the boot operating system.

Initially this inbuilt utility was coming along with Mac OS X Leopard and then was included in subsequent versions and Windows 7 (64 bits) and windows 8 are officially supported with OS X Mavericks.

After the innovation of the first Intel based Mac systems, Apple released a tool called Boot Camp. Which let Mac users to install and boot their machines into Microsoft Windows along with an existing OS X . This happens without running two operating systems simultaneously, it is opt for running performance-intensive applications.


Steps to to Install Boot Camp and Run Windows on Your Mac.

1) Check for updates and Backup:- Check the latest updates from Apple and download and install them on your Mac if required. You should take backup of your important data, because boot camp will be moving and reallocating space on your hard drive.

So your data may get corrupted while the process.

2) Run Boot Camp Assistant (OS X 10.6 or later):- Open a finder window click on Applications<Utilities<Boot Camp Assistant continue to begin the setup. Select Download the Window support software of this Mac and press enter to start downloading the software.


After the download completes, save the files and burn them to a disc.


3) Create Partition of your hard drive:- Once you've finished downloading the software, the assistant will precise you to create a Windows partition on your hard drive. This action will make your hard drive to devote some free space to Windows, without interfering with or erasing existing OS X installation.


A slider represent your hard drive. Adjust the slider to give your Windows partition more or less free space. Keep in mind that any space you assign will be reduced. from the available free space for OS X.

4) Install Windows and Windows Drivers:- Once the process of partitioning the hard drive is accomplished then your hard drive is ready to support Windows.

And, now its time to install the Windows operating system
Once Windows is installed, you need to install the drivers you can downloaded them easily to make sure that all of your Mac hardware works properly in Windows, including sound, display, and wireless network adapters.

Now the Question arises.

Is It Possible to Maintain a Boot Camp Partition while upgrading the Mac OS?

According to my perception answer of this question is yes, whereas some user had problem regarding their Mac updation with Boot Camp Partition.
It make sense to have a backup, As user may not regret on their data loss. If some thing went wrong, you can restore your data easily.
Apple's backing up technology (Time Machine) doesn't support backing up and restoring these partitions.

So, in that case you can try various third party tools for example
  1. Stellar Phoenix Mac Data Recovery:- This software safely recovers data from NTFS-based Boot Camp Partitions.

  1. Winclone 4 :- This software simply create an image of your Boot Camp partition and tuck it away on another drive.

Importance Of Preference Files In Mac

One of the most common reason for unusual behavior on the Mac can be a corrupt preference files. This type of corruption occurs when a program doesn't tends to open or crashes frequently. Preference files store all kind of application-specific information, everything from browser's home page, your default mail font settings, and even something you might have not imagined like your shortcuts kept in Finder sidebar. You can find preferences files by following the written path.

[Your Home Folder]/Library/Preferences for the associated file

After finding the corrupt preference file, usually one must delete them. The next time you launch that fussy application, it’ll recreate a default version of that file and hence your problem will be resolved.

If the problem isn't resolved by that, you can put the old preference file back where you got it so that all of its customized option of that program will return. Another important thing to know is that some preference files live within the /Library/Preferences folder at the top level of your hard drive, but you’ll need to be a bit more careful around them. Preference files stored in that location can affect all users of your machine. If still the problem prevails after deleting the file then you can restore those files if they are unable to fix the problem in same scenario.
One should always create Backup of Preference files!!!


Its very important to take backup of your preferences files including your keyboard shortcuts to import/export, preset plugins and your editing program. Without the proper preference file in place an experienced editor's productivity can completely disappear. This brings me too the focus of the article.

Before discussing about the importance of the Preference file it is very important to understand exactly what these files contains. The content of these files vary from program to program, every preference file contains the program setting and general preferences. Preferences files may also contains presets for new files which are user defined modification. Presets save a great amount of time. Setting them up properly for the first time would definitely, Create something that user want to keep around always.


Preference files sometimes contains effect and style settings, plugins. This means, there is a good chance that any custom work-space, column and window layouts are backed up for you.

How to Take Backup!!!!!!
You can take backup of your preference files in several ways:
  • One way to backup your preference file, is of course, to do it manually . You can explore the finder to make copies of appropriate files and stick them on to an external drive.
  • If you don't want to scroll or browse much then Preference Manager is a simple way to backup your preference file .
Preference Manager works with a variety of different programs. Supported programs include Final Cut Pro, Final Cut Pro X, Avid Media Composer, Avid Symphony, Adobe Premiere, Adobe After Effects, and many more. Whether your computer dies, your preference files become corrupted or you just need to work on a different computer, having a backup of these important files can be a lifesaver for your editing productivity.


Software to recover files & fix data corruption on OS X Mac


Data loss and data corruption are two separate instances of data disaster that results in financial loss and loss of time. An equal amount of resources & energy may put into work to recreate data from the scratch.

How Data Loss might arrive on OS X–Though data is pretty much secure on Mac, still their exist plenty of reasons which may result in loss of files & folders. Other than accidental deletion of the file, a data may be lost due to overwriting with a new file. Other drastic situations may arise from formatting of volume, Trojan attacks, and abrupt shutdown of system making the files go lost.  With advent of advanced hard drive technologies, data transfer & storage have become hassle free tasks. But on the other hand, quick corruption in the hard drive technologies have resulted in unmounted volumes. These unmounted volumes go undetected by the OS X and thus data persisting inside the drive is never shown to the user.

An unmounted volume is a result of corruption in directory structure of the drive. Though it is a logical error, disk utility or an advanced volume manager could fix it. Other than logical, a physically damaged hard drive may also fail to mount. Both the situations are drastic, resulting in immediate loss of data.

Tools to get data from an unmounted hard drive:

1.    Stellar Phoenix Mac data recovery ($99)

Claims to recover data from a logical corrupted hard drive (unmounted disk) within 3-4 steps. The software runs on Intel & PPC machines and could perform deleted, formatted & lost volume recovery. In the time, Stellar Phoenix Mac solution has gained quick popularity amongst many OS X users who brought their data back from the ashes.

2.    Disk Drill($89)

Another tool that promises to recover data with simple steps. Disk Drill supports latest Macs and could perform all sorts of recovery including Deep scan of media devices. Supports unmounted recovery of volumes.

3.    Prosoft ($99)

As it sounds, Prosoft Data Rescue does good job rescuing files from a logically defective hard drive.  Apart from this, it follows other conventional recovery options like deleted, formatted and lost volume/data recovery.

Note – All of the above software restrains them projecting recovery of files from a physically damaged hard drive. So, if your hard drive produces strange noise or is sure to be physically damaged then don’t use any of the above software, as it would be of no real benefit.

How File Corruption might occur on OS X Mac–An OS update, even an application update might sometimes results into corruption of certain files. While the files are still present (not lost), they may not launch, as they should. Some important part of the file may have been permanently damaged halting the smooth opening of that file.  Other causes of corruption may be partial removal of an application, malfunction of the header files, overwriting of some components of a file etc. What a damaged file requires is a ‘rebuilt’ of lost & broken components.  

A perfect example of a damaged file is an Image file (JPEG) format. Once corrupted, it fails to launch or part of the image file is badly disfigured.

Of course, a Mac is smart but none application possess the power to reconstruct the broken images. This results in arrival of 3rd party utilities –  

Fixing corrupt JPEG files on Mac

·      Stellar Phoenix JPEG Repair for Mac ($39)

While there are plenty of JPEG repair software but most of them exist for Windows OS. Seems like only Stellar Phoenix has the JPEG repair tool for OS X Mac.

Fixing corrupt MOV files on Mac –

·      Yodot MOV Repair ($69.95) – Scan & fixes MP4, MOV files on Mac OS X.
·      Stellar Phoenix MOV Repair ($69) – Find all corrupt .MOV files from Mac hard drive & repairs them.
·      Remo Repair MOV ($69) – Locates MOV files and fixes them in no time.

All above 3 MOV repair tools are powerful enough to find corruption & fix them. However, each one them show a repaired preview of file for unregistered version of the software.

Fixing damaged PDF files on Mac -

Unlike JPEG repair, we have plenty of option to choose from utilities that fixes bad PDF files on OS X.

·      VeryPDF PDF repair for Mac ($29.95)–Good choice for repairing multiple damaged pdf files on Mac. Removes PDF permission passwords.

·      Stellar Phoenix PDF Repair for Mac ($49) – Stellar Phoenix uses it’s well-established brand name & technological expertise, which brings in this repair utility for Mac OS X. It perform repair on bunch of pdf files, though doesn’t support password protected PDF repairs.

 Let us also evaluate back up software for Macs

Way before Cloud came into existence, Mac users widely depend upon 3rd party cloning apps to safeguard there hard drives. This method of data backup is traditional, reliable and user-friendly. Though it does require some cost including cost of data back-up software, an external hard drive or usb to save the data using a backup application. Still, backup software for Macs are huge hit amongst OS X users.  

Some trusted Mac backup software

·      Carbon Copy Cloner ($39.95)
·      SuperDuper ($27.95)
·      Stellar Drive Clone ($39)
·      Disk Utility (in-built)
·      Time Machine (can be in-built)

I would like readers to further contribute their experiences and suggestion related to above mentioned file recovery & repair utilities for Mac OS X. Any feedback in spite of good or bad is whole heartedly welcome. Cheers!!