Here's How to Fix “Can't delete a folder, require Admin Privileges”

At times, you may found yourself unable to delete any specific file or folder from your Windows like Windows 8/7/Vista/XP etc. Instead, you'll keep getting error like 'Access is Denied', 'Can't delete folder, not enough permission', 'Requires admin privileges to delete this folder' or any other file and folder permission errors. Remember, these errors are annoying and will not go away over time or the normal troubleshooting method. Alternatively, these errors will continue to arise even after you're logged in as administrator or have full rights to your system.

This issue may occur at any instance or after reinstalling a fresh copy of Windows. The common causes behind the aforementioned error could be:
  1. Third party faulty programs that try to remain control or gain access on any particular files or folders that you would want to delete.
  2. System files or any control panel settings accessing information from that particular files or folders.
  3. Any running application is using resources from that particular files or folder like settings and options.
  4. The file or folder containing targeted files is currently open in any other programs or applications.
Finally, how can I delete such folders or files?

There is an obvious solution to delete almost any type of files or folders that keeps throwing this error.  You will need to take control first on such directory and then tries to remove it. Follow the steps mentioned below to take control on almost any file and then remove it:
  1. Open notepad by going to Start > All Programs > Accessories.
  2. Press 'CTRL + 'S'' and name it to 'delete.bat'. Preferably, save this file to the desktop location.
  3. Type the following entries as it is in the blank text document and press the same button (CTRL + S) to save file again.
    “SET DIRECTORY_NAME="C:\Locked files or folders"
    TAKEOWN /f %DIRECTORY_NAME% /r /d y
    ICACLS %DIRECTORY_NAME% /grant administrators:F /t
    PAUSE”
    Note: You'll need to change the bold text as per your current problem directory. For example: “D:\delete files or folders” because you want to delete folder entitled ‘delete files or folders' residing in D:\ drive.
  4. Right click on the file 'delete.bat' from the desktop and select 'Run as administrator'. You'll now have full control over the problem files and folders and can easily go for deletion. You may also able to delete internal directory residing in such folders.

Alternate Solution

If you are bit experienced in working with Ubuntu Live CD, can use it to boot normally in Ubuntu mode, find, and delete such files or folders from there and choose to delete it. This time, you'll not be thrown with the same error messages as before.

Have you tried these methods and still facing trouble while deleting such files? Or, have an alternate solution to fix this issue, post your thoughts in comment section.

How to Refresh or Reset Your Windows 8 PC Using Recovery Drive?

Microsoft provides two great utility to help revives your Windows 8 PC problems entitled ‘Reset your PC’ & ‘Refresh your PC’. Reset your PC will wipes off everything on the PC and make your system like a new one. In other words, Reset your PC tool will reinstall a fresh copy of Windows 8 (replace old copy of Windows) and completely erase everything stored on the hard drive. This helps user to get away from any virus / Trojan infected or damaged PC to start everything from scratch.

However, if you've mistakenly erased something important files or documents while resetting your PC and want to get it back, can do so by using professional recovery software. This sort of software's have certain limitations like it can't recover data that's overwritten or can't run on the drive that is physically damaged or not showing in the software drives list. 

Refresh your PC tool will ensures the safety of stored hard drive content as well as keep all the settings and customizations intact. Standard formatting is used in refreshing your PC and any removed apps will be automatically reinstalled once the refreshing operation is completed.

Stuff you require

You'll need a recovery drive and Windows 8 Installation DVD to reset or refresh your PC. Though, if you don't have the recovery drive and wants to create a new one go through the tutorial of making a recovery drive in Windows 8 and create a new one.

Note: If you only want to reset your PC from within Windows, press 'CTRL + 'W'' to open search screen and type 'Remove' in the search text box. Select Remove everything and Reinstall Windows to launch reset your PC tool.

Getting Started with 'Reset your PC'

Running reset your PC from the recovery drive requires system restarts as the system can be reset only in Windows recovery environment (RE).

# 1

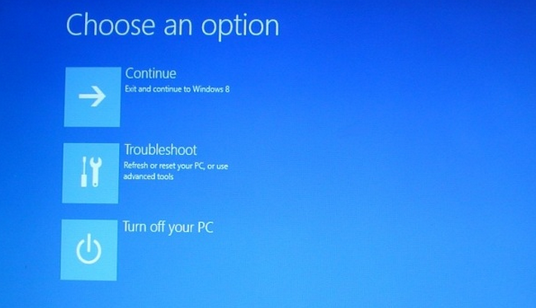
Connect recovery drive (the USB device which we've created previously) to your PC and restart your system. Now the system will boot from the recovery drive and gives you the screen as in the image below,


            choose-option-windows-8


# 2
Select Troubleshoot tile from choose an option screen. The next screen constitutes three options: Refresh your PC, Reset your PC, and Advanced options. As we're going to reset your PC, you'll need to click on the Reset your PC option located at mid.


               troubleshoot

# 3
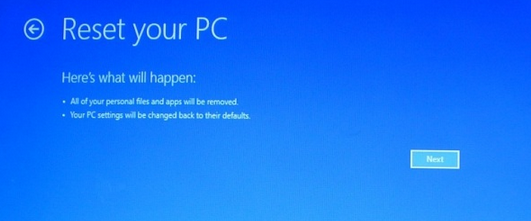
Reset your PC confirmation window will open to inform you about what will happen when you choose to reset your PC. For example all of your personal files and Apps will be removed; your PC settings will be changed back to their defaults. Once you're assured and decided to go with reset, Click on the Next button located at the bottom right corner of the screen.

               what-happen-after-reset

# 4
Locate the desired copy of Windows 8 OS (if you've dual versions of Windows 8) that you want to reset and click on it. Next screen will asks you to insert Windows 8 installation DVD. Remember to remove the recovery drive before inserting installation DVD as the system will starts many time during the whole process and keep plugging the recovery drive will causes unnecessary delays.
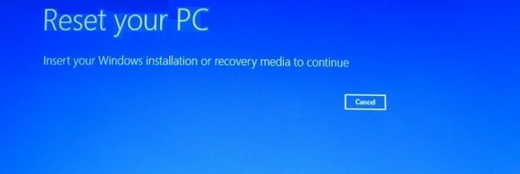
                 choose-next

P.S: Be sure to have installation DVD before heading towards this step.


# 5
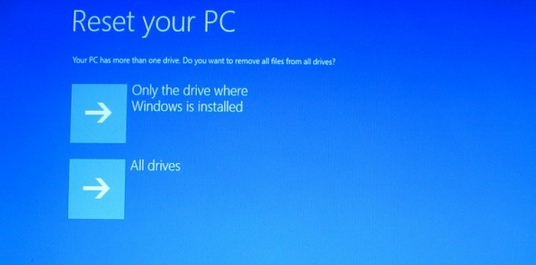
Soon after inserting the installation DVD, system will begin verifying media for its integrity and displays the next screen, which asks you to choose the drive to delete files such as the drive where Windows 8 is installed or all the drive/partitions currently partitioned in the hard drive.

              reset-PC-windows-8


# 6
Next screen will asks you to choose the desired formatting methods such as remove files using standard method or permanently clean your PC. The second option is bit useful especially when you're trying to sell or handover your Windows 8 PC to someone else and wants to get ensured that the stored data is permanently deleted which can't be recovered even by using professional recovery utilities. 

            choose-method-formatting

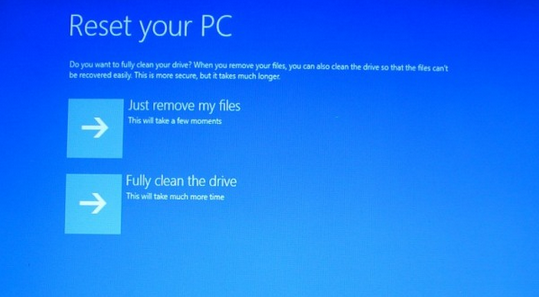
‘Just remove my files’ option is fairly quick and uses standard formatting method to clean your PC. On the other hand, ‘Fully clean the drive’ will permanently wipe everything and insert ‘0’ information throughout the sectors and blocks of your hard drive and makes it impossible to recover anything from the cleaned hard drive.
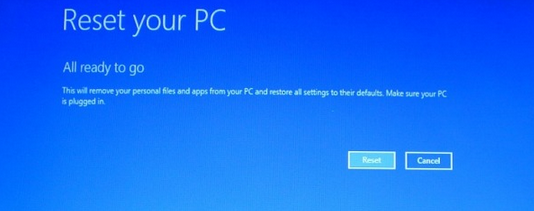

# 7
At last, setup is all set to reset your PC based on the finalized selections and parameters defined. Click on the Reset button to start resetting your PC. The requested action might take some time and gives you the percentage of operation that is completed on the black screen window. In the end, Windows will begin reinstalling all of the system drivers, settings, and screen options again to get your PC ready.

              ready-resetting


Steps to Refresh your PC

Refresh your PC is still a great way to resolve issues with your PC without deleting or modifying the stored data and installed Apps. To ensure that all the preexisting Apps were successfully installed after performing refresh your PC operation, this tool will automatically create a list of installed Apps as well as Apps which couldn't be installed that you need to manually install from the Microsoft Apps store. 

You can also run this tool from within the Windows as like reset your PC tool, though its always a good idea to run refresh your PC tool using the recovery drive as unstable or infected environment could cause tasks to be remain uncompleted or not at all and the problem might resurfaced even after successfully completing the refresh your PC task.

Note: As the first step of reset your PC is quite same, you can read it from the step #1 and instead of choosing reset your PC, you need to select refresh your PC from the step #2.

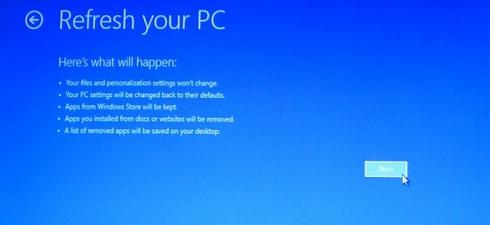
Select Refresh your PC option from the troubleshoot screen to begin refreshing PC. You can always check the information available at the refresh your PC screen to know about what happens once you choose to refresh your system. The options are like your PC and personalization settings won't change, PC settings will be changed back to their defaults, Apps from Windows store will be kept, Apps you installed from discs or websites will be removed, list of removed Apps will be saved on your desktop. Click on the Next button to proceed.


            refresh-PC-Windows-8

All of the rest steps will be same as in reset your PC except, refresh your PC will begin reinstalling removed Apps after successfully completing the aforementioned tasks. Refresh your PC tool lets you find the Apps which weren't installed during the aforementioned operation. Find the .html file entitled Removed Apps from the desktop and open it using IE or any browser you'd prefer to use.

 list-of-not-reinstalled-apps


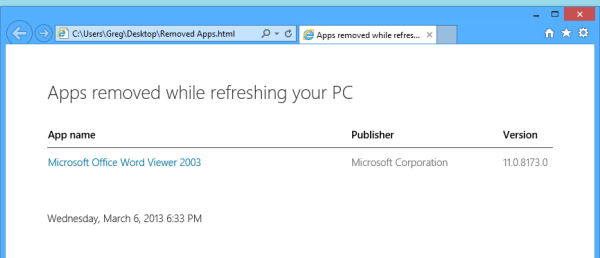
Above image gives you clear view of how the removed Apps file will look like. Later then, you can go for installing the same Apps again either from the Windows Apps store or from the publisher website.

What would you like to do now?

You might already have clear understanding about which operation best suites to your need. However, I'd like to share my own opinion about both. Refresh your PC gives you great chance to bring back everything to its normal state without modifying or deleting anything (except PC settings). However, refreshing PC won't remove any virus or damaged registries inside the system and cause your system to fail or become unstable again even after fully completing the refresh your PC operation.

Where as, reset your PC utility will force you to start everything from scratch yet fixes all the running issues by installing a fresh copy of Windows. So you might not have to worry about anything malicious and start using fresh and faster Windows 8 again.

Both options were highly useful and recommended as well as plays unique role when anything goes beyond your control. It’s all up to you about weather you want just to restore system to its default or completely remove everything from your PC. Don't forget to add your own opinions and any pros or cons that you've found during any ongoing resetting or refreshing operation.

Safari – Make it fast and glossy with new add-ons

Web browsing is a part of our daily life and on Mac it is the 'Safari' by default that lightens the browsing experience. Safari which is now 10 years old, began its journey from version 1 to 6 and served almost all Apple devices like Macs, iPods, iPads and iPhones. Being an Apple application, Safari percepts to be faster than other counterparts on Mac OS X. Remember, this is a perception and not to be termed as a fact until solid explanation. We know how Google Chrome has directed the Internet browsing in ways. 

Talking of Safari now, one should make sure to input basic maintenance activities to make Safari up to date and performing. Like any other browser or application, Safari will slow down after a period of time. That time period may arrive sooner or later depending upon the handling of the Mac OS X. But you can halt that time from arriving by keeping the browser clean and clear.

What Activity to monitor on Safari?


Monitor Caches on Safari – Cache files can eventually slow down the speed of a website loading on to Safari. This happens over a period of time when cache data keeps on accumulating in the folders & gets damaged causing adverse effects on the browsing. Older caches will keep on loading the old pages, neglecting the newer updates of the site until you clean them off. To do so, go to Library and find caches folder. Drag it to trash. You may feel some websites to go slower but cleaning out caches is an important task of the overhauling of the browser. After a day or so you will gain the same good loading speed.

Reset the browser – If you don't bother about any information to lose on Safari, then choosing to reset the browser is recommended. This takes less than a minute or may be a minute but quickly restore back the safari to factory settings.  Do it like this, Go to Safari Menu and expand to choose Reset Safari. You will be warned of loosing information stored at back-end. Proceed to clean the safari and set to default settings.

Monitor Preferences files
– The role of Preferences files on Mac is crucial as this only decides the positive and negative behaviour of an application. The application will show its abrupt behaviour moment the preference files become faulty. The best way to check the preferences files on Mac is to go Disk utility way and click 'Verify Disk'. Upon finding some of them with red coloured lines, it is best to delete them.

Update Safari
– If you are below than the Safari v6 on your Mac then think about an update. Before you update cross verify the system requirement with that of Safari.

Excite your Safari browsing with these features
-

So you have implemented the above terms on Safari and made it fast as it should be. Now time is to install few add-ons to make it livelier.

For Safari 5 and social media lovers,
  • Download Social Fixer for Facebook, an app that produces different themes and skin, much more can be read here. If you have a large appetite for photos on Facebook then add Facebook Photo Zoom to enlarge an image over mouse hover.
  • Just like you I love to tweet and for that Apple Extension (http://extensions.apple.com/) offers range of twitter tools to die for. All these will glow with Safari (v5).
  • For those who can't live latest political, social, business, & sport news must install NYTIMES to receive uninterrupted supply of latest happenings around the globe.
  • You can also improve the user experience of Safari browser by controlling unwanted and sometimes highly irritating advertisements. Use Ad-Block add-on to immediately stop these ads for intruding your web spaces. If you are no more interested in any kind of promotional offers from manufacturers, this kind of stuff is made for you. Still you love to know about the latest products and services then let the ads be there.
  • GMAIL Counter, a smart app for Safari let you monitor your Inbox and fresh emails. Once installed it will show up in the Safari toolbar.
  • Diggo.com which is an information distributing platform brings you the “Awesome Screenshot” add-on. Now, this is something you and me and all of us will enjoy for sure. It capture/share the images from the web pages to other websites. You don’t have to save the image from the page to the hard drive using right mouse click and then load it for sharing. With this app you can do it within few mouse clicks.

Safari also got some fabulous apps for video browsing
  • Ever wanted to watch only a YOUTUBE video without any distraction from the surroundings? It was not possible until the app clea.nr Videos for YouTube came to Safari. In a normal mode you will watch the video with all of the items scattered on the four corners, but with this app you will watch the video on a plain white screen. “We Remove Clutter”, this is what the developers of this app claims. Must try it out for peaceful video watching.
  • No stopping here as there are some other good apps waiting for your OS X Safari. If you have no concerns for the YouTube videos and only desires for the fast browsing, install ClickToFlash which will restrict flash items of a webpage to load. The speed of the Internet will then be channelized to launch other items of the webpage quickly.
  • Another app that betters the productivity on YOUTUBE is “Turn Off the Lights” by Stefan. It makes things simpler by dimming the background of the video you are viewing. You might get a feel of watching the video in a theatre. To know more try this app now.
  • NO time to loose for now as you know what lots off to be done on SAFARI. Make it the way you feel like.
Hang out with Google Chrome for Mac?

At-least keep another browser ready to launch on the Mac and that other browser is definitely going to be GOOGLE's CHROME. Chrome is fast, reliable, genuine, and error-free, of-course widely used browser than I.E and FIREFOX. Though some of you may not find it as glossy as Safari but it is still a better choice over Firefox which have a tendency to slow down or break down moment you load it with many add-ons.

The above Safari extensions are easily available with Chrome; actually chrome web store is over-loaded with thousands of free/paid add-ons. Not in mood to buy one then add most of the free ones to enjoy sophisticated browsing on Mac OS X. If you are a Google + lover then chrome being a Google product gives you variety of facilities such as Google+ Notifications. For Chrome you need to have Mac OS X10.6 or later.

Just FYI, My Mac got both the Safari and Chrome and that helps me maintain my flow of work in a situation which might go beyond my control.

Apps that uninstall stubborn software from Mac OS X

No rocket science is required to remove an application or software from a Mac hard drive. This job is simply accomplished by dragging the icon of the software to the trash folder and emptying it further. Visually we can't locate the trashed file anywhere on the Mac partitions and considered it to be completely gone from the OS X. This is misconception and at the background some of the associated files of the removed application are still found to be located on the said location. These associated files of the deleted utility comprises of -  
  • file preferences,
  • application logs,
  • cache files
  • Installer such as .pkg and .dmg.
These files are unintentionally kept on the Mac OS location to ease up the re-installation of the same application in the near future. Leftovers easily pick up the required information and set the application the way it was earlier. In actual, the size of these files is small and at times you may choose to ignore their presence. But if you are a core Mac user who even want to save small locations on the drive or at-least want the Mac to stay clean then you must find out such leftovers and kick them out.

It is also noted that these leftovers tend to create havoc at times when you try hard to install a newer update of the software. To play foul these files won't let you do a proper update as their stored information doesn't match with the newer version of th tool. So, in any case it is always good to eliminate these useless files that at times are troublesome also.

OS X or even disk utility is limited to let you find these files in an organized manner. If your Mac has limited partitions and files (folders) you can even think of manually trashing these files. In the opposite case, it would be a bad dream to find/remove leftovers from a large hard drive or files. In my best knowledge, there are absolute free tools that scan the entire Macintosh HD and bring out every single piece of these leftovers.

Option 1) Stellar Speed up Mac
Stellar Speedup Mac can be seen in much larger perspective to clean your entire Mac not only from the leftovers but also other kinds of unwanted files. Though its paid, the best part I liked about the software was the facility of a free uninstaller and removal of junk files (including logs, system junks, leftovers & extensions). The moment you launch the app it begins to analyse your main internal hard drive which in most cases is 'Macintosh HD'. The left bar indicates the process as well as amount of garbage data it accumulated from the system. The free version will let you remove the above mentioned files completely from the Mac OS X. If any day, you come across a stubborn or infected software that refuses to go to trash then make use of this tool that can even uninstall a dogged file.

Free Uninstaller for Stubborn Apps

Option 2) App Cleaner

It's free and worked likes a charm for my Mac (and yours too). Though it is not as big as Stellar Speedup Mac but fulfills the purpose of removing an app and its leftovers from the Mac without much effort. As you drag any icon on the trash, drag the same on the App Cleaner uninstall feature and relax. The App Cleaner reaches out every corner of the Macintosh HD to dig out small & large pieces of application's waste and eliminate them securely. 


Both the above mentioned tool requires Mac OS X 10.4 or later to operate. You must evaluate the free features of these tools to assure your Mac remains clean from unwanted junks.