Showing posts with label Technology. Show all posts

How to Use Old Windows Boot Manager Screen in Windows 8 Dual Booting Environment

Windows 8 lead outstanding changes in their fastest ever OS, formally known as Windows 8. Changes including Start Screen, metro style interface, faster boot processing etc. are some of the major one that greatly modified the way we interact with the PC.

Boot manager in Windows 8 is a part of the booting process that lets you choose desired OS to start with if you’re running in Multiple OS platforms. You’ll see this screen just after starting your system. Once you select the operating system, you’ll need to press Enter to start with desired version of operating system.


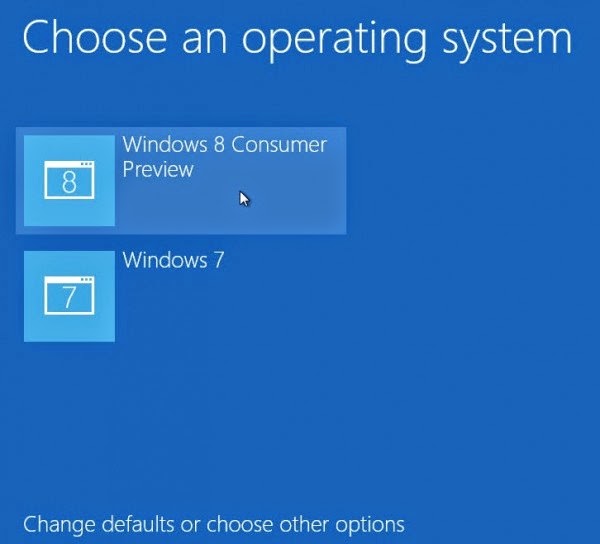
Microsoft had decided to remove the old boot manager screen and replaced with modern boot loader screen in Windows 8 so you can reach to desktop within the shortest possible span of time. However, some user didn’t liked it at all as it’ll restrict capabilities like advanced startup options, capabilities to start system using various other method like Safe Mode, Clean Boot Mode, system recovery options (all these options was previously found at Advanced startup options in Windows 7/Vista/XP). 

Moreover, if you’ve installed multiple OS including Windows 8 on the same system, it’ll directly boot into Windows 8 OS without giving any options to choose other installed operating system.
This will seems annoying if you want to boot into different copy of OS, Windows 7 or Windows Vista.

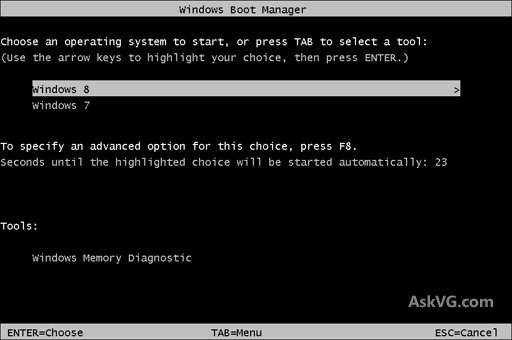
Sometime, user may get distract with their modern boot manager screen of Windows 8 and desperately want to bring back the old interfaced boot manager screen like Windows XP or Windows 7. This article will guide you how to bring back old boot manager screen without digging much deeper and conflicting your customizations and settings. Once you’re done with following all the steps, you’ll probably see your old boot loader screen instead of metro boot loader screen, as seen in the image below:


Disable Metro Boot Loader Screen
Follow the steps mentioned below to get your old boot loader screen:
  1. Open elevated command prompt in your Windows 8 computer by pressing ‘Window’ + ‘Q’ button, type cmd and right click on it. You’ll see an option to start command prompt using administrative credentials on the right screen.

    P.S. Enter desired admin details if asked and hit enter.
  2. Once you are on the black screen window (MS-DOS screen), type the below mentioned command and hit enter:

    bcdedit /set {default} bootmenupolicy legacy
  3. After receiving the conformation message, you’ll need exit from the command prompt window and restart system to see the old boot loader screen.


How to restore or enable metro boot loader screen back again
If at some time, you want to restore modern boot loader screen in Windows 8, just follow the tutorial below:
  1. Start command prompt as described in the first step of disabling metro boot loader screen and type the command mentioned below:

    bcdedit /set {default} bootmenupolicy standard
  2. Again, you’ll get a confirmation message as received in the previous tutorial that confirms that metro boot loader screen has been restored successfully.
In case you aren’t able to perform steps described above or facing problem while enabling/disabling metro boot loader screen, post your questions using the comment section and we’ll look onto it.
Moreover, if you’re continue receiving boot manager popups even after removing other copies of Installed OS, you’ll need to follow the tutorial to remove boot manager popups error.

5 Things to Do When Windows 7 Won’t Loads Properly

Many times we run across problems when our Windows 7 computer fails to boot or load properly. As we can’t get through and resolve the error, immediate working solution is needed to access your computer and so as your data. Though, many problems can be easily addressed by reinstalling a fresh copy of Windows but you may lose crucial information stored on the computer hard drive. 


We've combined here a list of 5 working tricks that may eventually leads to your computer booting failure problem resolved and allows you to access it without facing any problems or continuous restart loop.  Carefully look for steps to troubleshoot the problem, depend on your system and type of error you’re facing. 

P.S. Some of the error requires to modify settings in your computer hardware, so please see if you’re comfortable with playing around the hardware equipment’s. Expert help is recommended if you’re novice computer user or won’t have enough knowledge about hardware parts.

The solution may applies to all the latest Windows OS editions, however we’ve written it exclusively by keeping Windows 7 users in mind. So you may find it little different while applying solutions on your computer. 

#1 Perform System Restore
Sometime, there are few minor problems behind your unbootable computer state and simply restoring the system could fix it. System restore is a powerful system utility comes pre-included with your Windows installation package and helps user in restoring everything back to any specific date. However, it won’t roll back any saved documents, media files, and stored backup copy on the hard drive etc. 


If choosing any specific date doesn’t address the issue, you could select any different date (restore point) and see if it might help you on this. However, if restoring system doesn’t seems the obvious solution for your computer you might need to get deeper and proceed to next solutions covered below.

#2. Fix hardware related problems


The internal hardware lying on your CPU could be the primary suspect in most of the booting failure cases. If running some basic troubleshooting steps didn’t address the problem, this is the second place where you need to look carefully and make sure that the problem is not related to hardware. Based on the facts, below are the common error you may have faced already. You’ll get the subsequent solution that you can apply to resolve mentioned errors. 

Computer starts but no light on the monitor (memory related errors)
If you press the power button on your computer and everything seems running quite well except there is no display at the monitor. Moreover, replacing the display device yields the same result. If that’s the case, your computer might be suffering from some serious memory errors caused by faulty or outdated RAM (Random-access-memory). 


Latest Windows OS have capability to automatically detect problems related to computer memory and provides relevant solution to fix it immediately like Memory Diagnostic tool. You may choose to run this utility immediately by restarting your computer or choose to run it at any later date. Microsoft has a detailed tutorial page on to find and fix memory related problems on your computer. 

Windows Freezes, Hangs or Crashes During Boot (Hard Disk Error)
This error could happen because of installing faulty or suspicious software on your PC, but hard disks remains the primary suspect in most of the freezing or hangs cases. Failing or dying hard drive may give freezes or hangs at the startup and prevent you from accessing Windows normally.  There is a formal method to check your hard disk for errors and find ways relevant solutions to fix it.


In worst cases, you’ll need to replace the existing hard drive in order to get your system in working state. Though, complies to lose all your valuable data. You can try some professional Windows partition recovery program which offers very easy ways to recover data from inaccessible Windows. 

Blue Screen of Death or Continuous Startup Failure Loop (Device and Driver Errors)
Unsigned or outdated drivers for any newly installed hardware equipment’s may give BSOD errors which may occurs while logging in screen. It may also cause the system to fail while booting into Windows and follows the same in loop. 


You can either choose to uninstall such hardware or update all your system drivers to its latest. 

#3. Software Related problems
Avoid installing programs from unauthorized vendors or which has originated from any unknown sources. Such programs might provide heavy damages to your system and leaves it in inaccessible state. 
Moreover, try installing programs written exclusively for the OS edition you’re using. Old version may have compatibility issue with your current copy of Windows and is heavily responsible for damaging registries. 

#4. Windows Starts but Running too slow or starts abruptly
Sometime, due to corrupted or damaged file system and registries which prevents Windows from running smoothly. If you’re so lucky, you might able to logon to Windows but what if screen stays there for a very long time or restarts automatically. 


Windows provides powerful utility to solve such issues, even without reinstalling Windows or manually applying any registry tweaks. Startup repair provides powerful options to fix missing or damaged system files, solves memory errors or recover system from unbootable state. You can access it from the System recovery options by pressing F8 after starting the system. 

Startup repair will automatically find and fix problems on your Windows 7 computer without asking for any information. If it fails or won’t come up with any errors, you may need to run it again or run it twice as sometimes, it’s just miss errors which it won’t recognizes. 

If startup repair didn’t seems helpful, Try running your computer in Safe Mode by using Advanced Startup Options menu. It’ll start your system using minimum set of drivers and applications so you might have any idea about the conflicting programs or the devices drivers. 

Clean boot has been already available for selective startup by disabling certain programs so you can find the conflicting applications and uninstall it immediately to make your system working again. 

#5. Interrupted power supply or damaged cables
Sometime, performing basic tests could solve most of the issues at the very beginning. Just check and make sure that all the power cables were connected properly and performing their tasks. You’ll also need to check and make sure that PSU has been providing the needed power supply and in controlled manner. In case you’re using Laptop, removes the secondary power source which is the laptop battery and try connecting it directly to the power source. 


Windows 8 is Set to Overhaul - Windows 9 Codenamed ‘Threshold’ Releasing Next Year

After the successful release of Windows 8 and handful upgrades to Windows 8.1, this time Microsoft has reportedly planning something big to announce at Build 2014 Developer conference. As per the news report, it’ll be the release of Windows 9 codenamed “Threshold”, somewhere in April, 2015. The Microsoft very next OS after Windows 8.1 update 1 which will release this year in April.


With not so expected success of Windows 8, Microsoft still managed to sell over 90 Millions of license keys worldwide and raises their net profit for up to 13.5 % as compare to their previous quarter. This clearly indicates that users are interested in Microsoft upgrades and releases even if they weren't fully comfortable with it. 

What will be possibly included?

Microsoft vision is to release the advanced computer operating system with high end tiles and Metro 2.0 introduction which might lower the criticisms that Microsoft has faced after releasing the most recent operating system i.e. Windows 8. Rumors around the tech world were also loud about the addition of start button will be a big hit for company and might turns rumors into appraises.  

Besides this, there are number of changes that might rolled out before the final release of Window 9. These changes will completely overhaul Window 8 and leaves no traces of their previous pitfalls. The company is in no mood to sacrifices with anymore criticism whatsoever.

What we actually thinks about this release
According to a news report, Microsoft will release three pre-release versions of Windows 9 for users and developer to test. However, it’s still unclear that how many versions will be actually available for users to explore when Windows 9 is going under development. 
Build 2014 developer conference this year in April might bring some exciting changes and noticeable improvements on which, the company success lies. The company is not comfortable with announcing any updates till now but have high chances of revealing its vision in Build conference. 

Here's How to Fix “Can't delete a folder, require Admin Privileges”

At times, you may found yourself unable to delete any specific file or folder from your Windows like Windows 8/7/Vista/XP etc. Instead, you'll keep getting error like 'Access is Denied', 'Can't delete folder, not enough permission', 'Requires admin privileges to delete this folder' or any other file and folder permission errors. Remember, these errors are annoying and will not go away over time or the normal troubleshooting method. Alternatively, these errors will continue to arise even after you're logged in as administrator or have full rights to your system.

This issue may occur at any instance or after reinstalling a fresh copy of Windows. The common causes behind the aforementioned error could be:
  1. Third party faulty programs that try to remain control or gain access on any particular files or folders that you would want to delete.
  2. System files or any control panel settings accessing information from that particular files or folders.
  3. Any running application is using resources from that particular files or folder like settings and options.
  4. The file or folder containing targeted files is currently open in any other programs or applications.
Finally, how can I delete such folders or files?

There is an obvious solution to delete almost any type of files or folders that keeps throwing this error.  You will need to take control first on such directory and then tries to remove it. Follow the steps mentioned below to take control on almost any file and then remove it:
  1. Open notepad by going to Start > All Programs > Accessories.
  2. Press 'CTRL + 'S'' and name it to 'delete.bat'. Preferably, save this file to the desktop location.
  3. Type the following entries as it is in the blank text document and press the same button (CTRL + S) to save file again.
    “SET DIRECTORY_NAME="C:\Locked files or folders"
    TAKEOWN /f %DIRECTORY_NAME% /r /d y
    ICACLS %DIRECTORY_NAME% /grant administrators:F /t
    PAUSE”
    Note: You'll need to change the bold text as per your current problem directory. For example: “D:\delete files or folders” because you want to delete folder entitled ‘delete files or folders' residing in D:\ drive.
  4. Right click on the file 'delete.bat' from the desktop and select 'Run as administrator'. You'll now have full control over the problem files and folders and can easily go for deletion. You may also able to delete internal directory residing in such folders.

Alternate Solution

If you are bit experienced in working with Ubuntu Live CD, can use it to boot normally in Ubuntu mode, find, and delete such files or folders from there and choose to delete it. This time, you'll not be thrown with the same error messages as before.

Have you tried these methods and still facing trouble while deleting such files? Or, have an alternate solution to fix this issue, post your thoughts in comment section.

Now Develop and Host Websites with Google Drive

Google Drive, one of the most popular cloud storage service now offering developers to host their HTML Code , CSS or Java Script on Google drive to run any website, confirmed on 5th Feb post at Google Plus. This can help developers to design websites and test their output without choosing a dedicated web hosting services or paying a single bucks for it. Moreover, a live URL is generated which can be shared with the client or any party to see the live demo of a web-page.

Also Read Hard Drive Data Loss at a Glance

Below is a snapshot of a sample web-page, designed by Google Drive team. You can check out this live page here.

Google-drive-webpage-sample

Here's what you need to do:
  1. Open the URL drive.google.com and sign in using your Google account.
  2. Create a new folder and rename it to “Public on the web”.
  3. Add your entire HTML, iFrame and CSS code to this folder.
    Note: Remember to pre test your code to make sure that it’s free from any error (s) and can run smoothly on any web browser.
  4. Open the HTML file and you will get a Preview button to see the preview of a live web-page.
  5. Copy and share the live URL from the browser address bar.
You are free to create as many web-pages as you want but remember, Google Drive is free for only 5 GB of storage, and after then, you need to pay for it. Though, I do not recommend to use this for running your business or product websites.

Cheers!!