3 Easy Steps to Deal with Windows 7 Black Screen Computer Error’s?

Windows users were getting hectic errors while using the system which causes a lot of headache for them & requires their tough time to fix it. One such kind of tragic condition is called 'Black Screen of Death', which can happen either after starting the system or updating system drivers. After which, you'll become completely unable to regain access to your precious computer data.

Sometime dealing with such black screen computer error's are very easy but the condition become worse when your system is suffering from some serious errors or damages and couldn’t be fixed easily. So, let's look on this matter more deeply to find out the exact causes behind this errors and possible solutions.

Reasons & Solutions for Black Screen Errors:


Microsoft has investing causes behind this error and has officially announced about ‘Black Screen Error’ on 25th November. This error can happen due to of various reasons such as malware attack, registry corruption or faulty/outdated video driver. Common symptoms of getting black screen errors is system freezing, hanging or loop restart or sometime, complete system failure.

Prevx the research company and Microsoft Gold certified partner confirms in its rese
orgaorgrch that this error will not only remain to Windows 7 but can also affect its predecessor such as Vista, XP, 2000 etc. 

Read below mentioned steps to find out how to deal with black screen computer errors:

Update Video Driver

Most common reasons behind such black screen errors are due to faulty or damaged video adapter. In that case, simply updating the driver will fix the issue.
Note: To update your video or display driver, you need to be logged on to Windows either normally or in safe mode.

1. Press CTRL+ALT+DEL simultaneously or right click on task bar and click on Start Task Manager
2. Click on Processes tab and find explorer.exe
3. Select explorer.exe and click on End Process
4. Click on File and then New Task(Run)
5. Type explorer.exe in the open text box and hit enter.
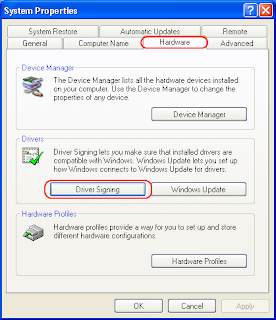
6. Click on Start button, type Device Manager in the search box and select device manger after system completes scanning.
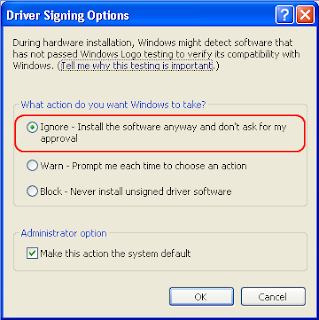
7. Find your system display adapter, right click on it and select Update Driver.
8. Restart the System.

Fix Damaged or Corrupted Registries

Interestingly, system registries also dominate in majority over your PC Black screen errors, especially when it gets corrupted or damaged. You need to tweak with your system registry settings and fix the desired problem but professional help is recommended.

1. Click on Start, then Run and type regedit in the opened text box
2. Navigate to the following folder HKEY_LOCAL_MACHINE\SOFTWARE\Microsoft\Windows NT\CurrentVersion\Winlogon, to see that explorer.exe file were present or not.
3. To do so, select WinLogon and click on Shell. The Shell value should be explorer.exe and if it's not double click on Shell and type explorer.exe in the open Value-Data text field and hit OK.
4. Close the Window and Restart your system.
   
Restore System

This process is applicable and much helpful when the system becomes unable to boot in normal mode or shows black screen every time you start your system just before the login screen. Simply restoring the system might resolve the issue and set's everything to any previously successful running state.

1. Press and hold the F8 keys just after starting the system or before Windows booting screen appears
2. Advanced Boot options screen will appear, use up & down arrows keys to select Safe Mode
3. Now your system will boot in safe mode. You need to be logged on using Administrator account in safe mode to restore your system
4. Click on Start logo, type System Restore and hit enter. If you are prompted to enter administrator password, enter the same and click ‘Next’.
5. Choose any previously successful system created start up point and click on Finish.
6. Restart your computer normally and see if the error were goes away.

If none of the above described methods had helped you, you can take help with Prevx Black Screen Fixing Steps by downloading its applic
orgorgation. You need to download, install and run this application after which, the software will automatically find the probable causes and fixes them instantly. 

Handling error code -8003 in Mac OS X?


"The operation can't be completed because an unexpected error occurred (error code -8003)” . The warning in other words may sound like this: You don't have enough privileges to perform the delete action.

Secure Wipe OS X El Capitan files with Mac wiping utility

The above code is one of the strange error codes occurring on Mac not letting you trash certain files. In spite of all your efforts in deleting the files from the trash you still find the trash filled with the files. In order to solve the issues the user firstly reacts by restarting the Mac hoping the same error won't be repeated again. However it is kind of hit and trial method which mostly sometimes works but on the contrary it is noticed that even the restart won't work at all.

Reason for error code -8003:

The error states that in Mac OS X you don't have enough privileges to perform a deletion of the file. This may be due to the files are present on an external drive but it is noticed this error bothers files even present on any drives. Another reason for the same error could be that the files present in the trash can are locked.

Possible Solutions for error code -8003:
  • Open the trash from the finder to view the entire files present in the bin.
  • Hold down the Option key and Click “Empty Trash” to do the rest of the job.
  • Problem still not solved then attempt to delete the files through “Secure Empty Trash”. Many of the Mac users may not know but this option deletes the data from the Mac hard drive permanently through wiping algorithms. The spaces of files once deleted are immediately overwritten by meaningless data to avoid recovery of files at later point of time.
Solution through Terminal:
  • Goto Applications->Utilities and click Terminal icon to open.
  • Upon opening the terminal type the code sudo rm -rf ~/.Trash/ and hit enter.
  • Above measure may sound sufficient to tackle the error code-8033. However, if all of the above measures fail to solve the issue then there are utilities which can be used to get rid of the trouble. You can select a wiping utility to erase the files, even locked files through right-click and selecting the files for permanently deletion.

How can I fasten my old Mac OS X?

At a certain point we have asked this question to ourself and many times we haven't been able to answer it correctly. When I bought my first Mac Mini home I felt like sitting next to a home version of a super computer. It was that fast and advanced. But a year has gone by now and today I feel like sitting next to a sluggish OS X. So what happened to my Mini during a period of year? Out of 365 days if I was able to work on say 300 days then I would have 10000+ times performed read/write operations on hard drive, install & uninstall plenty of wanted & unwanted applications. I truly belive now my Mac hard drive needs an over-hauling and for that I am going to implement several tips and will also take the help of a tool if necessary.

Test Machine Specifications:

Mac Mini OS X 10.7.2 Lion
500GB Hard drive &

1) Starting with Mac Restarts: My Mac remains ON for almost the day and during the first half of the day I don't find any of the speed complications. But after I had my lunch and I make my way back to the machine I certainly feel sluggishness playing around the OS X which is very undesirable. To fix this time-being sluggishness the OS X needs to be restarted. So, close down all the application and restart the Mac for further work. You will definitely feel a good difference. The reason behind a restart is simple: because many of the already on applications consume lots of memory space and makes the OS X to respond even slower.

2) A Clean Desktop looks good: Not only a clean desktop gives a refreshing feeling but it also help the system get rid of sluggishness that is caused by plenty of desktops icons.

Image Source: Cult of Mac

The above image is what an example of a cluttered desktop of a Mac user. Hopefully you and me don't prefer to have a desktop like the above image. Literally, It require even less than 15 minutes to organize a desktop and manage the unnecessary icons.

3) In any OS X, you can set the login items in the System Preference menu. Doing that makes the system to start the set items once you login into your Mac. Other than the usefulness of startup items in System Preferences, the same can be the cause of OS X's poor speed. If anyhow, some unwanted items get added to the list then it will certainly consume more of the CPU usage which in turn slow down the system. We as a user never know, after a new software installation the items might add themselves to the login-itmes which now needs to be moderated on regular basis.

4) Are Widgets really a necessity: Installing newly launched widgets and applications are one of the famous activity done by many of us. Widgets entertain us a lot but the fact can't be denied that the same of them eats up good amount of computer memory resource in the background. Here, I do not meant to get rid of all the widgets you have ob your Mac but cutting down their numbers, removing unwanted widgets will definitely help the Mac have some more of the space that were early consumed.

5) Time Machine needs to be schedules: I have gone through several forums where users are dissatisfied with the slow time machine back up process. Here's how you can set the scheduling of a time machine back-up:http://osxdaily.com/2012/02/02/change-the-time-machine-backup- schedule/. This will help you to take backup during non-working hours and would not halt when you sit on your system.

6) Cleaning a hard drive: In OS X, many of the settings have to be changed to grab some more free space. Similarly, hard drive is a huge segment where we can regain Gb's of free space by performing the below following activities:
  • Wiping out the pool of stored caches and temporary files from volumes,
  • Removing useless applications from the hard drive which are not accessed for months and does not add too user's productivity.
  • During a software installation, many of the languages get installed on the system and other than the default language all of the rest are unnecessary. Removing these unwanted packs of language files can make the OS X take full advantage of the free space.
  • Duplicate files and data are a complete mess which needs to be removed at first glance. Not always, but many a times same file or software is saved on different logical partitions which is a burden on the hard drive. Here, the user can also choose a cleaning utility to dig out bunches of duplicate files from the Mac hard drive.
  • With help of a speed up tool, the leftovers and trashes on the hard drive can be located for deletion.
Before I end this article, I would say that the above tips helped me get the crap cleared from my Mac Mini hard drive and have gained good amount of speed and performance back on Mac. There are plenty of more tips to implement which I would share in upcoming posts.

How to safeguard the private data during a computer repair?

Just in time you encountered a problem with the system and don’t know how to fix it. You make a call to the support and they recommend you to leave the computer in their service station for few days. Isn’t it a general scenario during a computer visit to the service center? I remember when took my brother's DELL Vostro 1410 Laptop to the service center that took it for a whole day and returned me with the ready machine next day. I wondered, although the technician being an honest person doesn't bother to look into your hard drive. But what if someone in curiosity or a person with bad intention tries to access your photographs, images and other confidential data during the repair? If it occurs, this could be very nasty for the user.

I am sharing some of the information through which the user can prevent the data getting into someone’s hand. Here's the process:
  • Take backup of the partition.
  • To take the back-up use either cloning, imaging.
  • Mac users can take time machine backup on an external hard drive.
This will ensure that even your hard drive gets tampered during the repair; you still have the access of your data through proper back up measures. But let’s not forget the data is still in open for any third person to gain access. Now what to do with the data that is accessible even during the repair.

  • Organize a small data management campaign and prepare the list of private data needs to be secured.
  • When all the data files, even the smallest of them is complied, make them write either on a large capacity BD disc, an external drive. If you have server connectivity then it’s too good to store data safe and secure over there.
  • If you are a cloud user then use the online data storage facility.
  • Formatting the hard drive will definitely erase the data from the hard drive but to guarantee data deletion from the drive one must secure clean it.
  • How to secure wipe the data from the system: To do so hard drive needs to be erased using several passes. These passes are provided by the set of wiping algorithms that ensure safe deletion of the data beyond the scope of recovery. Here, Mac & Win users can run a third party wiping software to erase the confidential data through several passes.

RAID 5 Data Corruption: Symptoms & Precautions

Since the discovery of RAID (Redundant array of independent disk) Data storage technique, user follows the trends of having mass storage capacity as well as ability to recover his/her data from any failure conditions. The most widely used and famous RAID Storage technique is RAID 5, require minimum of 3 disks and have some key features, such as:
  • Fault Tolerance means increase data protection and integrity
  • Increase storage capacity
  • Faster performance
Many users believe that RAID drive has been made to not fault but in reality, it fails. In most of the cases RAID 5 array become failed or corrupted due to various unavoidable facts. For details, look around the topics mentioned below:
  1. When one hard drive attached to RAID servers become failed, eventually the RAID arrays will start to run in degraded mode. After which, other disks in the array will have to suffer an equal stress which results in failure of second hard drive. So, consecutive failure in two drives attached to RAID arrays will leads to RAID 5 array failure.
  2. RAID 5 controller failure
  3. Any power surges, occurs with RAID 5 controller can malfunction RAID elements, RAID configuration or the hard drive itself.
  4. Sometime, in an attempt to rebuild failed RAID arrays, you may enter wrong RAID parameters, which causes a sudden breakdown and complete system failure.
  5. Logical corruption such as virus/malware attack, hard drive crash, human errors, RAID partition table corruption etc. Though, RAID Drives are made with fault tolerance which protects only physical failure but could fail in case of logical failure.
You should avoid doing any of the following activities to stay away from any data loss situations:
  1. Stop using RAID drives in case of a single hard drive failure. Any remedial actions on such conditions will leads to damage on second hard drive and failed RAID arrays.
  2. Don't try to remove or alter any hard drive attached to RAID arrays while system is performing any read/write operation.
  3. Always remember or note down the various RAID parameters which greatly helps to successfully rebuild corrupted or failed RAID 5 arrays. The possible required RAID parameters could be :
  • Disk Order
  • Stripe Size
  • RAID Header Size
  • Parity Rotation
  • Parity Delay
   4.  Do not operate any chkdsk or similar disk checking operation, as this command will run 
        in write mode and heavily responsible for overwriting the failed hard drive data.
   5.  If you've loose any important data from failed RAID arrays, it's advisable to wisely 
        choose any data recovery software.
 

P.S.: To recover data from failed RAID arrays using RAID recovery software, you are 
        also required to enter the correct RAID parameters which I have already described in #3. 

Other Useful Readings: 

OS X Mountain Lion set to roar. Coming this July 2012


Mountain Lion:Apple.com

The wait for Mountain Lion seems to be over as Apple Inc. has officially announced the new OS to be released in this July. The Apple Inc. made many mac owners curious in the beginning of the year 2012 by announcing the OS X M.L. to be released in summer time. Just wondering how many Mac users will go with the OS X update on their Macs. The numbers of users downloading Mountain Lion from the App store can be huge.

Have you noticed one thing that Apple is emphasising over. That's combining the features of its iPad, iPhone, iPod & bringing it to the Mac OS X. This is a smart marketing strategy by the Apple because its line of iPods, iPhones & iPad are already selling like hot cakes. And, the user also get a chance to enjoy their favourite application, features from these devices on Mac OS X.

So lets not wait and take a glimpse of what the Mountain Lion has to offer this July:

iCloud Integration:
As the concept of online storing & accessing data has become a fashion, M.L. brings the iCloud feature so that you can use the data & features of iPod, ipad & iphone all together on your Mac OS. You get access to your mailbox, phone-book contacts, doc files, notes etc. from iPad, iPhone, and iPod. And believe it and praise the synchronisation done by the iCloud, you make changes on the above features on Mac and it gets automatically updated on your other devices. Similarly, you change using any of the Apple device and get the update on Mac OS X.

To enjoy the service, just sign in once with the Apple ID & it sets up in your Apple OS & devices.

Reminders:
You will feel like having an extra brain to remember the important dates & work to accomplish. Add & manage several lists & keep updating them. With iCloud, the users are alerted for the reminders & deadlines as they approaches. The reminders are updated on Mac and other devices so you don't miss the bus.

Notes
:
The purpose of notes is to write it down whatever comes in your mind so that at later point of time you don't' forget. But what makes this nots feature different from an ordinary note program is you can customize the notes beautifully with images, attachments etc. Can quickly share your note in your circle by an email/messages. Paste the urgent notes on your Mac OS desktop & with iCloud, a note either created or updated is shared on your iPhone, iPad, and iPod devices.

iMessages:
Here they come on Mac OS X making conversation more easy and interesting. With iMessages, Apple devices get synchronised that means if you say hello to your friend from Mac you can continue the further chat from an iPhone or iPod touch. Share your media easily with imessages.

Notification Center:
Every time there is something new a pops welcomes you. You receive notifications of mails, messages, apps, software update etc. Notifications don't stay for long on your desktop, they disappear quickly so you won't get interrupted.

Power Nap:
A Mac wakes up doing your job even when you send it to sleep. Mac doesn't stop updating your calendars, mails, contacts, notes, reminders even on sleep mode.

Dictation:
Convert your words into text by the use of in-built microphone.

Facebook:
We all love Facebook because it is the hottest thing on the web. Sharing & caring for your friends and circle is tips away as the new OS X is more FB friendly. Share images, links & add, read comments. Notifications let you update your status right from the notification centre.

Tweet with Mountain Lion:
To tweet simply sign once & share links, photos from safari browser, iphoto & Photobooth.
Beside all this there are some other exciting features to roll on:

AirPlay – Your Mac OS is conneced to the Apple TV.

Gatekeeper: The built-in application which guards the OS X from downloading malign apps & software.

How To Disable Error Messages While Installing Drivers

While installing driver for any purpose, Your Windows XP system might prevents you to install the software driver, specially when it is not signed by Microsoft. If you are techy guy and need to install many driver for your purpose, this error may annoy you to peak.  The default error messages could appear like this:

“The software you are installing for this hardware: “hardware name” has not passed Windows Logo testing to verify its compatibility with Windows XP”

Tough, I have found some steps to manually disable any error messages. Doing this will easily install as many driver as you want without showing any error messages.
All you need is just to follow the below mentioned steps:

  • Right Click on 'My Computer' and choose the option 'Properties'.
  • Go to the 'Hardware' tab and then click on 'Driver signing' Get idea from the below image:                                                                                                                         
                           
 
  • Tick the radio button stating ' Ignore – Install the software anyway and don’t ask for my approval.'
              
                             
That's it. You are all set to go. From next time onwords, you don't need to close those annoying error messages and can install any desired software.
 
All the best!!

How To Test Computer Memory Problems in Windows Vista

If you are using Vista and suffering from some memory issues, then here is a good chance that you can fix it on your own and it usually takes less than two minutes.

To do so, follow the simple steps mentioned below:
  1. Click on Start and type 'Memory' in the search box.
  2. A program named 'Memory diagnostics tool' will be  highlighted. Click on it to open the program.
  3. Pop up Windows will open which ask you to perform the memory test immediately or the next time you restart your PC. 
  4. Chose the preferred option. For the time being, you should click on 'recommended' option to run the test immediately after restarting the PC. 
  5. After choosing the recommended methods, you will see a Windows named 'Vista Memory Diagnostics tool'.
                         

     6. You can also do the same thing using command prompt. To do so, Select  
         'Advanced start up option', on next screen you should probably see the 
         option of memory diagnostics utility as dictated in the picture below:


           Note: To go to the the above screen, Simply holding the 'F8' key.

Please post your comment below if you couldn't able to solve problem on your own or facing any other problem related to 'Windows Memory diagnostics utility'.