How to Move Windows 8 from HDD to SSD, the Easy Way?

SSD can give your computer a superb boost and make your applications start almost instantly unlike HDD’s where applications may take more time, depend on the space filled and memory it requires to run. However, hard drive is still a top runner when it comes to storing bunch of files and user data but may results in low performance over time due to degraded equipment. So, it’s better to move your current OS from the old HDD to a brand new SSD to get maximum possible speed and use your old drive to store as much data as you want. 

Clean installation of Windows in new SSD would be much easier but may force you to start everything from scratch such as installing all the programs once again, copy data to the drive, customize windows the way it was before etc. So, if you don’t want to take that much headache and simply want to put everything from the old drive to new SSD, we’re describing few simple things to get this done easily.

What you need?
You’ll require SSD drive to use as a destination device and the old drive as a source drive to migrate Windows 8. Keep in mind that SSD prices are almost double as compare to the normal hard drives but you can take a low capacity solid state drive (at the cost of normal drives) to put only Windows and install programs you can’t live without. However, make sure the SSD capacity is equal or greater than the size of C: drive. If the C drive is too big, you can take backup and then delete files from c:\users\. We’ll need this backup later to restore everything back to the old drive. Make this backup copy as updated as possible, just to be sure that you’re not missed anything updated recently. You can use external hard drive or the spare removable storage device to secure the backup copy.

Note: As the process is little tricky and anything could go wrong. Keeping a copy of professional Windows data recoWindowsvery software is recommended to recover any lost, deleted or formatted data. 

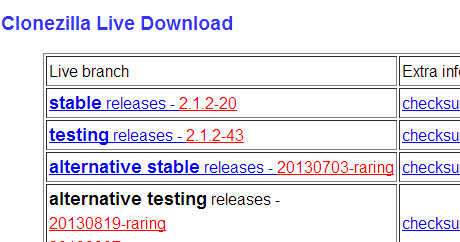
We’ll need a free Drive Cloning tool, called Clonezilla also known as Clonezilla live as you’ll need get an ISO copy of Clonezilla and thereafter, have to create a bootable USB or CD/DVD. Once you’ve opened the website, click on stable release and the ISO file will begin downloading. Burn the downloaded ISO copy to USB or bland CD using imgburn.
                            
                 
During ongoing cloning process, Clonezilla tends to format the destination drive. So it’s recommend to create a prior backup copy or move entire data to an external drive such as USB or flash drive.

Note: Before continuing with this migration, make sure that you’ve cleared enough files and defragmented the drive to get some extra free space. This is to ensure that the current partition size is at the lowest and could easily fit to the solid state drive.

How to Migrate?

Hook up your SSD to your computer in the available slots and remove hard drive after taking updated backup.

Restart your computer and the created USB or CD will take care of the rest such as automatically boot your system using the same and provide various options to clone HDD and transfer it to SSD. If your computer didn’t start automatically using the bootable USB or CD, change the boot sequence from the BIOS option.

After choosing the display size and preferred language, you’ll get an option to start cloning the drive using Clonezilla.

Note: Choose Device to device cloning option when screen appears to choose the desired cloning method.

Once you’ve completed with SSD migration, reconnect the old drive back again and format it to erase everything on the drive and restore files from the backup copy we’ve created previously.

That’s it. You have now Windows 8 installed on your computer with spare drive left to store almost anything else you want. Just make sure to thoroughly read your SSD user manual to keep it maintained and free from troubles.

Disk Repair exercise on Mac OS X

A Mac when all in good state of health runs like a charm. It follows your command request and delivers the desired output. However, if a Mac is behaving in an abrupt manner from past many days & you are really concern for its health then don’t waste a time to run Disk Utility. The disk utility is a clinic for Macs where you can run few test to determine the cause of its illness. The First-Aid feature is capable of verifying the individual as well as the entire hard drive of the OS X. It can also adopt corrective measures to put your troubled disk back to work. A below test ran on one of the Mac disk ends up suggesting the hard drive (volume) is absolutely fine. It requires no further repair or attention from the
user. This is always a sign of big relief.  

1

Unfortunately, this sign of relief will not appear on the user’s face if the below report is delivered by the disk utility. As the image suggests the First-Aid tool has found numerous concerns on Mac disk. These concerns are denoted by red lines, which are an indication of danger. These reports marked by red lines clearly indicate the problem persisting in that particular area.

2 

The Disk utility will clearly mention to run a repair immediately and dump the problem at this point. In no time, user can click to Repair Button to fix the faults.

“”Note: The Mac OS boot volume can be tested for disk permissions. However, this option is not available for rest of the Mac volumes.””

How effective is Disk Utility? Disk Utility is something that can resolve the disk problems on your Mac either instantly or may not fix any corruption. Yes, the reason I said ”May Not” is mostly cited when disk corruption is severe. The hard drive may have gone through series of corruption in catalog files, volume bitmaps, even a corruption of directory structure. Disk utility on Macs boot volume verifies and repair permissions for applications that may have turned bad. The applications may be of OS X and of 3rd party software vendors. You will find people recommending running repair permissions feature at times when Mac is slow or an application is not opening. The same is suggested even when a Mac disk goes through corruption. Although effective but repair permissions fails to resolve any of the major corruption that might have crippled a Mac disk. This major corruption can again in the form of directory corruption. The same error is identified by “Invalid Node” error, which in turn is quite unpopular amongst Mac users. The family of Invalid Node error extends to Invalid Entry – Count, Length, Key, header & so on.

Need arises for a proficient disk repair software? Soon you realize the Mac is not going to be treated by the Disk utility, you have to opt for a disk repair utility. Volume repair software will scan the hard drive of the computer and will create a new directory structure for it. The moment it finishes fixing minor bugs in the directory or recreates a new one, you can have your Mac back & running. Not only this, disk repair software for Mac also heals variety of Invalid Node errors. Why you may require a bootable DVD?  As we learn above, that errors minor in nature will sorted out by the Disk utility. But a boot disk of Mac facing larger damage may not be treated efficiently by the disk utility. In that case you may require a bootable DVD of your Mac to fix it.  The bootable DVD can be created with the help of a repair utility. Once you select your Macintosh OS drive you are prompted to create an image (or DVD) to boot the Mac.

3 

The above is a screenshot of Stellar Volume Repair that is suggesting the user to create a boot DVD in order to proceed with the boot repair. Once the DVD is created, it will boot the Mac and hard drive will become a secondary device. The user can now perform the directory rebuilding on the said volume.

5 Reasons to Must Have Linux Live CD around Your Workstation

Linux is an open source platform and useful to keep your computing environment highly secured as compare to other OS manufacturers like Windows & Mac. There are many Linux distributions available to use Linux either in command or GUI mode, which mainly consists of Linux Kernel and large collection of software applications such as media player, spreadsheets, word processor, calculator etc.   

Using the Live CD (Any of the Linux Distros), you can run an operating system without even installing it and start exploring all the features. So, if you’re a novice computer user or just wants to try Linux, Live media CD is there for you. You can find a list of available Live CD list and choose any desired Distros.

This article includes some of the major benefits of having Live CD at your workplace that helps you in getting out of troubles with your PC or provides secured environment while using online banking facilities and so forth.

Before telling you the benefits of having Live CD, You’d better learn first about what exactly a Live CD is and how it works?

Live CD is a ‘ready to boot’ and use or so called operating system and can able to run on whatever computer system you were using even in the absence of internal hard disk. Live CD will run from the computer’s internal memory (RAM), so avoid you to perform any write operation around the internal hard disk. Don’t worry about the saved files or programs on your computer as Live CD or DVD or Live USB doesn’t require installation and therefore, leaves the computer settings and saved files behind.

Developers and experts uses this media to test newly released Linux distributions or to heal sick PC’s.  However, you can create a Linux Live CD using an ISO image file of a Live CD available on the various Linux distributions website such as Ubuntu, Knoppix or Puppy Linux. You can create bootable Linux Live CD from the downloaded image file using ISO Burner Software.

These are the three most popular lightweight Linux distributions that come with list of software packages. After downloading the ISO files from any of the aforementioned Linux distributions, you can burn it to CD, DVD or create a bootable USB flash drive. 

                                    Live CD Distributions Ubuntu Knoppix Puppy Linux
Note: Make sure that you’ve copied all your data successfully before creating a Live CD, if you’ve chosen to test Live CD using USB flash storage media. Below are the reasons that enforces you to must have a copy of ready to boot Live CD:

Reasons #1. Troubleshoot Problems with Windows
Definitely, Windows covers the largest area in operating system market share (around 92%, rest covered by Apples, UNIX, Linux etc.) and majority of users prefer to use it either at workplace or home. However, Windows has lot of exploits and security breaches that sometimes make windows inaccessible or completely fail to start at all and the possible reasons could be registry corruption, file system damages, virus/Trojan attack etc. Now what to do to get your stored files back and fix errors? Live CD comes with unique functionality to automatically load system drivers and OS capability as well as allows users to boot and navigate around your hard disk partitions. Therefore, you can easily copy your stored files to external storage media and perform remedy actions to troubleshoot windows.

However, sometime window gives error due to off failing hardware and similar problems where Live CD might not to the magic. So if you can’t able to boot using Live CD on the failed Windows, check your hardware first and seek for professional help if the situation seems tricky and out of your reach.
Reasons #2. Recover lost or deleted files
Deleted or lost files from the Windows system have high probability of recovery as the existing file system (NTFS) tends to keep a copy of the deleted files into their MFT (Master File Table) as long as the space is not occupied by new files. Live CD could help you to recover Linux data even from the failed hard drive and similar storage device where navigating through explorer window isn’t possible. In case, the drive is physically damaged and there is no other way left to recover data, try to image the failed drive and perform data recovery from the image. Please note imaging the drive will leaves documents or files that is damaged, virus infected or lost their properties.

However, it is strongly recommended to use another storage device of same or higher capacity to copy/save the recovered files. You can find more details about step by step recovery using Ubuntu Live CD on official website.
Reasons #3. Secured Banking Using Live CD
According to recent report organized by independent agency, users has higher possibilities of losing their confidential banking details if they’re using Internet Banking online on Windows. Though, experts would never recommend to do this and suggests to use Linux if you don’t want to be a victim of phishing or internet fraud.  

As already stated that Windows were used in majority in all over the world, most hackers or bad programs tends to create and circulate malicious programs only for Windows. Malicious programs can easily got access to the victims Windows computer and makes it easier for hackers to see all the stored files, see browser history and used credentials to access online bank accounts. Whereas, non-Windows OS such as Linux have less vulnerabilities to get caught by virus and thus ensures, much safer computing environment. Live CD provides fast and easy method to convert your Windows computer into Linux and perform the desired actions. Thereafter, you can easily remove or unplug the Live CD/USB and use your Windows computer as before.

Reasons #4. Not Resource Hungry
One of the most famous Linux distributions is Puppy Linux, which runs quite well on older hardware and doesn’t demand high computer memory to run programs properly. Unlike Windows, it won’t always hangs up or freezes at a single screen and instead, provides fast output to any generated requests.

So if you’ve quite old hardware configured computer machine and doesn’t want to invest in upgrading the hardware, you could make it your Linux computer and start taking all the benefits of using Live CD.

Reasons #5. Clonezilla Live
Clonezilla live comes as a standalone Linux distributions and serves great purposes like imaging or cloning failed drive and start recovering your precious files from created copy of image or clone. Clonezilla tends to clone only used blocks inside the drive and thus, provides fast cloning environment. Clonezilla supports list of file systems for Linux, Windows & Mac.

Solving Minor Errors on Mac OS X?

Below are the collections of few basic Mac OS X errors that come out of nowhere and tease the user to some extent. The first reaction to these errors is certainly tensed but most of them can be solved with the help of few basic adjustments.
  • When Mac says 'No available applications to open it?'
Though this error message is quite minor in nature but many times it causes the user to go complete nuts about it. Safari is an built-in OS X web browser and can't open an executable application on its own. Safari locates the appropriate or associated application on the Mac OS X hard drive to be most suited for the downloaded applications. Anyhow, when Mac's browser could not locate to find such an application that will help execute the application, it out of nowhere prompts this error message.

For Instance: I am in the process of downloading a Photoshop file that requires Adobe Photoshop to be pre-installed on my Mac. As the Photoshop application is missing out the OS X the Safari would not hesitate to display this error.

You can immediately resolve this minor error by identifying the file extension of the downloaded file. This is simple and even a novice can do without any technical guidance. Check out the file extension from its properties. If suppose the file extension is .psb then it’s an Adobe Photoshop image file and you now know which application to download from the Internet.
  • When Mac says 'You are not authorized to open this application?'
This error goes on to display on the Mac screen when the application is from the developer which Apple don't trust. With the help of minor settings in the System Preference you can help eliminate this message.
  • go to apple logo and click system preference
  • double click security & privacy icon
  • See the first tab 'General'. Click the lock below to unlock it. It will ask for the password (if any)
 

  • Select the third option which is ‘Anywhere’. This allows you to download an app from any developer whether trusted or not trusted by Apple Inc. Actually, doing so is compromising with the system security and be performed only when you are critical about it.

The other two options in the Security & Privacy Window allow downloading apps only from the Apple App Store and few identified developers respectively.
  • When Mac says 'Your Start-up disk is almost full'?
Consider this error message as a warning of start up disk running out of free hard drive spaces. Mac OS is loaded on to a particular volume which helps boot the OS whenever it is ask to do. The OS X all the time needs reserve free spaces to run the execution of the Mac applications perfectly. In the absence of these free spaces, the OS X will begin to respond painfully slow which is not at all good for a computer system.

If you have sight this error message quite often then you have to gear up and perform cleaning task for your boot volume. You can begin cleaning any possible junk and duplicate data that is eating up the spaces on your boot volume. Be very sure not to delete any system file in a hurry else you will end up in a bigger trouble.
  • When Mac says: “Not able to install abc.xyz on Mac”?
There are some technical points to what caused this error to flash on your Mac OS X. Firstly; the hardware of the Mac OS X may be outdated to run a newer application. This is quite a common thing with the PowerPC machines that are unable to launch an Intel based OS X applications. Secondly, even if you have an Intel Mac at your place, its OS X could possibly be the other reason of installation denial. To get the things done, you should have an upgraded Mac with Intel processor and also the supported OS X for the application.
  • When Mac says “The operation couldn't be completed. (OSStatus error – 67049.)”
You must have encountered this strange error on OS X Mountain Lion (10.8) and also on Lion 10.7.5. Remember, Apple introduced Gatekeeper to secure your Mac OS X from malicious apps that causes nasty user experiences. The gatekeeper monitors the applications that are downloaded from the Internet, mostly from the unidentified developers.

Solution to overcome this error is very simple and all you have to do is repeat the steps suggested in the second question which says - “When Mac says 'You are not authorized to open this application?”
  • When Mac says “The operation can’t be completed because an unexpected error occurred (error code – 8003).”
This error indicates, you are unable to delete a file out of a trash can permanently. This may occur either due to lack of write privileges on the file itself or due to damaged permissions setups for the file. On any of the occasion this file would make trouble to move from the trash. However, you can try with the few helpful tips that follow below:
  • Macs have ability to secure wipe the trash can and delete all the contents inside it without possibility of recovery. All you have to do is press hold the mouse click on the trash can and hold down the Apple Key (Command) to bring out the option of Secure Empty Trash.

If this option fails to solve the query then turn up to a free utility that uninstalls or remove your application instantly. Read about the error - 8003 in detail.
  • What to do when Mac shows a 'flashing Globe icon at startup?'
A Flashing Globe on a Mac start screen looks panicking at early. But this is not caused due to any technical glitches or so. It’s just that a network drive has been selected as a startup disk and now OS X is looking for that drive. If the Mac locates the network drive then it will boot into this drive, else it boots back into its own OS X after few minutes of delay.

The delay however can stretch to few or more minutes but restarting the Mac in agony would make no changes to this process. It is advised to stay patient while the Mac end its search for the network drive and boot normally.
  • When Mac says "You are opening the application, ****, for the first time".?
Do you know how and when this error is flashed on your Mac OS X system?
After you ran a clean up utility like Onyx, this error is expected to put up on the Mac screen. As Onyx removes the system caches from the hard drive the OS X treats the application as a fresh one. As we know, Caches are nothing but bits of information and activities that are stored and retrieved when an access of the application is made. Upon the deletion of this stored information (caches) the OS X treats it as you are opening the application for the very first time. This is one of the major side-effects of system caches wiping.

There would certainly be more basic Mac OS X errors coming with their simple and effective solutions. Stay Tuned.

Windows 8.1: Leaked Features and Improvements over Windows 8


Windows 8.1, codenamed Blue is the first major update after Windows 8 and expected to arrive here for public review on 26th June 2013. It has lots of improvement and added functionality to mitigate drawbacks of Windows 8 such as start button returns, more personalization settings, improved apps store and more. Microsoft will provide this update for free to Windows 8 and RT users,available from the Apps Store.


Microsoft has implemented these updates to Windows 8 after receiving feedback and reviews from  the avid PC users and has high hope to provide uniquely build OS for both consumers and businesses. Needless to say, this time Microsoft won't want users to be disappointed and doesn't want the charms of Windows 8 get ruined.

Let’s talk about some leaked features of Windows 8.1, the upcoming version. In depth details about all the features will be available only after putting it in the live test environment.

Start Button Restored
Much awaited and long missed traditional start button is likely to be placed again in Windows 8.1. However, the functionality may differ as compare to start button in older version of Windows. New looking start button will alike as latest Windows logo and is placed at the bottom exactly where it exists in the previous windows versions.

                    start button in windows 8.1


However, unlike its functioning in previous Windows copy, press start button in Windows 8.1 a. k. a. blue will take user to the metro-style start screen or UI interface. Sources also confirmed that the so called new start button will not be visible on the metro-style/ Windows app store screen but can be accessed by hovering over your mouse to bottom left corner of the screen.

Though, user may able play with start button settings and can set it to open in old fashioned manner in which, all programs were available on the single screen. That will makes it easier for user to find installed programs that is not pinned on the start screen or has quick launch icon on the desktop screen.

Directly Boot into Desktop

This one would be best news for users who hates the modern start screen which appears just after starting Windows 8. In the so called “Milestone Preview” release of Windows 8.1, users may able to boot directly into the desktop environment instead of seeing the bogus UI screen filled with apps.

In this upcoming release of Windows, users have the full capability to bypass infamous UI screen and see their traditional desktop screen on startup. Metro apps screen distracted windows users to a great extend and becomes the primary causes of not so much success of Window 8.

Since the said features are still not confirmed by Microsoft, anything can be change when it ships finally to consumer hands.

Option to Set Personalized Wallpaper on Start & Lock Screen

There is much more added to make your PC more customized exactly in the way you want it to be. Now you can your own set of wallpapers to lock screen or change background and accent colors to start screen or apps screen. In the current running Windows OS, you can only change the color scheme and accents, but these limitation would likely be lifted with Windows upcoming release. For the lock screen, you can create a slide show of photos that is stored in the PC or hosted on the cloud. You can also take pictures using built in camera from the lock screen apps without logging in.

This is not over, to slim the confusion between start screen and your desktop screen, you can set your desktop background as your start screen background or vice versa and makes both screen highly looks alike.

Personalized Wallpapers on Lock Screen Windows 8.1

Customize Tiles with easy

Windows 8 has large tiles button at the start screen that looks ugly and distracts users by default. Things get even worse as the user won't provide with any option to make tiles large or small for apps or programs which they use most or which they'll use less frequently.

Many flexibilities were also added in customizing tiles such as rearranging group or tiles, select multiple apps at once to resize, uninstall or rearrange them. This will allow adding more tiles or pinning more apps to your start screen and starting digging them.

Unified Search Screen

Search feature in Windows 8.1 is completely revamped and feature rich. You'll get the search results from the web, apps, skydrive or settings in a simple to read, hierarchy form and available without tapping menu's that makes it easier for you to find almost anything, either from the web or from your local computer.

P.S. This search feature will use Bing search to fetch results from the web.

You can scroll down at bottom for search queries that yields many results. In Windows 8, user gets the results only from apps by default. To see results from settings or files, you'll need to tap it, available at the bottom of apps button.


Inbuilt apps get redesigned and Good Looking Windows apps store

Whenever we talk about tablet or smart-phone, we can't forget about apps. But now windows 8.1 have everything that you could find on tablet and much more to offer in near future. Windows 8 inbuilt apps like “Music” or “Photos” app were updated to helps you make the most of it in Windows 8.1 a k a Windows Blue. Such as, photo apps will let you quickly edit or adjust pictures or open them directly from other placed like mail, cloud server or camera apps. Whereas, music app is redesigned to help you quickly pick and play music from your great music collection.

Microsoft is planning to offer more inbuilt apps with Windows 8.1 which will launch very soon.

Unlike Windows 8 apps screen where only one app could be seen at a time, now you can have at most four apps on one single screen. You can also view the double window of same app on one screen, such as two running window of Music app can be seen on one single screen.

Windows 8.1 apps store would get also updated where large number of apps in top free, new release and picks for you would available that help you decide more suitable apps from the huge list. Apps screen will constitutes more information and an extra area is added to help you choose more related apps.


There are still much more to explore in this highly redesigned Windows OS. We can't predict about its success or failure as like Windows 7 which is a very successful release of Microsoft just after failed Windows Vista but can presume that It'll going to tougher the operating system marketing challenges as well as brings revolutionary change in the apps history. Let’s wait and watch!!!

How to salvage data from a Volume Corruption in Mac?

  • Mac OS X General Volume and Partition information
To know about your Macintosh HD and volumes go to Finder<Application<Utilities and Disk Utilities window. The left hand side of the disk utility windows shows all the partitions along with your Macintosh HD.
  • How to find if a volume is logically corrupted?
Even before the disk utility reports you about the possible logical corruption on the OS X volumes, you can judge by the absurd behaviour of that particular Mac volume. This absurd behaviour may include:
  • Inaccessibility of the Mac volume,
  • The volume may not be formatted or any other operations may not be performed on damaged volume,
  • The volume in disk utility may appear in light shade. This light shaded partition is indication of an unmounted Mac volume. The unmounted drive causes inaccessibility of data that is stored on it.
These are not all but some of the common incidents that begin to show up when one of the Mac volumes goes corrupt. The situation is calculated to be worse when the corruption case is of the boot volume of the OS X Mac. To assure the presence of errors on the OS X volumes go to Disk Utility and select a partition from the left menu. Now, in First-Aid tab click the verify disk to scan volume for errors.

Consider the above snapshot of a Mac volume diagnosed with logical corruption. In a normal scenario the disk utility scans the media and reports the final summary as - . But in an opposite case the disk utility will return each diagnosed corruption with a red line indicating 'danger'. Follow the summary of the 'Verify Disk' process and execute the below places button which is 'Repair Disk'. Many a times the disk utility volume report also indicates faulty disk permissions. So, you have another pair of Verify and Repair Permissions button in the same First-Aid tab. Both of the options can be used to check damaged permissions and ultimately repair them.

Types of logical corruption occurring on Mac partition(s)

It wouldn't be wrong to categorize the types of logical corruption of volume into these phases, namely:
  • Mac boot volume corruption,
  • damaged permissions on OS X,
  • Affliction to caches files and folders.
Most known reasons responsible for logically damaged Mac volumes:
  • The first and the foremost reason for logical damages would be abrupt system shut offs, including hard Mac shut downs,
  • Fallacious applications causing damages to OS X resources,
  • Directory corruption of the volume leads to complete inaccessibility of the data,
  • Although Mac is much secure against malware and viruses but possibility of logical failure of the volume can't be ruled out.
  • Other instances of volume corruption could be summed as – damage to catalog files, overflow extent, faulty journaled, errors in multi-linked files etc.
Types of Failed Volume error messages displayed by Mac OS X:

This error in particular is displayed when the header is corrupted in one of the Mac volumes.

'Volume Header needs minor repair
The volume Macintosh HD needs to be repaired.
Error: The underlying task reported failure on exit
1 HFS volume checked
Volume needs repair'


Initially start with the Disk Utility to repair the corruption, else follow below tutorial.

How to salvage data from a logically failed volume?

If salvaging data is on the priority then here are few tips you can implement to get maximum data out from a corrupted hard drive.
  • Get a demo version of the Macintosh file recovery program. Please careful not to go for a free recovery program as they are inefficient to salvage data from a corrupted hard drive. Yes, they sometimes may recover data which is deleted normally but don't trust such tools for advance operations like recovery from a damaged hard drive.
  • Scan your corrupted hard drive with the data recovery Mac tool & preview the recoverable files from the inaccessible volume. Once you registered for the tool to save the recovered data back to Mac, be careful you choose another destination.
  • In case your boot volume is corrupted then choose a data recovery Mac tool with boot DVD. This boot DVD can be of immense help as it will help you to start the Mac and then scan the boot volume with the file recovery tool. Once all recovered files are previewed you can save them on an external hard drive.  
How to resolve a failed volume?

Above is the case when salvaging data is on your priority. If any how you don't care about the data or you don't have any important data on that volume then you can go for repair first.

Free tips to resolve a corrupt partition on Mac OS X:
  • Jump to disk utility and hit repair disk for the damaged volume. The disk utility will surely resolve errors that are not gigantic in nature. In case the problem is too big for disk utility then follow the next step.
  • Get clone software and an external hard drive.
  • Once you develop a bootable clone media for your Mac you can then perform repair task on the volume with the help of a disk repair utility. This process can also be applied to Mac start-up disk in case of corruption.
How to timely find out a Mac volume corruption?

To timely find out a volume corruption or to prevent a possible corruption, monitor the SMART status of the hard drive. Also, put a habit of verifying and repairing Mac disk on periodic basis.

Let us not ignore some physical damages too?

Yes, a Mac disk is also prone to physical damages. Among most unpopular events of hard drive crashes are the bad sectors. Again, there is no utility present in Mac to figure out no. of bad blocks on the hard drive. You have to turn up to a non Apple utility to check out the presence of bad sectors on the Macintosh HD and partitions.

Once the 3rd party tool reports bad sectors on the hard drive, immediately use a clone utility to copy the media to another media. Don't worry the cloning utility as well as imaging doesn't replicate the bad sectors of the hard drive. It only copies the good and healthy sectors. While doing so you may loose some pieces of data that is located on to the bad sectors of the hard drive. But again you will be able to succeed in salvaging data from the entire hard drive in question.

Here's How to Fix “Can't delete a folder, require Admin Privileges”

At times, you may found yourself unable to delete any specific file or folder from your Windows like Windows 8/7/Vista/XP etc. Instead, you'll keep getting error like 'Access is Denied', 'Can't delete folder, not enough permission', 'Requires admin privileges to delete this folder' or any other file and folder permission errors. Remember, these errors are annoying and will not go away over time or the normal troubleshooting method. Alternatively, these errors will continue to arise even after you're logged in as administrator or have full rights to your system.

This issue may occur at any instance or after reinstalling a fresh copy of Windows. The common causes behind the aforementioned error could be:
  1. Third party faulty programs that try to remain control or gain access on any particular files or folders that you would want to delete.
  2. System files or any control panel settings accessing information from that particular files or folders.
  3. Any running application is using resources from that particular files or folder like settings and options.
  4. The file or folder containing targeted files is currently open in any other programs or applications.
Finally, how can I delete such folders or files?

There is an obvious solution to delete almost any type of files or folders that keeps throwing this error.  You will need to take control first on such directory and then tries to remove it. Follow the steps mentioned below to take control on almost any file and then remove it:
  1. Open notepad by going to Start > All Programs > Accessories.
  2. Press 'CTRL + 'S'' and name it to 'delete.bat'. Preferably, save this file to the desktop location.
  3. Type the following entries as it is in the blank text document and press the same button (CTRL + S) to save file again.
    “SET DIRECTORY_NAME="C:\Locked files or folders"
    TAKEOWN /f %DIRECTORY_NAME% /r /d y
    ICACLS %DIRECTORY_NAME% /grant administrators:F /t
    PAUSE”
    Note: You'll need to change the bold text as per your current problem directory. For example: “D:\delete files or folders” because you want to delete folder entitled ‘delete files or folders' residing in D:\ drive.
  4. Right click on the file 'delete.bat' from the desktop and select 'Run as administrator'. You'll now have full control over the problem files and folders and can easily go for deletion. You may also able to delete internal directory residing in such folders.

Alternate Solution

If you are bit experienced in working with Ubuntu Live CD, can use it to boot normally in Ubuntu mode, find, and delete such files or folders from there and choose to delete it. This time, you'll not be thrown with the same error messages as before.

Have you tried these methods and still facing trouble while deleting such files? Or, have an alternate solution to fix this issue, post your thoughts in comment section.

How to Refresh or Reset Your Windows 8 PC Using Recovery Drive?

Microsoft provides two great utility to help revives your Windows 8 PC problems entitled ‘Reset your PC’ & ‘Refresh your PC’. Reset your PC will wipes off everything on the PC and make your system like a new one. In other words, Reset your PC tool will reinstall a fresh copy of Windows 8 (replace old copy of Windows) and completely erase everything stored on the hard drive. This helps user to get away from any virus / Trojan infected or damaged PC to start everything from scratch.

However, if you've mistakenly erased something important files or documents while resetting your PC and want to get it back, can do so by using professional recovery software. This sort of software's have certain limitations like it can't recover data that's overwritten or can't run on the drive that is physically damaged or not showing in the software drives list. 

Refresh your PC tool will ensures the safety of stored hard drive content as well as keep all the settings and customizations intact. Standard formatting is used in refreshing your PC and any removed apps will be automatically reinstalled once the refreshing operation is completed.

Stuff you require

You'll need a recovery drive and Windows 8 Installation DVD to reset or refresh your PC. Though, if you don't have the recovery drive and wants to create a new one go through the tutorial of making a recovery drive in Windows 8 and create a new one.

Note: If you only want to reset your PC from within Windows, press 'CTRL + 'W'' to open search screen and type 'Remove' in the search text box. Select Remove everything and Reinstall Windows to launch reset your PC tool.

Getting Started with 'Reset your PC'

Running reset your PC from the recovery drive requires system restarts as the system can be reset only in Windows recovery environment (RE).

# 1

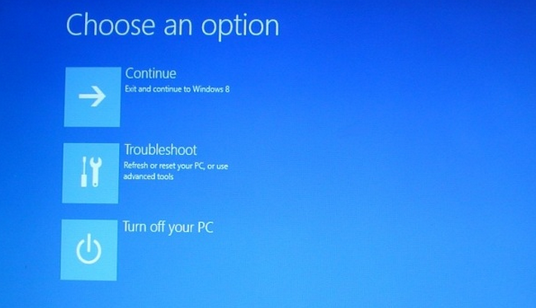
Connect recovery drive (the USB device which we've created previously) to your PC and restart your system. Now the system will boot from the recovery drive and gives you the screen as in the image below,


            choose-option-windows-8


# 2
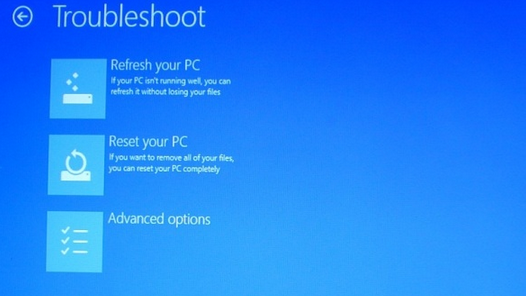
Select Troubleshoot tile from choose an option screen. The next screen constitutes three options: Refresh your PC, Reset your PC, and Advanced options. As we're going to reset your PC, you'll need to click on the Reset your PC option located at mid.


               troubleshoot

# 3
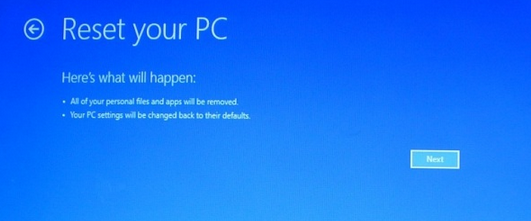
Reset your PC confirmation window will open to inform you about what will happen when you choose to reset your PC. For example all of your personal files and Apps will be removed; your PC settings will be changed back to their defaults. Once you're assured and decided to go with reset, Click on the Next button located at the bottom right corner of the screen.

               what-happen-after-reset

# 4
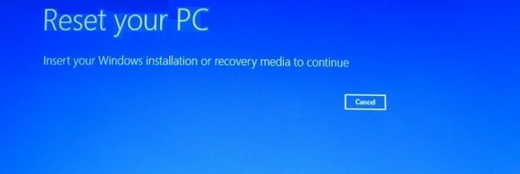
Locate the desired copy of Windows 8 OS (if you've dual versions of Windows 8) that you want to reset and click on it. Next screen will asks you to insert Windows 8 installation DVD. Remember to remove the recovery drive before inserting installation DVD as the system will starts many time during the whole process and keep plugging the recovery drive will causes unnecessary delays.

                 choose-next

P.S: Be sure to have installation DVD before heading towards this step.


# 5
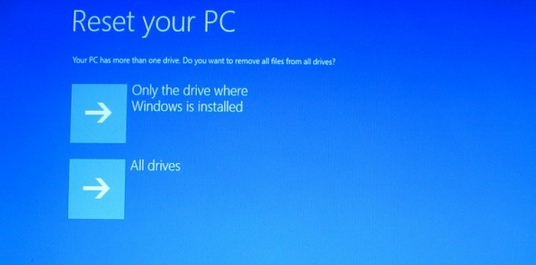
Soon after inserting the installation DVD, system will begin verifying media for its integrity and displays the next screen, which asks you to choose the drive to delete files such as the drive where Windows 8 is installed or all the drive/partitions currently partitioned in the hard drive.

              reset-PC-windows-8


# 6
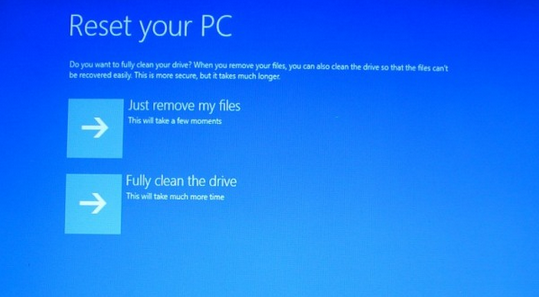
Next screen will asks you to choose the desired formatting methods such as remove files using standard method or permanently clean your PC. The second option is bit useful especially when you're trying to sell or handover your Windows 8 PC to someone else and wants to get ensured that the stored data is permanently deleted which can't be recovered even by using professional recovery utilities. 

            choose-method-formatting

‘Just remove my files’ option is fairly quick and uses standard formatting method to clean your PC. On the other hand, ‘Fully clean the drive’ will permanently wipe everything and insert ‘0’ information throughout the sectors and blocks of your hard drive and makes it impossible to recover anything from the cleaned hard drive.


# 7
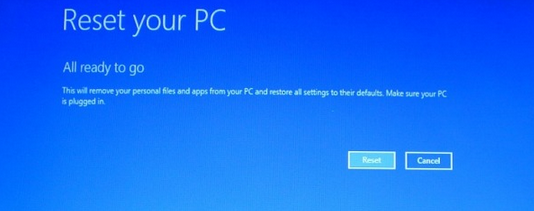
At last, setup is all set to reset your PC based on the finalized selections and parameters defined. Click on the Reset button to start resetting your PC. The requested action might take some time and gives you the percentage of operation that is completed on the black screen window. In the end, Windows will begin reinstalling all of the system drivers, settings, and screen options again to get your PC ready.

              ready-resetting


Steps to Refresh your PC

Refresh your PC is still a great way to resolve issues with your PC without deleting or modifying the stored data and installed Apps. To ensure that all the preexisting Apps were successfully installed after performing refresh your PC operation, this tool will automatically create a list of installed Apps as well as Apps which couldn't be installed that you need to manually install from the Microsoft Apps store. 

You can also run this tool from within the Windows as like reset your PC tool, though its always a good idea to run refresh your PC tool using the recovery drive as unstable or infected environment could cause tasks to be remain uncompleted or not at all and the problem might resurfaced even after successfully completing the refresh your PC task.

Note: As the first step of reset your PC is quite same, you can read it from the step #1 and instead of choosing reset your PC, you need to select refresh your PC from the step #2.

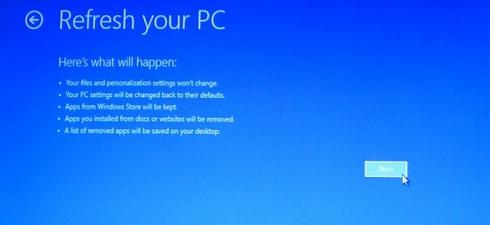
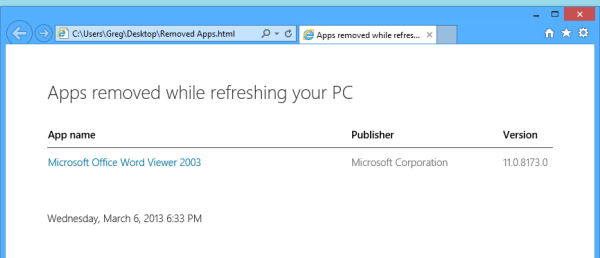
Select Refresh your PC option from the troubleshoot screen to begin refreshing PC. You can always check the information available at the refresh your PC screen to know about what happens once you choose to refresh your system. The options are like your PC and personalization settings won't change, PC settings will be changed back to their defaults, Apps from Windows store will be kept, Apps you installed from discs or websites will be removed, list of removed Apps will be saved on your desktop. Click on the Next button to proceed.


            refresh-PC-Windows-8

All of the rest steps will be same as in reset your PC except, refresh your PC will begin reinstalling removed Apps after successfully completing the aforementioned tasks. Refresh your PC tool lets you find the Apps which weren't installed during the aforementioned operation. Find the .html file entitled Removed Apps from the desktop and open it using IE or any browser you'd prefer to use.

 list-of-not-reinstalled-apps


Above image gives you clear view of how the removed Apps file will look like. Later then, you can go for installing the same Apps again either from the Windows Apps store or from the publisher website.

What would you like to do now?

You might already have clear understanding about which operation best suites to your need. However, I'd like to share my own opinion about both. Refresh your PC gives you great chance to bring back everything to its normal state without modifying or deleting anything (except PC settings). However, refreshing PC won't remove any virus or damaged registries inside the system and cause your system to fail or become unstable again even after fully completing the refresh your PC operation.

Where as, reset your PC utility will force you to start everything from scratch yet fixes all the running issues by installing a fresh copy of Windows. So you might not have to worry about anything malicious and start using fresh and faster Windows 8 again.

Both options were highly useful and recommended as well as plays unique role when anything goes beyond your control. It’s all up to you about weather you want just to restore system to its default or completely remove everything from your PC. Don't forget to add your own opinions and any pros or cons that you've found during any ongoing resetting or refreshing operation.