3 Most Infamous Windows 8 Drawbacks, My Personal Experience

Microsoft Windows 8 might be the biggest launch of the year and even in Microsoft's 30 year history. Microsoft's engineers were trying to develop a new generation and high speed OS since 2010 and finally cam with Windows 8 in 2012. However, with many improvements and splendid advantages over its predecessors, Windows 8 still have some drawbacks that can annoy users.

Over the course of two months (Since, Windows 8 was first introduced in the market), I've compiled a list of some drawbacks and reported to Microsoft forums to check and see if they can do something to remove those bugs. Perhaps, you didn't notice it or just enjoy those updates, but some users really got messed up with these and looking for alternatives, if there are any. Here, You can find a great list of infamous Windows 8 drawbacks along with its subsequent alternatives so that Windows 8 taste never feels wasted out.

# R.I.P. Traditional Start Menu in Windows 8
Microsoft has finally removed the widely popular 'Start' button in Windows 8, which is still being used to access several programs and control panel settings. Since the launch of Windows 2000, users get addicted to use this start button and finally after 15 years, Microsoft decided to remove this button in Windows 8. Lets have a look that what Chaitanya Sareen, Principle program manager at Microsoft says on this;
When we evolved the taskbar we saw awesome adoption of pinning on the taskbar. We are seeing people pin like crazy. And so we saw the Start menu usage dramatically dropping, and that gave us an option. We’re saying 'look, Start menu usage is dropping, what can we do about it? What can we do with the Start menu to revive it, to give it some new identity, give it some new power?
However, If you are one of those that can't afford using Windows without using Start button, can restore traditional start menu in Windows 8 using Classic Shell.

# Metro -  Start
Whenever you start your Windows 8 system, the very first screen you see is the tile based start menu items and programs where you could scroll right to see more apps or can arrange those by simple drag and drop operations.

However, this might be another pain point for Windows lovers where they are restricted to use either Windows 8 apps or switch to task bar (in Windows 7ish style) one at a time. Moreover, as soon as you start any apps from the menu, it will automatically start in full screen mode with no window bar or buttons to close, minimize or navigate and the only option you left is to drag it to the bottom (close it using alt + F4 option) or switch to another running application using the traditional app switcher shortcut (Alt+Tab). Means, you can't see what other apps are running without taking an action, mouse movement or keyboard shortcut as there is no task bar present when you use metro style apps..

The most worst thing is, you get no alternative for this metro style startup except to completely remove it from your Windows 8 PC.

[Also Read: Revert Back to Windows 7 From Windows 8]
 
# Automatic Live Account Sync.
While installing or upgrading to Windows 8, you'll be asked to enter live account for activation and Windows 8 will keep you logged in throughout all the Microsoft services like live, social accounts (if connected with live account), browser etc. If we keep these positive aspects aside, you'll find no reason to appreciate. This feature  lets you be signed in always into your social accounts which involves risk of  loosing your confidential information which can be easily used by anyone.

There are various other drawbacks that worth having your attention but this time, you've to agree with only these three. Though, I'll publish some other Windows 8 drawbacks as soon as I notice  those and worth writing here.

Windows 8 vs Windows 8 PRO vs Windows 8 RT : Full Review


Microsoft windows 8 was launched on 26th October 2012 with completely redesigned user interface and fast processing speed. Microsoft has done a lot of changes in Windows 8 to improve the booting speed, home screen design, security and interface of Windows.

Windows 8 comes in three versions - Windows 8, Windows 8 pro and Windows RT. Each version is completely different with one another and has its own importance. So if you are wondering about the information on what these three different versions stands for or which of these is suitable for your home or office use, here is the answer.

Brief Introduction
Windows 8: Windows 8 is the basic version falls under the Windows 8 family and contains almost all the features of other versions. Windows 8 comes pre-installed on desktop, laptops, PC's etc.. It is also available as standalone retail boxes which users can download and install on their current PC. Windows 8 supports third party applications or Apps from Windows 8 app store.

Windows 8 Pro: Windows 8 Pro is the professional version of Windows 8 and can be upgraded from Windows 7 (yes, you can't upgrade to Windows 8 from Windows 7). It can be easily adjusted with any new PC or an old home PC with compatible hardware as well as comes in already installed mode with tablet.

Windows 8 RT: Windows 8 RT stands for 'Runtime' or also called Microsoft surface. Windows 8 RT is specially built to be used for ARM enabled devices. Microsoft breaks the long held record of not making Windows compatible with ARM processors. Windows RT completely differ from Windows 8 and Windows 8 Pro and lacks some of the great features of Windows 8/Pro like remote control, network sharing, third party application support etc. Below is the detailed comparison and difference between these three.

[Read Also: Windows 8 Released, Have You Tried It]

Full Comparison of Windows 8/Pro and Windows 8 RT

Features Windows 8 Windows 8 Pro Windows 8 RT
Basic Windows 8 Apps like people, Mail, SkyDrive Charms Bar, fast booting, removed traditional start button, apps store etc. Charms Bar, fast booting, removed traditional start button, apps store etc. Charms Bar, fast booting, removed traditional start button, apps store etc.
Browser IE 10 IE 10 IE 10
Price and Upgrade Offers $19 for Up-gradation, $39 USD for Retail Boxes $19 for Up-gradation, $39 USD for Retail Boxes You can't buy it, Comes Pre-Installed with Tablets or Ultrbooks
Carry Forward Old Windows Files and Settings Yes Yes No
Tablet Compatibility Yes Yes Yes
Processors Any Latest Processors Like i3, i5 or i7 Any Latest Processors Like i3, i5 or i7 Only runs on ARM devices
Interface Metro Interface, Can be tiled to Desktop Metro Interface, Can be tiled to Desktop Metro Interface, Can't be tiled to Desktop
Third Party Software Support Supports existing Windows programs and supports third party applications Supports existing Windows programs and supports third party applications Comes preinstalled Office, can only use applications from Windows app store
Functionality WPM, Storage Spaces, Windows to Go, Domain Support, Remote Desktop WPM, Storage Spaces, Windows to Go, Domain Support, Remote Desktop Only Xbox, Mail Sync, Browser Support etc.
Display Varry according to size of the desktop Varry according to size of the desktop, 10.6 Inches in surface 10.6 Inches in Surface and may vary in other tablets or ultrabook devices.
Old software support Supports Old Windows software that runs in Windows 7, XP, Vista Supports Old Windows software that runs in Windows 7, XP, Vista, This feature is restricted in Windows 8 Pro tablets Can only run the latest Software designed only for Windows 8 RT enabled devices.

Precautions You Should Take in 2013 to Reduce Photo Loss Risks From Memory Cards

When using our mobile phones or digital camera to store/capture photos, we might be at a risk of loosing photos at any moment. I'm sure that most of us know or at least heard about such circumstances. But, what precautions we've taken to keep our precious photos secure & stored in the memory card or the storage device? Not any, right?

So, heads up to the best 4 ways for reducing photo loss risks that are easy to follow and can make your photos even more secured and intact.

Memory cards are the non-volatile flash storage components comes in different sizes and shapes for different camera brands or smart phones. However, these cards can easily get corrupted or inaccessible because of improper uses, bad formatting, internal damages or overage. And, after which, you would no longer able to retrieve or access the photos stored inside the memory card.


#1 Proper uses
You can greatly increase the memory card life by using it in recommended way like remove the card only when the source device is off. Irrespectively, if you remove the memory card while saving or editing photos on the camera, it can instantly damage or deletes the photos as well as can make the memory card inaccessible. So, it is advisable to edit or delete photos only in the computer not in the camera or mobile phone.

#2  Securely Copy/Save Photos 
Many times, we need to format the memory card or delete picture from it just to save few more photos when there is no free space left in the card and couldn't store more images. So we do the same and start using it immediately. Where as, the correct way is, simply copy/move all your photos in computer or laptop from the card at once and format it there. This will make your card very fresh and completely free to save the bunch of images or recorded videos.

#3 Take backup daily
Creating backup of your photos taken throughout the day will take hardly 5-10 minutes but ensures you that whenever disaster strikes, you're still able to restore lost, deleted or damaged multimedia files from the backup copy on your computer. You can further distribute the backup to cloud or burn it to CD or DVD for even more security.

#4 Purchase memory card from trusted online or in-person store
The news is recently highlighted that many manufacturers on ebay and various other online selling websites is selling damaged or non durable cards. These cards will look same as the original and save your photos too but suddenly become crashed or corrupted and would give you no chance to retrieve the photos back to your computer.

# Bonus Advise to get back the lost card

One of the biggest nightmare for many photographers is that they often complain about having no way to find the lost or stolen memory card. Therefore, you can stick a tag with your name, complete address and phone number to all your memory cards, so that if anyone finds your card, can easily get in touch and return it to you (if they're honest).

Thanks to +David Douglas for making this article live here.

Resolving Mass Storage: Error Detected problem in Mac OS X


Anytime you initiate a hardware test on Mac OS X connected hard drives and in return receives the result as “Mass Storage: Error Detected 2STF/8/3 : ATA - 100 ata - 6 – Master”, then consider something fishy with the Macintosh HD, and a serious attention is required in the case.  

To begin with the occurrence of this error, even a crashed application can cause the hard drive to display this message followed by series of system slowdowns, other applications starts to show weird behavior and download files may transform into corrupt files. Another instance of the occurrence of this error is when an external hard drive is disconnected unethically while data transfer is under way. At times, the hard drive develops the corruption of one of the A.T.A – 100 buses that might not be as serious as MBR corruption, though it allows functioning of the drive but in a troublesome manner. 

Also, interruptions through abrupt shutdowns, system or hard drive components going through power jolts may also put an end to the normal functioning of the devices and eventually leads to the corruption of Master Boot Record (MBR). In no such way, the Master Boot Record corruption should be taken lightly because in the worse case of all, it can deprive you the access to your entire system and the data residing on the HD (or an external hard drive). Oops, I must also not forget to mention another worse kind of case where the drive in question may be considered for replacement. 

From the user end, verifying the disk and running 'Repair Disk Permissions' could prove to be of some help but the Disk utility may not always be victorious in resolving severe errors, but yes if the damage done on the drive is small then Disk utility can fix it for sure. Another try is to verify the A.T.A controller of the drive & monitoring the connectors of the drive in question followed by a Mac OS X reboot. This could prove to be of little or great help sometimes.

Hard Drive Replacement and other tools of help: Hopefully if the drive is under warranty or comes under 'Apple care Protection Plan', then approaching for the replacement should be on priority. Otherwise, we do have good hard drive repair utilities for Macintosh Hds that claims to repair severe drives (volume) errors including the re-building of directory structure, if damaged. A damaged boot volume can also be put under the scanner of a drive repair utility with the help of a boot DVD which can further help the drive repair its errors.  

How to back-up a Mac hard drive whose surface incorporate bad sectors

Bad sectors don't allow the OS to use the sectors for storing purposes and the data stored already in the bad sector becomes inaccessible. A user requesting the OS for any read/write operations on the data residing in the bad sector may face series of problems including the OS X freezing, system reboot and even hard drive producing annoying sounds. These frequently occurring symptoms can be an early indications of the drive incorporating bad sectors which would further result in drive failure in the near future.

Backing up bad hard drive is not that simple as backing a healthy drive. In most of the cases, the bad sectors don't participate in any operations resulting in multiple failure attempts of copying the data on to an another drive. Since the bad sectors would cut down any efforts of ensuring back-up, the only correct technique left is to either Clone or Image the drive with a utility. Prior to clone, we would also let user know on how to verify the surface of the drive for bad sectors. To accomplish your requirements, the two utilities of Stellar Drive Toolbox will be most suited:

  1. Surface Scan
  2. Drive Clone
What exactly is a Surface Scan?

Surface Scan utility is one of the important part of Stellar Drive Toolbox which incorporates 12 utilities in all. Once initiated, the Surface Scan will vigorously analyze the hard drive surface for presence of bad sectors. Launch the Surface Scan utility from the Drive Toolbox menu and choose the preferred drive. Click the 'Start Scan' button to initiate the process where each block of the drive is scanned. Any of the bad sectors encountered during the scan are displayed with the help of a  RED square box. If the report ends up with too many RED blocks appears then consider backing up the entire drive at earliest to avoid any kind of inaccessibility in near future. And, for the same the Drive Clone utility is of abundant help.


From Stellar Drive ToolBox > goto Drive Clone utility to backup the bad sector hard drive.
  • Stellar Drive Clone window appears, click continue to proceed.
  • Out of four options displayed on the left pane, select the option 'Imaging'.
  • Imaging further splits into 2 choices. Hard Drive Image and Volume Image. Check the preferred option, choose source and provide a separate destination path (other than the drive itself). 
  • While Imaging, the Drive Clone utility skips any bad sector encountered and deliver the image of good sectors only.


Certainly, the method to image the bad drive is accomplished with lesser amount of worries while producing best results. The data imaged from the drive could prove to be of great help in accessing any necessary files, even booting the system in case of fatal shutdown. 

More information on:  How to use Stellar Drive Toolbox

Revert Back to Windows 7 from Windows 8 without Loosing Your Data

If you are in the list of 'Annoyed with Windows 8' users and interested in getting back your old Windows i.e., Windows 7 or even Vista, then here is a good chance that you might succeed in doing so without loosing a single piece of data or without affecting the installed programs.

Windows 8 launched recently in the market with bunch of functionalities and benefits like speedy booting, metro screen, great Apps gallery etc. that gives smile on millions of faces. Though, some disadvantages are there which might annoys you while using Windows 8 such as no more start button, removed restore option, sluggish start screen, direct deleting feature etc. Already, there is long list of complaints about Windows 8 and Microsoft needs to invest more effort and time to solve those errors or bugs. Obviously, some of you couldn't wait till it becomes bug free or refined version of Windows 8 is released and want to switch back to your old Windows 7 right away. Remember, if you had installed Windows 8 on your Windows XP machine then sadly, you aren't eligible for this degrading feature.

The Automatic Way
 
Microsoft currently offers downgrade rights for Windows 8 pro to let user replace their Windows 8 copy with older of Windows without paying any extra amount. Currently, you can only migrate to Windows 7 Professional or Windows Vista Business from Windows 8 pro, as these are the only two versions allocated with downgrade rights for Windows 8 pro. A noteworthy comment from one of Microsoft's employee

“"Neither the manufacturer or installer, nor Microsoft, is obligated to supply earlier versions to you," read the licensing agreement. “You must obtain the earlier version separately.”

Using Recovery Media
 
Windows 7 users have given with opportunity to create one or more recovery media's DVD other than recovery partition to restore Windows to factory settings. So, if you have those DVD's, your PC would be easily migrated from the current version of Windows to previous version. In case, you don't have or created yet, you can create now by downloading the ISO image located here.

There are rough chances that you may successfully able to get to the Windows 7 desktop as your BIOS 'Legacy Mode' settings has been changed after installing Windows 8 and you need to disable it first. Including this, Windows 8 will automatically enable NX feature from the BIOS security settings and you need to revert it to default too.

However, if all above mentioned steps didn't help you to reach Windows 7 then you might have a single choice left, which is to reinstall Windows 7 using Windows installation media. Doing this might risk you to loose your data currently stored in if you haven’t created any recent backup. Though, you can recover it using various available data recovery programs which comes in free and paid versions, but choosing paid option is recommend and will greatly help you to find your lost data efficiently.

Introduction to Android Smartphone Data Recovery Software

Mobile phone industry is bringing new & revolutionary phones day by day in front of users which gives them much more functionality and benefits like easy and quick emailing, storing large amount of data, playing HD games, using applications from a list of millions etc. Smartphone manufacturers like HTC, Samsung are using Google's Android OS in majority because of its open source nature with millions of free and paid apps available in the Google play gallery. Definitely, using smartphones or tablet computers let you be free from sitting at desk for long hours or allows to prepare documents and send e-mail on the go. Though, Android enabled devices are more vulnerable to data loss in comparison to other OS phones and can make the data completely inaccessible to you.

Android Smart Phone Data Recovery


Brief introduction about Android
Android is a Linux based open source OS especially designed for touch screen devices and was collectively introduced by Open Handset Alliance and Google in late 2008. It is a combination of Linux commands and a graphical user interface to support various hand held devices like smartphones and tablet computers. However, inbuilt storage capacity may not fit to your needs and might force you to purchase external storage i.e, memory card, SD card, mini SD cards etc. Android 4.2 (Jelly Bean) is the latest released OS which can give you a significantly improved performance and a new level of using functionalities such as multiple user accessibility, wireless display, easy and expanded notifications in th mobile display etc.

One major risk involved with such hand held devices is that it can wipe out your data without warnings. File system corruption, damage due to rough uses or accidental file deletion are the most common reasons of data loss from Android devices. Though, there are several data recovery software available in the market, but may cost you a few dollars. These software programs can be helpful in recovery of data provided that the storage device, typically a memory card, is not physically damaged. Let me explain some advantages of using an advanced Android data recovery program:

Below are the refined points from the long list of benefits:

  1. Restore wiped, formatted or accidentally erased data from any Android devices.
  2. Easily undelete precious photos, videos, collection of songs etc.
  3. Recover list of file types from old as well as any latest Android OS version i.e. 4.2 Jelly Bean.
  4. Fast recovery i.e. you can recover the desired data from your Android device in few simple steps. For example, connect the device to PC/Laptop, Scan the media, Click recover and choose the desired location to save the recovered data. That's it.Note: Destination drive should be different from the problem one.
  5. All the recovered data would have the quality intact. There is 100% guarantee that all your data will be intact even after deleting or formatting.
  6. Long list of supported Android devices i.e., HTC, Motorola, Acer, LG, Samsung and many other.
  7. Multiple file system support such as FAT16, FAT32, exFAT, NTFS etc.
[Read Also: Time Machine in Mac]

Many Android recovery programs available in the industry but choosing the best one out of them is pretty difficult. So choose/invest money wisely on any of them.

Undetected Hard Drive Data Recovery Using Free Parted Magic Linux Live CD

Hard drive problems are imminent and might throw you in deep trouble by giving you complete data inaccessibility. After which, one may not be able to access their precious stuff like years of work documents, memories captured in images, collection of movies etc. However, you are still able to recover files from the un-detectable hard drive by using third party software tools provided it is not severely damaged by physical means.

A traditional hard drive consists of equipments like platter, spindle motor, SATA/IDE cables etc., but at some point, your hard hard drive may not be detected by the PC as a cause of any of the hard drive equipments failed. In such situations, keep patience and leave your hard drive for no further use until you recover the 100% data intact.

Symptoms of Non Readable Hard Drive
  1. Your PC won't detect the hard drive whenever you start the system. You will face error messages like operating system not found, insert bootable media, system files missing and so on.
  2. Complete system inaccessibility or your system wouldn't start. Sometime your PC automatically detects the hard drive but you can face this again the next time you start the system.
  3. Face problem in reading or copying data to/from your hard drive
  4. Unexpected system shutdown etc.
  5. System asks you to format the drive before using it. Note: Doing this will completely erase the existing hard drive data. So if you are able to get to the desktop anyway, immediately take backup before doing experiments.
Above mentioned symptoms clearly signifies that your hard drive has equipments that are about to fail and soon it will not be able to boot the system.

Quick Tips to Fix Problem Hard Drive
Sometimes, hard drive can face aforementioned problems due to some minor internal errors and you could simply fix it by your own, follow the below steps
  1. If the drive is external, you can directly connect it to your motherboard as a secondary internal drive and see if you can access the data in that drive.
  2. In case of internally connected drives, remove and plug-in it back externally using SATA/IDE connector to another PC. This is to ensure that internal power/data cables are not damaged.
  3. Use system restore
  4. Start repairing your system using system recovery options. It can be accessed easily by pressing and holding the F8 button just after starting your Windows 7 or Vista machine.
Though, if you already stuck in such situations and aren't able to access the drive anymore, follow the steps mentioned below.

Recover Data Using Parted Magic

Parted Magic : A Linux Live CD

You are still left with one amazing option that gives you best chance to have your files back in case of all above fails. Parted Magic, a Linux Live CD which can boot the system without installing Linux on it and shows you the existing data inside the troubled hard drive.

1. Download the latest version of Parted Magic and burn image to USB or burn image to CD/DVD.
2. For external hard drives, remove it from the USB connector and use SATA/IDE cables to connect it directly to your motherboard.
3. Insert/Connect your bootable media (which is either CD/DVD or USB) and restart your PC
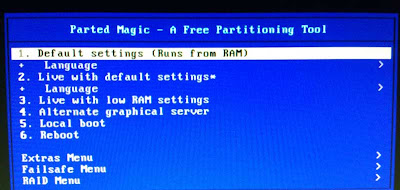
4. At first, select option 'Default settings (Runs from RAM)' where you need to press enter to get to Parted Magic desktop screen.
                        Parted Magic Boot Options

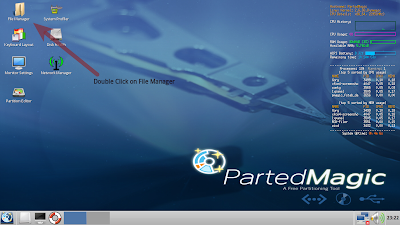
5. At the Parted Magic desktop screen, double click on item 'File Manager' which opens a window containing your problematic hard drives. From the same window, you can freely copy all your important content to any secondary/external storage media.

Parted Magic Desktop Screen
Parted Magic Desktop Scren

6. Once you copied all the desired content, you are free to shut it down.

Parted Magic can also show the drive health status using Disk Health menu available at the desktop screen. This is pretty amazing to know the status of hard drive and helps you decide weather to continue with the same or replace it immediately.

We are interested to know your opinion about using Parted Magic and any attempts you have made along with its results.

Buckle up belt to fasten a crawling Mac OS X

Ever since people started writing about tips to fasten a slow Mac there have been at-least 50 and even 100 tips suggested to do so. The amount of time pour into research and efforts is highly appreciating but this may also lead to misconception of fastening a slow Mac. Therefore, after carefully examining the tips suggested by many Mac users following can be suggested to uplift a Mac performance.

Speed up Mac Tips that are going to work:

  • Tidy Mac: A less cluttered desktop on your Mac machine is certainly going to contribute to cutting down the slow processing of the machine to some extent. Small icons placed on the desktop of a Mac consumes memory and more no. of desktop icons will collectively consume more space. Isn't wise to manage the junks files & unwanted icons on the desktop, eventually sending them to trash?

  • Emptying The Trash: Just like all the files and folders are consuming Mac's RAM as well as hard drive space, similarly the trash too uses Mac's drive space for its operation. A stagnated trash folder is certainly not a good idea to have on a Mac computer. The unwanted files in the trash folder only accumulates due to negligence from the user's part, otherwise emptying the trash is just on the tips of the fingers. Please note that: emptying the trash folder contributes to arranging free space on the drive. Although recommended, only emptying trash may not always result in fastening a slow Mac but yes it does grab drive space which is also a important factor in making the Mac machine quicker than before. 

  • Optimize a Mac hard drive & getting more free space is much wider concept which can be further divided into multiple activities like: Un-installing unsought software & applications, vacating the library folder from the heap of caches & unused log files. Consider the language packs (other than the default installed language), as unwanted and removing them again will add few more bytes of free space. The boot drive too needs to have good amount of free space to load the OS X in minimum amount of time other wise the OS X will prompt you with an error which is: “Your Startup Disk is almost full”. The above activities if implemented, will always helps in gathering free space for the boot drive and will least bother a Mac user.

  • Let us not underestimate minor activities that can bring drastic change in the working of a Mac. Beginning with widgets and animated desktops, it is recommended to turn them off to save the OS X reserve which might be turned up for other useful activity. Eliminating animation effect, dock shadow, else invalidating the dashboard can improve a system's performance to some extent.
Applying free suggestion on a Mac computer doesn't sound to a boring idea. Else, to optimize a large hard drive and its individual volumes there is always necessity of a tool that can minimize the work of hours into few minutes of finding pile of crap data and eliminating it from the drive.

Comparing Time Machine and Cloning utility for Mac OS X:

Time machine keeps both the original file and its recently updated versions. For instance, a text file that underwent few updates 4-5 times in a week, will be backed by Time Machine every time the update was done, keeping the oldest and most recent ones. A general question arises: Will the Time Machine end up loosing all the space due to multiple updated files? The answer is NO, Time Machine is good at managing drive space, it removes the old backed up files by its own and thus only keeps the most recent ones.

TM does not offers any archive of the files that have been updated many times. Forget about the original ones that might got replaced over time with the latest updated file.

When cloning comes to the picture, everyone knows it can be easily done with the help of a cloning utility like Stellar Drive Clone. This utility builds up a mirror image of the hard drive, resulting in an identical copy of the original drive, containing each file for only once. Like Time Machine, Clones too can be made to take incremental back-ups keeping the most recent file on the drive. If several files on the drive are updated and again cloned on the destination drive then the cloned copy holds the most recent information for that particular file. Unlike Time Machine, the cloned copy doesn't hold the original as well as updated copy, instead it overwrites the old file with the new one. Compared to the Time Machine, the cloned copy of the drive uses less space because it has to hold only the latest updated file rather than the files that were updated days or weeks ago.

Due to multiple files on the time machine the overall size may exceed, but in cloning as files are most recent, the size remains the same. E.g, 500GB drive will require the size equal to another destination drive.

Cloned copies are mirror images of their original source making them bootable. Now, if the Mac responses are negative and a failure occurs, then you can restore the Mac back to its last settings with the help of the cloned copy.

Making a clone copy of anything is totally dependent on the user's choice of what exactly is to be cloned and when. It is certain that clone copies can't be produced every time. 

Being automatic on other hand, Time Machine handles the incremental backup smartly and does not require the user to monitor the backups (like in cloning). The backups are taken every single hour by the TM.

Cloned copy being a separate back up can be kept away from the system, thus if the whole system faces a physical disaster like fire, the cloned copy still remains secure for further use.

Microsoft Windows 8 Released, Have You Tried It?


Much awaited and anticipated version of Microsoft Windows OS i.e., Windows 8 is officially released at New York City and ready for download at Microsoft official website. May be, many of you are already using a Windows 8 Consumer Version but now the time has come to upgrade it by paying just few bucks. Microsoft is offering upgrades for your home PC, notebook or laptop at just $40. You can upgrade to Windows 8 if you are currently running Windows 7, Vista or XP and your machine's hardware configuration matches the Windows 8 system requirements. However, a user having no Windows PC can also try it on or after 26th October either by downloading ISO image from the Microsoft website or buying from a local store.

                            Microsoft Windows 8 Promo


Windows 8 is available in two versions: Windows 8, TER  to be used on PC, notebook or laptop and Windows RT (Windows 8 for ARM devices) comes pre-installed with Windows tablet and Windows 8 enabled smart phones. Windows RT has certain limitations as compared to Windows 8 TER version. To be blunt, you can't use Windows RT unless you buy the new tablet enabled with Windows 8 and supported hardware. Microsoft has already launched Surface Tablet starting at $499 and can be pre-ordered from here: http://www.microsoft.com/Surface/en-US


Its free to download and install third party as well as legacy Apps from Windows Apps store. Though, if you are using Windows RT, you won't be allowed to use third party Apps.

Windows 8 offers an easy to install procedure and removes the headache of installing OS as before. Just keep your Windows 8 DVD as well as license key ready and allow the computer to manually reboot and automatically install Window 8 for you. Microsoft has a separate guide to help you in successfully upgrading your PC from Windows 7, Vista or XP to Windows 8.


Easy Upgrade: You can carry all your settings, folders of Windows 7 to Windows 8 except their programs and 'Start' menu/button. But in Windows XP, this feature is restricted to carry only stuff from desired storage location.

What Microsoft has specially focused is to build an exceptionally better and high performance PC. This is true to some extent as because of metro start screen (Replacement of Start menu as looks in old Windows), all Apps are available on home screen, control panel settings in just single click etc. 

Windows 8 Charms Bar
                         Img Credit: Cnet                 

In an above highlighted image, charms bar is located at the right side containing a set of tools to monitor and control various hardware as well as program settings in a single click. Tasks such as, finding and sharing the desired files of your loved ones, installing or un-installing Apps, accessing start screen, accessing internal or external devices can be easily performed by this Charms bar.

I think we can not expect much more from Microsoft Windows 8, it gives you no reason to complain. In dark side, Windows users may feel annoying while using Windows 8 for the first time might as there no replacement to the removed start button. One thing is for sure, Windows 8 has remarkably fast and free from bugs as compared to its predecessor. So, there is pretty enough chances of high success rate of this latest release in OS  market.  Let's wait for the time when we  all will have something better and more improved version of new generation OS.
 
To explore more features about Windows 8, read a great blog post entitled 'Are You Ready For Windows 8'

Windows God Mode and Similar Hidden Tweaks

If you are using any of the latest versions of Windows such as windows 8, Windows 7 or Vista, you can have access to all the control panel settings in just a single folder, using Windows amazing features called God Mode, first coined by bloggers. Its original name is ‘Master control panel shortcut but users would prefer to call it God Mode as it provides all the basic as well as advanced OS settings without navigating to control panel for each setting individually. It's an invisible developer shortcut and can be created or used from any location you want.
Windows God Mode supports best to Windows 7 & Vista in 32 bit mode but often crashes with same OS of 64 bit. IT administrators and professional users can freely use it to troubleshoot system errors from fixing registries to change hard drive volume settings.

Here's how to create God Mode Folder:
All you have to do is to create a single folder and rename it with certain parameters to use all God Mode features in a single click.
  1. Create a new folder at any desired location.
  2. Directly press F2 to rename that particular folder and enter the text string showed in the below image (Without braces):
  3. Folder icon will be automatically changed to control panel icon. Now explore the folder to find list of tweaks and options to customize your computer. 
Note: You can choose any folder name by replacing the text 'God Mode' with your desired name, dictated in the image above.

Microsoft's professional wouldn't recommend it to use as it may cause serious damages and hardware failure on your computer especially if you use God Mode with incompatible OS.
There are other tweaks (text string) like God Mode which can be used to access more control panel settings. Similar to God Mode, you have to create a new folder and then enter any of the strings provided below (Without braces and names)

Action Center {BB64F8A7-BEE7-4E1A-AB8D-7D8273F7FDB6}
Backup and Restore {B98A2BEA-7D42-4558-8BD1-832F41BAC6FD}
Biometric Devices {0142e4d0-fb7a-11dc-ba4a-000ffe7ab428}
Credential Manager {1206F5F1-0569-412C-8FEC-3204630DFB70}
Default Location {00C6D95F-329C-409a-81D7-C46C66EA7F33}
Devices and Printers {A8A91A66-3A7D-4424-8D24-04E180695C7A}
Display {C555438B-3C23-4769-A71F-B6D3D9B6053A}
HomeGroup {67CA7650-96E6-4FDD-BB43-A8E774F73A57}
Location and Other Sensors {E9950154-C418-419e-A90A-20C5287AE24B}
Notification Area Icons {05d7b0f4-2121-4eff-bf6b-ed3f69b894d9}
Recovery {9FE63AFD-59CF-4419-9775-ABCC3849F861}
RemoteApp and Desktop Connections {241D7C96-F8BF-4F85-B01F-E2B043341A4B}
Speech Recognition {58E3C745-D971-4081-9034-86E34B30836A}
Troubleshooting {C58C4893-3BE0-4B45-ABB5-A63E4B8C8651}

The above strings were revealed by Steven Sinofsky, Microsoft's Windows division president after being asked by a Cnet professional
.

Note: Again, use any string at your own risk because unsupported OS might cause accidental crash.

You can follow Oliver on twitter @powellstellar

How to Repair your Computer from Ukash Virus

Unlike Trojan or adware,Windows Ukash virus may have severe impact over your PC such as complete locking or freezing, system inaccessibility and more. More than millions of PC attacks have been recorded only in US after which user had either lost their valuable data or looted by scammers. Ukash falls under ransom ware category and infected PC with various versions such as 'Metropolitan Police Ukash Virus', 'FBI Money pack Virus' or similar.

Whenever any machine gets attacked by Ukash, user will see nasty warning messages and found their computer completely locked. Warnings messages states that you have violated legal laws or may be the victim of piracy Act or similar and asks to pay hundred or even thousands of dolor’s as a penalty for being involved in any malicious activities or so. Believing it and paying your money yield no results and your computer will remain locked until you find and fix it using a proper solution.

Microsoft Windows Ukash Virus
The virus named Ukash because it uses the private Ukash payment gateway option to pay the mentioned amount in warning messages. You don't worry about it as here are some simple steps to easily identify such attacks and a handy process to manually remove it.

How one can get infected by Ukash Virus
There are various holes and security vulnerabilities that scammers used to seek and attack. Ukash virus can easily infect PC if user surfs malware websites, download, & install hacked applications etc. This virus can trick many people as it’s customized to translate in various other languages and then asks people to pay for the money. It's obvious that user get scared by seeing those horrible error messages with local police department and trademark at top of the warning messages.

You can see example in pictures below taken from ‘METROPOLITAN UKASH Virus’ infected PC, to get an idea about how it actually looks:

Ukash Virus PC infection
For better analysis, below are some common points that you can notice in case of Ukash virus infection:
  1. Freezing, Computer speed slows down automatically.
  2. Series of popup warnings containing set of threatening message.
  3. Permanently inaccessibility to files & folders stored in the drive as warning pop ups has fully locked your computer.
  4. Startup failure, unexpected computer errors etc.
Steps for Manually Removing Ukash Virus

Follow the simple steps to manually remove it from infected PCs,
  1. Normally, restart your PC
  2. Press F8 during startup to go to 'Advanced Startup Options'
  3. Select option 'Safe Mode with Networking'
  4. Start 'Task Manger' and locate to ‘Processes’ tab to find out all unknown or unexpected processes running on your computer. Kill them immediately. Enter administrator password whenever required.
  5. Restart the system and see if you have successfully removed the virus.

If Ukash virus still exists on your PC, simply download SpyHunter from here. After installation, this will automatically traces all print of Ukash and will easily remove it.

Some unknown, but most useful utility for Macs OS X

There are plenty of useful utilities that work to maintain the well-being of a Mac system. They may not be available as a single utility and often comes with bunch of other useful tools. Such a combination of different utilities combined together is termed as a toolbox (like a car toolbox equipped with all the necessity tools including jack, screwdriver, rinch etc.). Taking Mac into consideration, the tools that are of much help are the ones which focus to maintain the smooth running of the in-built Mac hard drive.   
If you go through any Mac forums, Yahoo Questions & Answers, even on Apple's thread you may find Mac users asking pool of questions related to a troubled hard drive, sudden Mac shutdown, bad blocks, a slow responding Mac, partition related queries and much more. A general Mac user may find it difficult to solve any of the above mentioned queries due to lack of proper knowledge and sufficient tool. 

In this particular article, we shall focus our discussion at solving most basic and frequent occurring troubles:

Q1) How can I check my hard drive for bad blocks?

A1) Bad blocks can occur on a hard drive no matter if it’s a brand new or an old drive. But old hard drive are more sensitive to bad blocks because they have went through various read/writes operations, formatting, sluggishness and in some cases even power jolts. To check the hard drives for bad bocks, the surface of the drive must be checked through a utility commonly known as 'Surface Scan'. As the name suggest, Surface Scan tool with the help of its in-built algorithm launches the entire hard drive and scans each and every blocks (of sectors) to bring in front the bad blocks. 

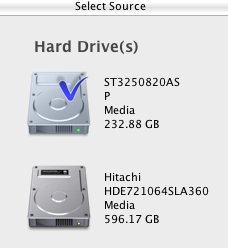
Step: 1) Select the source drive for surface scan:


Step: 2) The selected volume (hd) is ready for vigorous scan and upon hitting the “Start Scan” button, the operation is launched. 


Once a bad block is encountered by the tool, it will be marked in red color block indicating a danger.

Q 2) How to protect my data when bad blocks on hd have reported?

A2) Bad blocks are the worse occurring error on a hard drive which can eventually damage the drive to repair or beyond repair. Extracting data from a bad drive is a challenge, but it can be done with the help of a cloning utility which can duplicate all the content of the drive residing in good sectors (blocks). 
To make a clone the bad hard drive you need an external drive (having a larger space then the source drive) and a clone utility. When all is set, use the cloning software's 'Clone Drive' option which copies the entire content of the drive to the destination. When the process completes, the user now has the content copied from the good sector of the source drive, skipping any bad block. Other than cloning, imaging process can also be performed which performs the similar activity of copying data from good sectors only. However, it is advised not to save the image on the same drive because if any malfunction occurs on the drive, image file will also be affected.  

For more information on Mac OS X hard drive surface scan, drop me mail at tompatrick2009@gmail.com

Photokina 2012 images: The world's best imaging event


How should one retaliate if he/she suffers an epic data loss from his beloved Mac OS X, digital camera or any other media? A data loss could be nightmarish and an event that no one wants to invite. We can't avoid a data loss to happen, however we could control it to some extent but certainly can't avoid it. It may happen any time and with any one. Even I and you could become a victim of data loss :(. But there is nothing to loose all the hope if you are going through a data loss. Thanks to the ever changing technology, recovering lost, deleted and even formatted images is made possible with the help of useful recovery software.


The above box is the image of Stellar Phoenix Mac Photo Recovery 5.0, recently showcased in Photokina 2012. To be precise and candid, the term data recovery is either misunderstood or is often low-rated. The facts should now be cleared that data recovery does not only limits to an expert user who knows everything about a hard drive. In fact, the term data recovery is made simple by the help of Do-It-Yourself software which are easily handled even by lay users. 

At Photokina 2012


My Mac OS X & different ways to back it up

We humans need to act like ants, which are the hardest working creatures on the planet. Like ants collect their food stuff for the winter season, we too can back-up our entire hard drive data and contents to overcome a near future obstacle. These uninvited obstacles may be in the form of hard drive failures, data corruption, system inaccessibility, or theft. Although I don't have the exact figures of such obstacles but I could only estimates that thousands of Mac users go through the pain of data loss due to sudden malfunction of the Mac machine, software gone bad and theft. Such circumstances may not be under control of any user but we can act beforehand to at least ensure the content of the hard drive remains accessible by implementing a back-up plan.

Components of the back-up plan include two basic requirements:
  • The system hard drive (source) and,
  • an external hard drive (destination),
  • Third back-up process may include the use of online storage Medias which are becoming popular day-by-day.
External hard drives are the accessories which are most used by the users, after all who doesn’t require having additional storage capacity. 

1.Imaging the hard drive: With the help of a non-Apple utility, we can choose to create an image file of the drive (important data). Once the imaging is made it may be stored on the source itself. However how wise it would be store on the same system taking the inaccessibility of the Mac on account. This can be done by saving the back-up on an external hard drive and should be done on weekly basis.  


Stellar Drive Clone 2.0: Ready to create an image file of hard drive or volume
(The chosen drive is imaged to the user's location)


2. Cloning the hard drive: Another activity you could do in place of imaging is cloning the source to a large destination (A destination drive larger than source is always required to make a clone). What is good about the cloning is it creates a similar copy of the source hard drive which is in the ready to use form.

Take Note that: Cloning erases all the content of the destination drive. If destination > source drive then you can also expand the volumes located on destination drive. Cloning creates a bootable DVD for the system helpful to boot the Mac if inaccessible. 

3. Time-Machine backup: It’s simple to do by connecting an equal or bigger external hard drive to the Mac system. Making way through System Preferences<<Time Machine, double click to launch it and switch the time machine ON. See the 'Select Disk' option, you need to click and select the connected external drive. All done, only the check box located at below needs to be clicked. 


Wikipedia: Time-Machine in action can be found in the Mac 10.5 and above versions. It creates incremental backup that can be restored at backward date.

How to Deal With "WINDOWS\SYSTEM32\CONFIG\SYSTEM" Error

Your computer contains set of registries and system files for smooth and uninterrupted PC running. When any of the system files get deleted or registries got corrupted, you may face bunch of error messages or sometime complete system failure. One such error is “windows\system32\config\system” which may occurs due to of deleted system files, windows corruption, or hard drive failure etc. and will make your system unbootable. As results, you won't be able to access your stuff inside the system till you fix the error. See the below image to know how it looks like:

Computer won't boot

Windows could not start because the following file is missing or corrupt: \WINDOWS\SYSTEM32\CONFIG\SYSTEM”

If you are suffering from the same and desperately hunting for it's solution then you are at the right place as I'll describe here the most prominent causes behind this error and the easy steps to solve it on your own.

Why This Error?

As I described in above paragraph, your registries are the most sensitive parts inside the system and can be easily malfunctioned or damaged. Once your registries got corrupted, it makes their corresponding file (which is at the location Windows\System32\Config\system/software), unreadable. This system file can also be corrupted or deleted by viruses, human or the file itself got unstable by any unauthorized system operation and needs to be updated. Therefore, once the file is corrupted and next time you started the system, it won't boot up and gives an error as described in the image above.

What you can do to get it fixed?

The simplest solution is to replace the same file with an updated and non corrupted file from your Windows media disc or from the registry backup (if you had taken a backup of your system registries?

Here are the detailed steps on how you can do it manually:
  1. Insert your Windows installation CD into CD ROM and restart your PC.
  2. Follow the same steps as in the case of installing fresh Window except the screen appears after pressing 'F8' key, where you have to select 'R' key (to go the recovery console) instead of pressing 'Enter'.
  3. Select the targeted windows if you have dual booting operating system.
  4. Type the administrator password whenever asked. Leave it blank if you don't have any.
  5. Once you reached at the command prompt, type the following commands and press enter each time after typing a line:
    md tmp
    copy c:\windows\system32\config\system c:\windows\tmp\system.bak
    copy c:\windows\system32\config\software c:\windows\tmp\software.bak
    copy c:\windows\system32\config\sam c:\windows\tmp\sam.bak
    copy c:\windows\system32\config\security c:\windows\tmp\security.bak
    copy c:\windows\system32\config\default c:\windows\tmp\default.bak
    delete c:\windows\system32\config\system
    delete c:\windows\system32\config\software
    delete c:\windows\system32\config\sam
    delete c:\windows\system32\config\security
    delete c:\windows\system32\config\default
    copy c:\windows\repair\system c:\windows\system32\config\system
    copy c:\windows\repair\software c:\windows\system32\config\software
    copy c:\windows\repair\sam c:\windows\system32\config\sam
    copy c:\windows\repair\security c:\windows\system32\config\security
    copy c:\windows\repair\default c:\windows\system32\config\default
  6. Type ‘exist’ to navigate away from the black screen and restart your system. See if your system starts normally, but if not follow the next steps.
  7. Remove and connect your hard drive to another computer to take backup of your important data. Once you done with this again plug it back to your old computer and install a fresh copy of Windows to get back to your system normally and recover your data.