How to back-up a Mac hard drive whose surface incorporate bad sectors

Bad sectors don't allow the OS to use the sectors for storing purposes and the data stored already in the bad sector becomes inaccessible. A user requesting the OS for any read/write operations on the data residing in the bad sector may face series of problems including the OS X freezing, system reboot and even hard drive producing annoying sounds. These frequently occurring symptoms can be an early indications of the drive incorporating bad sectors which would further result in drive failure in the near future.

Backing up bad hard drive is not that simple as backing a healthy drive. In most of the cases, the bad sectors don't participate in any operations resulting in multiple failure attempts of copying the data on to an another drive. Since the bad sectors would cut down any efforts of ensuring back-up, the only correct technique left is to either Clone or Image the drive with a utility. Prior to clone, we would also let user know on how to verify the surface of the drive for bad sectors. To accomplish your requirements, the two utilities of Stellar Drive Toolbox will be most suited:

  1. Surface Scan
  2. Drive Clone
What exactly is a Surface Scan?

Surface Scan utility is one of the important part of Stellar Drive Toolbox which incorporates 12 utilities in all. Once initiated, the Surface Scan will vigorously analyze the hard drive surface for presence of bad sectors. Launch the Surface Scan utility from the Drive Toolbox menu and choose the preferred drive. Click the 'Start Scan' button to initiate the process where each block of the drive is scanned. Any of the bad sectors encountered during the scan are displayed with the help of a  RED square box. If the report ends up with too many RED blocks appears then consider backing up the entire drive at earliest to avoid any kind of inaccessibility in near future. And, for the same the Drive Clone utility is of abundant help.


From Stellar Drive ToolBox > goto Drive Clone utility to backup the bad sector hard drive.
  • Stellar Drive Clone window appears, click continue to proceed.
  • Out of four options displayed on the left pane, select the option 'Imaging'.
  • Imaging further splits into 2 choices. Hard Drive Image and Volume Image. Check the preferred option, choose source and provide a separate destination path (other than the drive itself). 
  • While Imaging, the Drive Clone utility skips any bad sector encountered and deliver the image of good sectors only.


Certainly, the method to image the bad drive is accomplished with lesser amount of worries while producing best results. The data imaged from the drive could prove to be of great help in accessing any necessary files, even booting the system in case of fatal shutdown. 

More information on:  How to use Stellar Drive Toolbox

Revert Back to Windows 7 from Windows 8 without Loosing Your Data

If you are in the list of 'Annoyed with Windows 8' users and interested in getting back your old Windows i.e., Windows 7 or even Vista, then here is a good chance that you might succeed in doing so without loosing a single piece of data or without affecting the installed programs.

Windows 8 launched recently in the market with bunch of functionalities and benefits like speedy booting, metro screen, great Apps gallery etc. that gives smile on millions of faces. Though, some disadvantages are there which might annoys you while using Windows 8 such as no more start button, removed restore option, sluggish start screen, direct deleting feature etc. Already, there is long list of complaints about Windows 8 and Microsoft needs to invest more effort and time to solve those errors or bugs. Obviously, some of you couldn't wait till it becomes bug free or refined version of Windows 8 is released and want to switch back to your old Windows 7 right away. Remember, if you had installed Windows 8 on your Windows XP machine then sadly, you aren't eligible for this degrading feature.

The Automatic Way
 
Microsoft currently offers downgrade rights for Windows 8 pro to let user replace their Windows 8 copy with older of Windows without paying any extra amount. Currently, you can only migrate to Windows 7 Professional or Windows Vista Business from Windows 8 pro, as these are the only two versions allocated with downgrade rights for Windows 8 pro. A noteworthy comment from one of Microsoft's employee

“"Neither the manufacturer or installer, nor Microsoft, is obligated to supply earlier versions to you," read the licensing agreement. “You must obtain the earlier version separately.”

Using Recovery Media
 
Windows 7 users have given with opportunity to create one or more recovery media's DVD other than recovery partition to restore Windows to factory settings. So, if you have those DVD's, your PC would be easily migrated from the current version of Windows to previous version. In case, you don't have or created yet, you can create now by downloading the ISO image located here.

There are rough chances that you may successfully able to get to the Windows 7 desktop as your BIOS 'Legacy Mode' settings has been changed after installing Windows 8 and you need to disable it first. Including this, Windows 8 will automatically enable NX feature from the BIOS security settings and you need to revert it to default too.

However, if all above mentioned steps didn't help you to reach Windows 7 then you might have a single choice left, which is to reinstall Windows 7 using Windows installation media. Doing this might risk you to loose your data currently stored in if you haven’t created any recent backup. Though, you can recover it using various available data recovery programs which comes in free and paid versions, but choosing paid option is recommend and will greatly help you to find your lost data efficiently.

Introduction to Android Smartphone Data Recovery Software

Mobile phone industry is bringing new & revolutionary phones day by day in front of users which gives them much more functionality and benefits like easy and quick emailing, storing large amount of data, playing HD games, using applications from a list of millions etc. Smartphone manufacturers like HTC, Samsung are using Google's Android OS in majority because of its open source nature with millions of free and paid apps available in the Google play gallery. Definitely, using smartphones or tablet computers let you be free from sitting at desk for long hours or allows to prepare documents and send e-mail on the go. Though, Android enabled devices are more vulnerable to data loss in comparison to other OS phones and can make the data completely inaccessible to you.

Android Smart Phone Data Recovery


Brief introduction about Android
Android is a Linux based open source OS especially designed for touch screen devices and was collectively introduced by Open Handset Alliance and Google in late 2008. It is a combination of Linux commands and a graphical user interface to support various hand held devices like smartphones and tablet computers. However, inbuilt storage capacity may not fit to your needs and might force you to purchase external storage i.e, memory card, SD card, mini SD cards etc. Android 4.2 (Jelly Bean) is the latest released OS which can give you a significantly improved performance and a new level of using functionalities such as multiple user accessibility, wireless display, easy and expanded notifications in th mobile display etc.

One major risk involved with such hand held devices is that it can wipe out your data without warnings. File system corruption, damage due to rough uses or accidental file deletion are the most common reasons of data loss from Android devices. Though, there are several data recovery software available in the market, but may cost you a few dollars. These software programs can be helpful in recovery of data provided that the storage device, typically a memory card, is not physically damaged. Let me explain some advantages of using an advanced Android data recovery program:

Below are the refined points from the long list of benefits:

  1. Restore wiped, formatted or accidentally erased data from any Android devices.
  2. Easily undelete precious photos, videos, collection of songs etc.
  3. Recover list of file types from old as well as any latest Android OS version i.e. 4.2 Jelly Bean.
  4. Fast recovery i.e. you can recover the desired data from your Android device in few simple steps. For example, connect the device to PC/Laptop, Scan the media, Click recover and choose the desired location to save the recovered data. That's it.Note: Destination drive should be different from the problem one.
  5. All the recovered data would have the quality intact. There is 100% guarantee that all your data will be intact even after deleting or formatting.
  6. Long list of supported Android devices i.e., HTC, Motorola, Acer, LG, Samsung and many other.
  7. Multiple file system support such as FAT16, FAT32, exFAT, NTFS etc.
[Read Also: Time Machine in Mac]

Many Android recovery programs available in the industry but choosing the best one out of them is pretty difficult. So choose/invest money wisely on any of them.

Undetected Hard Drive Data Recovery Using Free Parted Magic Linux Live CD

Hard drive problems are imminent and might throw you in deep trouble by giving you complete data inaccessibility. After which, one may not be able to access their precious stuff like years of work documents, memories captured in images, collection of movies etc. However, you are still able to recover files from the un-detectable hard drive by using third party software tools provided it is not severely damaged by physical means.

A traditional hard drive consists of equipments like platter, spindle motor, SATA/IDE cables etc., but at some point, your hard hard drive may not be detected by the PC as a cause of any of the hard drive equipments failed. In such situations, keep patience and leave your hard drive for no further use until you recover the 100% data intact.

Symptoms of Non Readable Hard Drive
  1. Your PC won't detect the hard drive whenever you start the system. You will face error messages like operating system not found, insert bootable media, system files missing and so on.
  2. Complete system inaccessibility or your system wouldn't start. Sometime your PC automatically detects the hard drive but you can face this again the next time you start the system.
  3. Face problem in reading or copying data to/from your hard drive
  4. Unexpected system shutdown etc.
  5. System asks you to format the drive before using it. Note: Doing this will completely erase the existing hard drive data. So if you are able to get to the desktop anyway, immediately take backup before doing experiments.
Above mentioned symptoms clearly signifies that your hard drive has equipments that are about to fail and soon it will not be able to boot the system.

Quick Tips to Fix Problem Hard Drive
Sometimes, hard drive can face aforementioned problems due to some minor internal errors and you could simply fix it by your own, follow the below steps
  1. If the drive is external, you can directly connect it to your motherboard as a secondary internal drive and see if you can access the data in that drive.
  2. In case of internally connected drives, remove and plug-in it back externally using SATA/IDE connector to another PC. This is to ensure that internal power/data cables are not damaged.
  3. Use system restore
  4. Start repairing your system using system recovery options. It can be accessed easily by pressing and holding the F8 button just after starting your Windows 7 or Vista machine.
Though, if you already stuck in such situations and aren't able to access the drive anymore, follow the steps mentioned below.

Recover Data Using Parted Magic

Parted Magic : A Linux Live CD

You are still left with one amazing option that gives you best chance to have your files back in case of all above fails. Parted Magic, a Linux Live CD which can boot the system without installing Linux on it and shows you the existing data inside the troubled hard drive.

1. Download the latest version of Parted Magic and burn image to USB or burn image to CD/DVD.
2. For external hard drives, remove it from the USB connector and use SATA/IDE cables to connect it directly to your motherboard.
3. Insert/Connect your bootable media (which is either CD/DVD or USB) and restart your PC
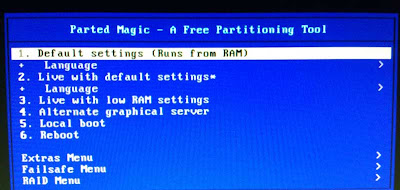
4. At first, select option 'Default settings (Runs from RAM)' where you need to press enter to get to Parted Magic desktop screen.
                        Parted Magic Boot Options

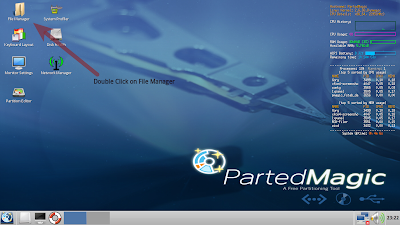
5. At the Parted Magic desktop screen, double click on item 'File Manager' which opens a window containing your problematic hard drives. From the same window, you can freely copy all your important content to any secondary/external storage media.

Parted Magic Desktop Screen
Parted Magic Desktop Scren

6. Once you copied all the desired content, you are free to shut it down.

Parted Magic can also show the drive health status using Disk Health menu available at the desktop screen. This is pretty amazing to know the status of hard drive and helps you decide weather to continue with the same or replace it immediately.

We are interested to know your opinion about using Parted Magic and any attempts you have made along with its results.

Buckle up belt to fasten a crawling Mac OS X

Ever since people started writing about tips to fasten a slow Mac there have been at-least 50 and even 100 tips suggested to do so. The amount of time pour into research and efforts is highly appreciating but this may also lead to misconception of fastening a slow Mac. Therefore, after carefully examining the tips suggested by many Mac users following can be suggested to uplift a Mac performance.

Speed up Mac Tips that are going to work:

  • Tidy Mac: A less cluttered desktop on your Mac machine is certainly going to contribute to cutting down the slow processing of the machine to some extent. Small icons placed on the desktop of a Mac consumes memory and more no. of desktop icons will collectively consume more space. Isn't wise to manage the junks files & unwanted icons on the desktop, eventually sending them to trash?

  • Emptying The Trash: Just like all the files and folders are consuming Mac's RAM as well as hard drive space, similarly the trash too uses Mac's drive space for its operation. A stagnated trash folder is certainly not a good idea to have on a Mac computer. The unwanted files in the trash folder only accumulates due to negligence from the user's part, otherwise emptying the trash is just on the tips of the fingers. Please note that: emptying the trash folder contributes to arranging free space on the drive. Although recommended, only emptying trash may not always result in fastening a slow Mac but yes it does grab drive space which is also a important factor in making the Mac machine quicker than before. 

  • Optimize a Mac hard drive & getting more free space is much wider concept which can be further divided into multiple activities like: Un-installing unsought software & applications, vacating the library folder from the heap of caches & unused log files. Consider the language packs (other than the default installed language), as unwanted and removing them again will add few more bytes of free space. The boot drive too needs to have good amount of free space to load the OS X in minimum amount of time other wise the OS X will prompt you with an error which is: “Your Startup Disk is almost full”. The above activities if implemented, will always helps in gathering free space for the boot drive and will least bother a Mac user.

  • Let us not underestimate minor activities that can bring drastic change in the working of a Mac. Beginning with widgets and animated desktops, it is recommended to turn them off to save the OS X reserve which might be turned up for other useful activity. Eliminating animation effect, dock shadow, else invalidating the dashboard can improve a system's performance to some extent.
Applying free suggestion on a Mac computer doesn't sound to a boring idea. Else, to optimize a large hard drive and its individual volumes there is always necessity of a tool that can minimize the work of hours into few minutes of finding pile of crap data and eliminating it from the drive.

Comparing Time Machine and Cloning utility for Mac OS X:

Time machine keeps both the original file and its recently updated versions. For instance, a text file that underwent few updates 4-5 times in a week, will be backed by Time Machine every time the update was done, keeping the oldest and most recent ones. A general question arises: Will the Time Machine end up loosing all the space due to multiple updated files? The answer is NO, Time Machine is good at managing drive space, it removes the old backed up files by its own and thus only keeps the most recent ones.

TM does not offers any archive of the files that have been updated many times. Forget about the original ones that might got replaced over time with the latest updated file.

When cloning comes to the picture, everyone knows it can be easily done with the help of a cloning utility like Stellar Drive Clone. This utility builds up a mirror image of the hard drive, resulting in an identical copy of the original drive, containing each file for only once. Like Time Machine, Clones too can be made to take incremental back-ups keeping the most recent file on the drive. If several files on the drive are updated and again cloned on the destination drive then the cloned copy holds the most recent information for that particular file. Unlike Time Machine, the cloned copy doesn't hold the original as well as updated copy, instead it overwrites the old file with the new one. Compared to the Time Machine, the cloned copy of the drive uses less space because it has to hold only the latest updated file rather than the files that were updated days or weeks ago.

Due to multiple files on the time machine the overall size may exceed, but in cloning as files are most recent, the size remains the same. E.g, 500GB drive will require the size equal to another destination drive.

Cloned copies are mirror images of their original source making them bootable. Now, if the Mac responses are negative and a failure occurs, then you can restore the Mac back to its last settings with the help of the cloned copy.

Making a clone copy of anything is totally dependent on the user's choice of what exactly is to be cloned and when. It is certain that clone copies can't be produced every time. 

Being automatic on other hand, Time Machine handles the incremental backup smartly and does not require the user to monitor the backups (like in cloning). The backups are taken every single hour by the TM.

Cloned copy being a separate back up can be kept away from the system, thus if the whole system faces a physical disaster like fire, the cloned copy still remains secure for further use.