Microsoft Windows 8 Released, Have You Tried It?


Much awaited and anticipated version of Microsoft Windows OS i.e., Windows 8 is officially released at New York City and ready for download at Microsoft official website. May be, many of you are already using a Windows 8 Consumer Version but now the time has come to upgrade it by paying just few bucks. Microsoft is offering upgrades for your home PC, notebook or laptop at just $40. You can upgrade to Windows 8 if you are currently running Windows 7, Vista or XP and your machine's hardware configuration matches the Windows 8 system requirements. However, a user having no Windows PC can also try it on or after 26th October either by downloading ISO image from the Microsoft website or buying from a local store.

                            Microsoft Windows 8 Promo


Windows 8 is available in two versions: Windows 8, TER  to be used on PC, notebook or laptop and Windows RT (Windows 8 for ARM devices) comes pre-installed with Windows tablet and Windows 8 enabled smart phones. Windows RT has certain limitations as compared to Windows 8 TER version. To be blunt, you can't use Windows RT unless you buy the new tablet enabled with Windows 8 and supported hardware. Microsoft has already launched Surface Tablet starting at $499 and can be pre-ordered from here: http://www.microsoft.com/Surface/en-US


Its free to download and install third party as well as legacy Apps from Windows Apps store. Though, if you are using Windows RT, you won't be allowed to use third party Apps.

Windows 8 offers an easy to install procedure and removes the headache of installing OS as before. Just keep your Windows 8 DVD as well as license key ready and allow the computer to manually reboot and automatically install Window 8 for you. Microsoft has a separate guide to help you in successfully upgrading your PC from Windows 7, Vista or XP to Windows 8.


Easy Upgrade: You can carry all your settings, folders of Windows 7 to Windows 8 except their programs and 'Start' menu/button. But in Windows XP, this feature is restricted to carry only stuff from desired storage location.

What Microsoft has specially focused is to build an exceptionally better and high performance PC. This is true to some extent as because of metro start screen (Replacement of Start menu as looks in old Windows), all Apps are available on home screen, control panel settings in just single click etc. 

Windows 8 Charms Bar
                         Img Credit: Cnet                 

In an above highlighted image, charms bar is located at the right side containing a set of tools to monitor and control various hardware as well as program settings in a single click. Tasks such as, finding and sharing the desired files of your loved ones, installing or un-installing Apps, accessing start screen, accessing internal or external devices can be easily performed by this Charms bar.

I think we can not expect much more from Microsoft Windows 8, it gives you no reason to complain. In dark side, Windows users may feel annoying while using Windows 8 for the first time might as there no replacement to the removed start button. One thing is for sure, Windows 8 has remarkably fast and free from bugs as compared to its predecessor. So, there is pretty enough chances of high success rate of this latest release in OS  market.  Let's wait for the time when we  all will have something better and more improved version of new generation OS.
 
To explore more features about Windows 8, read a great blog post entitled 'Are You Ready For Windows 8'

Windows God Mode and Similar Hidden Tweaks

If you are using any of the latest versions of Windows such as windows 8, Windows 7 or Vista, you can have access to all the control panel settings in just a single folder, using Windows amazing features called God Mode, first coined by bloggers. Its original name is ‘Master control panel shortcut but users would prefer to call it God Mode as it provides all the basic as well as advanced OS settings without navigating to control panel for each setting individually. It's an invisible developer shortcut and can be created or used from any location you want.
Windows God Mode supports best to Windows 7 & Vista in 32 bit mode but often crashes with same OS of 64 bit. IT administrators and professional users can freely use it to troubleshoot system errors from fixing registries to change hard drive volume settings.

Here's how to create God Mode Folder:
All you have to do is to create a single folder and rename it with certain parameters to use all God Mode features in a single click.
  1. Create a new folder at any desired location.
  2. Directly press F2 to rename that particular folder and enter the text string showed in the below image (Without braces):
  3. Folder icon will be automatically changed to control panel icon. Now explore the folder to find list of tweaks and options to customize your computer. 
Note: You can choose any folder name by replacing the text 'God Mode' with your desired name, dictated in the image above.

Microsoft's professional wouldn't recommend it to use as it may cause serious damages and hardware failure on your computer especially if you use God Mode with incompatible OS.
There are other tweaks (text string) like God Mode which can be used to access more control panel settings. Similar to God Mode, you have to create a new folder and then enter any of the strings provided below (Without braces and names)

Action Center {BB64F8A7-BEE7-4E1A-AB8D-7D8273F7FDB6}
Backup and Restore {B98A2BEA-7D42-4558-8BD1-832F41BAC6FD}
Biometric Devices {0142e4d0-fb7a-11dc-ba4a-000ffe7ab428}
Credential Manager {1206F5F1-0569-412C-8FEC-3204630DFB70}
Default Location {00C6D95F-329C-409a-81D7-C46C66EA7F33}
Devices and Printers {A8A91A66-3A7D-4424-8D24-04E180695C7A}
Display {C555438B-3C23-4769-A71F-B6D3D9B6053A}
HomeGroup {67CA7650-96E6-4FDD-BB43-A8E774F73A57}
Location and Other Sensors {E9950154-C418-419e-A90A-20C5287AE24B}
Notification Area Icons {05d7b0f4-2121-4eff-bf6b-ed3f69b894d9}
Recovery {9FE63AFD-59CF-4419-9775-ABCC3849F861}
RemoteApp and Desktop Connections {241D7C96-F8BF-4F85-B01F-E2B043341A4B}
Speech Recognition {58E3C745-D971-4081-9034-86E34B30836A}
Troubleshooting {C58C4893-3BE0-4B45-ABB5-A63E4B8C8651}

The above strings were revealed by Steven Sinofsky, Microsoft's Windows division president after being asked by a Cnet professional
.

Note: Again, use any string at your own risk because unsupported OS might cause accidental crash.

You can follow Oliver on twitter @powellstellar

How to Repair your Computer from Ukash Virus

Unlike Trojan or adware,Windows Ukash virus may have severe impact over your PC such as complete locking or freezing, system inaccessibility and more. More than millions of PC attacks have been recorded only in US after which user had either lost their valuable data or looted by scammers. Ukash falls under ransom ware category and infected PC with various versions such as 'Metropolitan Police Ukash Virus', 'FBI Money pack Virus' or similar.

Whenever any machine gets attacked by Ukash, user will see nasty warning messages and found their computer completely locked. Warnings messages states that you have violated legal laws or may be the victim of piracy Act or similar and asks to pay hundred or even thousands of dolor’s as a penalty for being involved in any malicious activities or so. Believing it and paying your money yield no results and your computer will remain locked until you find and fix it using a proper solution.

Microsoft Windows Ukash Virus
The virus named Ukash because it uses the private Ukash payment gateway option to pay the mentioned amount in warning messages. You don't worry about it as here are some simple steps to easily identify such attacks and a handy process to manually remove it.

How one can get infected by Ukash Virus
There are various holes and security vulnerabilities that scammers used to seek and attack. Ukash virus can easily infect PC if user surfs malware websites, download, & install hacked applications etc. This virus can trick many people as it’s customized to translate in various other languages and then asks people to pay for the money. It's obvious that user get scared by seeing those horrible error messages with local police department and trademark at top of the warning messages.

You can see example in pictures below taken from ‘METROPOLITAN UKASH Virus’ infected PC, to get an idea about how it actually looks:

Ukash Virus PC infection
For better analysis, below are some common points that you can notice in case of Ukash virus infection:
  1. Freezing, Computer speed slows down automatically.
  2. Series of popup warnings containing set of threatening message.
  3. Permanently inaccessibility to files & folders stored in the drive as warning pop ups has fully locked your computer.
  4. Startup failure, unexpected computer errors etc.
Steps for Manually Removing Ukash Virus

Follow the simple steps to manually remove it from infected PCs,
  1. Normally, restart your PC
  2. Press F8 during startup to go to 'Advanced Startup Options'
  3. Select option 'Safe Mode with Networking'
  4. Start 'Task Manger' and locate to ‘Processes’ tab to find out all unknown or unexpected processes running on your computer. Kill them immediately. Enter administrator password whenever required.
  5. Restart the system and see if you have successfully removed the virus.

If Ukash virus still exists on your PC, simply download SpyHunter from here. After installation, this will automatically traces all print of Ukash and will easily remove it.

Some unknown, but most useful utility for Macs OS X

There are plenty of useful utilities that work to maintain the well-being of a Mac system. They may not be available as a single utility and often comes with bunch of other useful tools. Such a combination of different utilities combined together is termed as a toolbox (like a car toolbox equipped with all the necessity tools including jack, screwdriver, rinch etc.). Taking Mac into consideration, the tools that are of much help are the ones which focus to maintain the smooth running of the in-built Mac hard drive.   
If you go through any Mac forums, Yahoo Questions & Answers, even on Apple's thread you may find Mac users asking pool of questions related to a troubled hard drive, sudden Mac shutdown, bad blocks, a slow responding Mac, partition related queries and much more. A general Mac user may find it difficult to solve any of the above mentioned queries due to lack of proper knowledge and sufficient tool. 

In this particular article, we shall focus our discussion at solving most basic and frequent occurring troubles:

Q1) How can I check my hard drive for bad blocks?

A1) Bad blocks can occur on a hard drive no matter if it’s a brand new or an old drive. But old hard drive are more sensitive to bad blocks because they have went through various read/writes operations, formatting, sluggishness and in some cases even power jolts. To check the hard drives for bad bocks, the surface of the drive must be checked through a utility commonly known as 'Surface Scan'. As the name suggest, Surface Scan tool with the help of its in-built algorithm launches the entire hard drive and scans each and every blocks (of sectors) to bring in front the bad blocks. 

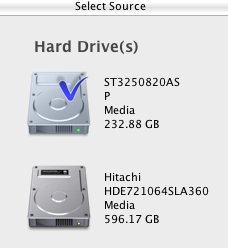
Step: 1) Select the source drive for surface scan:


Step: 2) The selected volume (hd) is ready for vigorous scan and upon hitting the “Start Scan” button, the operation is launched. 


Once a bad block is encountered by the tool, it will be marked in red color block indicating a danger.

Q 2) How to protect my data when bad blocks on hd have reported?

A2) Bad blocks are the worse occurring error on a hard drive which can eventually damage the drive to repair or beyond repair. Extracting data from a bad drive is a challenge, but it can be done with the help of a cloning utility which can duplicate all the content of the drive residing in good sectors (blocks). 
To make a clone the bad hard drive you need an external drive (having a larger space then the source drive) and a clone utility. When all is set, use the cloning software's 'Clone Drive' option which copies the entire content of the drive to the destination. When the process completes, the user now has the content copied from the good sector of the source drive, skipping any bad block. Other than cloning, imaging process can also be performed which performs the similar activity of copying data from good sectors only. However, it is advised not to save the image on the same drive because if any malfunction occurs on the drive, image file will also be affected.  

For more information on Mac OS X hard drive surface scan, drop me mail at tompatrick2009@gmail.com

Photokina 2012 images: The world's best imaging event


How should one retaliate if he/she suffers an epic data loss from his beloved Mac OS X, digital camera or any other media? A data loss could be nightmarish and an event that no one wants to invite. We can't avoid a data loss to happen, however we could control it to some extent but certainly can't avoid it. It may happen any time and with any one. Even I and you could become a victim of data loss :(. But there is nothing to loose all the hope if you are going through a data loss. Thanks to the ever changing technology, recovering lost, deleted and even formatted images is made possible with the help of useful recovery software.


The above box is the image of Stellar Phoenix Mac Photo Recovery 5.0, recently showcased in Photokina 2012. To be precise and candid, the term data recovery is either misunderstood or is often low-rated. The facts should now be cleared that data recovery does not only limits to an expert user who knows everything about a hard drive. In fact, the term data recovery is made simple by the help of Do-It-Yourself software which are easily handled even by lay users. 

At Photokina 2012


My Mac OS X & different ways to back it up

We humans need to act like ants, which are the hardest working creatures on the planet. Like ants collect their food stuff for the winter season, we too can back-up our entire hard drive data and contents to overcome a near future obstacle. These uninvited obstacles may be in the form of hard drive failures, data corruption, system inaccessibility, or theft. Although I don't have the exact figures of such obstacles but I could only estimates that thousands of Mac users go through the pain of data loss due to sudden malfunction of the Mac machine, software gone bad and theft. Such circumstances may not be under control of any user but we can act beforehand to at least ensure the content of the hard drive remains accessible by implementing a back-up plan.

Components of the back-up plan include two basic requirements:
  • The system hard drive (source) and,
  • an external hard drive (destination),
  • Third back-up process may include the use of online storage Medias which are becoming popular day-by-day.
External hard drives are the accessories which are most used by the users, after all who doesn’t require having additional storage capacity. 

1.Imaging the hard drive: With the help of a non-Apple utility, we can choose to create an image file of the drive (important data). Once the imaging is made it may be stored on the source itself. However how wise it would be store on the same system taking the inaccessibility of the Mac on account. This can be done by saving the back-up on an external hard drive and should be done on weekly basis.  


Stellar Drive Clone 2.0: Ready to create an image file of hard drive or volume
(The chosen drive is imaged to the user's location)


2. Cloning the hard drive: Another activity you could do in place of imaging is cloning the source to a large destination (A destination drive larger than source is always required to make a clone). What is good about the cloning is it creates a similar copy of the source hard drive which is in the ready to use form.

Take Note that: Cloning erases all the content of the destination drive. If destination > source drive then you can also expand the volumes located on destination drive. Cloning creates a bootable DVD for the system helpful to boot the Mac if inaccessible. 

3. Time-Machine backup: It’s simple to do by connecting an equal or bigger external hard drive to the Mac system. Making way through System Preferences<<Time Machine, double click to launch it and switch the time machine ON. See the 'Select Disk' option, you need to click and select the connected external drive. All done, only the check box located at below needs to be clicked. 


Wikipedia: Time-Machine in action can be found in the Mac 10.5 and above versions. It creates incremental backup that can be restored at backward date.

How to Deal With "WINDOWS\SYSTEM32\CONFIG\SYSTEM" Error

Your computer contains set of registries and system files for smooth and uninterrupted PC running. When any of the system files get deleted or registries got corrupted, you may face bunch of error messages or sometime complete system failure. One such error is “windows\system32\config\system” which may occurs due to of deleted system files, windows corruption, or hard drive failure etc. and will make your system unbootable. As results, you won't be able to access your stuff inside the system till you fix the error. See the below image to know how it looks like:

Computer won't boot

Windows could not start because the following file is missing or corrupt: \WINDOWS\SYSTEM32\CONFIG\SYSTEM”

If you are suffering from the same and desperately hunting for it's solution then you are at the right place as I'll describe here the most prominent causes behind this error and the easy steps to solve it on your own.

Why This Error?

As I described in above paragraph, your registries are the most sensitive parts inside the system and can be easily malfunctioned or damaged. Once your registries got corrupted, it makes their corresponding file (which is at the location Windows\System32\Config\system/software), unreadable. This system file can also be corrupted or deleted by viruses, human or the file itself got unstable by any unauthorized system operation and needs to be updated. Therefore, once the file is corrupted and next time you started the system, it won't boot up and gives an error as described in the image above.

What you can do to get it fixed?

The simplest solution is to replace the same file with an updated and non corrupted file from your Windows media disc or from the registry backup (if you had taken a backup of your system registries?

Here are the detailed steps on how you can do it manually:
  1. Insert your Windows installation CD into CD ROM and restart your PC.
  2. Follow the same steps as in the case of installing fresh Window except the screen appears after pressing 'F8' key, where you have to select 'R' key (to go the recovery console) instead of pressing 'Enter'.
  3. Select the targeted windows if you have dual booting operating system.
  4. Type the administrator password whenever asked. Leave it blank if you don't have any.
  5. Once you reached at the command prompt, type the following commands and press enter each time after typing a line:
    md tmp
    copy c:\windows\system32\config\system c:\windows\tmp\system.bak
    copy c:\windows\system32\config\software c:\windows\tmp\software.bak
    copy c:\windows\system32\config\sam c:\windows\tmp\sam.bak
    copy c:\windows\system32\config\security c:\windows\tmp\security.bak
    copy c:\windows\system32\config\default c:\windows\tmp\default.bak
    delete c:\windows\system32\config\system
    delete c:\windows\system32\config\software
    delete c:\windows\system32\config\sam
    delete c:\windows\system32\config\security
    delete c:\windows\system32\config\default
    copy c:\windows\repair\system c:\windows\system32\config\system
    copy c:\windows\repair\software c:\windows\system32\config\software
    copy c:\windows\repair\sam c:\windows\system32\config\sam
    copy c:\windows\repair\security c:\windows\system32\config\security
    copy c:\windows\repair\default c:\windows\system32\config\default
  6. Type ‘exist’ to navigate away from the black screen and restart your system. See if your system starts normally, but if not follow the next steps.
  7. Remove and connect your hard drive to another computer to take backup of your important data. Once you done with this again plug it back to your old computer and install a fresh copy of Windows to get back to your system normally and recover your data.

Mac OS X corrupt PDF file repair guide

A few times PDF files on Mac won't open up and this could be an agitation state for the user. Mac owners have frequently reported to such errors where portable files on their system won't respond or previews blanks pages, if files open.

A recent query of my friend Matthew reported me a similar error. He says: 

“I am using Mac Mini OS X 10.7.2 and upon clicking the PDF files they generate the blank screen.”

What can be the possible reasons for the Matthew issues? 
  • Chances of damaged PDF files: The first thing that strikes the mind is the credibility of the files. Upon downloading them from the Internet, were they corrupted? It mostly happens die to the poor connectivity of the broadband speed when an incomplete file gets download on the system. Although the files are saved on the HDD but it fails to collect the proper information which it needs to open correctly.
  • Other reasons for file corruptions: It's not only the Internet held responsible for a PDF file corruption but other factors such as 'a sudden Mac OS X shutdown', 'interrupted transfer of PDF files from a media to the system, 'PDF files present on the bad sectors of the hard drive' and 'an improper PDF file uploaded on the website' can be summed up to broaden the possibility of damage of the PDF files. 
  • Susceptible to malware: PDF files are easily carried away by the Trojans, malware and other suspicious attacks. Upon opening these files, they not only mislead the information but may also harm the entire system.
  • Non-Compatible Programs: Whether to view the file in Adobe PDF reader or Mac's own in-built Viewer remains the question for users. Although both will serve the purpose for viewing the PDF files but there are many other software available which can be totally incompatible with the PDF files created with the help of other tools.
Coming back to solving Matthew own trouble: Here are my inputs that Mattew followed to get over the PDF file issue:

1. Suggested him to check if /Applications/Preview.app present? Also try to open the PDF file with the right-click of the mouse and choose /Application. Preview.

2. If the application still fails to open with the Preview, then try installing a fresh copy of Adobe Acrobat Reader program. If this works then its fine and no further steps are needed.

3. However, if the file fails to open with both the application then a choice of using a PDF repair tool is still left open.

5. Select the PDF file(s) to be repaired. Proceed to the next window.

6. Although the software being a demo does not repair the damaged PDF files in real but let you see the preview of repairable PDF pages. 

As directed Matthew did follow my instructions and also tried the repair tool and he was surprised enough to see the preview of his repaired PDF files (including the inside objects). By the end of the day Matthew did have his corrupted PDF file repairs which now work fine on his Mac Mini 10.7.2.